


DAW - Der andere Weg - The other way
Moderators: Slitherine Core, Panzer Corps Design, Panzer Corps Moderators

Re: DAW - Der andere Weg - The other way
Does anyone know what a kind of house "gefangene / structure" is worth, what do you get on the Danzig stage?
Re: DAW - Der andere Weg - The other way
Yes, they were the prisoners who had to be rescued. In the next scenario it appeared to deploy, and I didn't know if it was worth anything. then it disappeared
-
Sonja89_1
- Administrative Corporal - SdKfz 251/1

- Posts: 142
- Joined: Sun Jul 04, 2021 4:27 pm
- Location: Holstein, Germany
Re: DAW - Der andere Weg - The other way
Ah, I see. That was the prisoner figure who had to be rescued in the "Oberschlesien" scenario. Afterwards, the figure ends up as an AUX unit with the core troops. It has no further function after that. You can sell it for a few prestige points. If you place it again, it remains on the current map.
-
Sonja89_1
- Administrative Corporal - SdKfz 251/1
- Posts: 142
- Joined: Sun Jul 04, 2021 4:27 pm
- Location: Holstein, Germany
Re: DAW - Der andere Weg - The other way
At this point I would like to go into more detail about general combat tactics in the DAW scenarios in particular.
First of all, I have to point out that due to the advantages of the AMULET component and various special units that gradually come into play, one's own core troops receive a significant increase in combat power compared to the original game. I also deliberately didn't want any "prestige strangulation", as this seems to me similar to a car race in which you run out of fuel in the last lap and are therefore eliminated. When you fight a war, you don't fight it with the handbrake on.
In order to achieve a practicable balance in my campaigns, I had to make the opponent quantitatively and/or qualitatively stronger than in the Grand Campaign, for example. In fact, you can count on two to three times the number of units in my scenarios, which are additionally equipped with a handful of hero units with overstrength that can really hurt.
But no one needs to get anxiety attacks, everything is manageable. To demonstrate this, I have chosen the last scenario of the second campaign - Benghazi.
I will make it as detailed and hopefully comprehensible as possible, similar to an AAR (After Action Report). However, I will limit myself to rounds 1 - 19 in order not to let the scope get too large. What is important to me will in any case be recognisable.
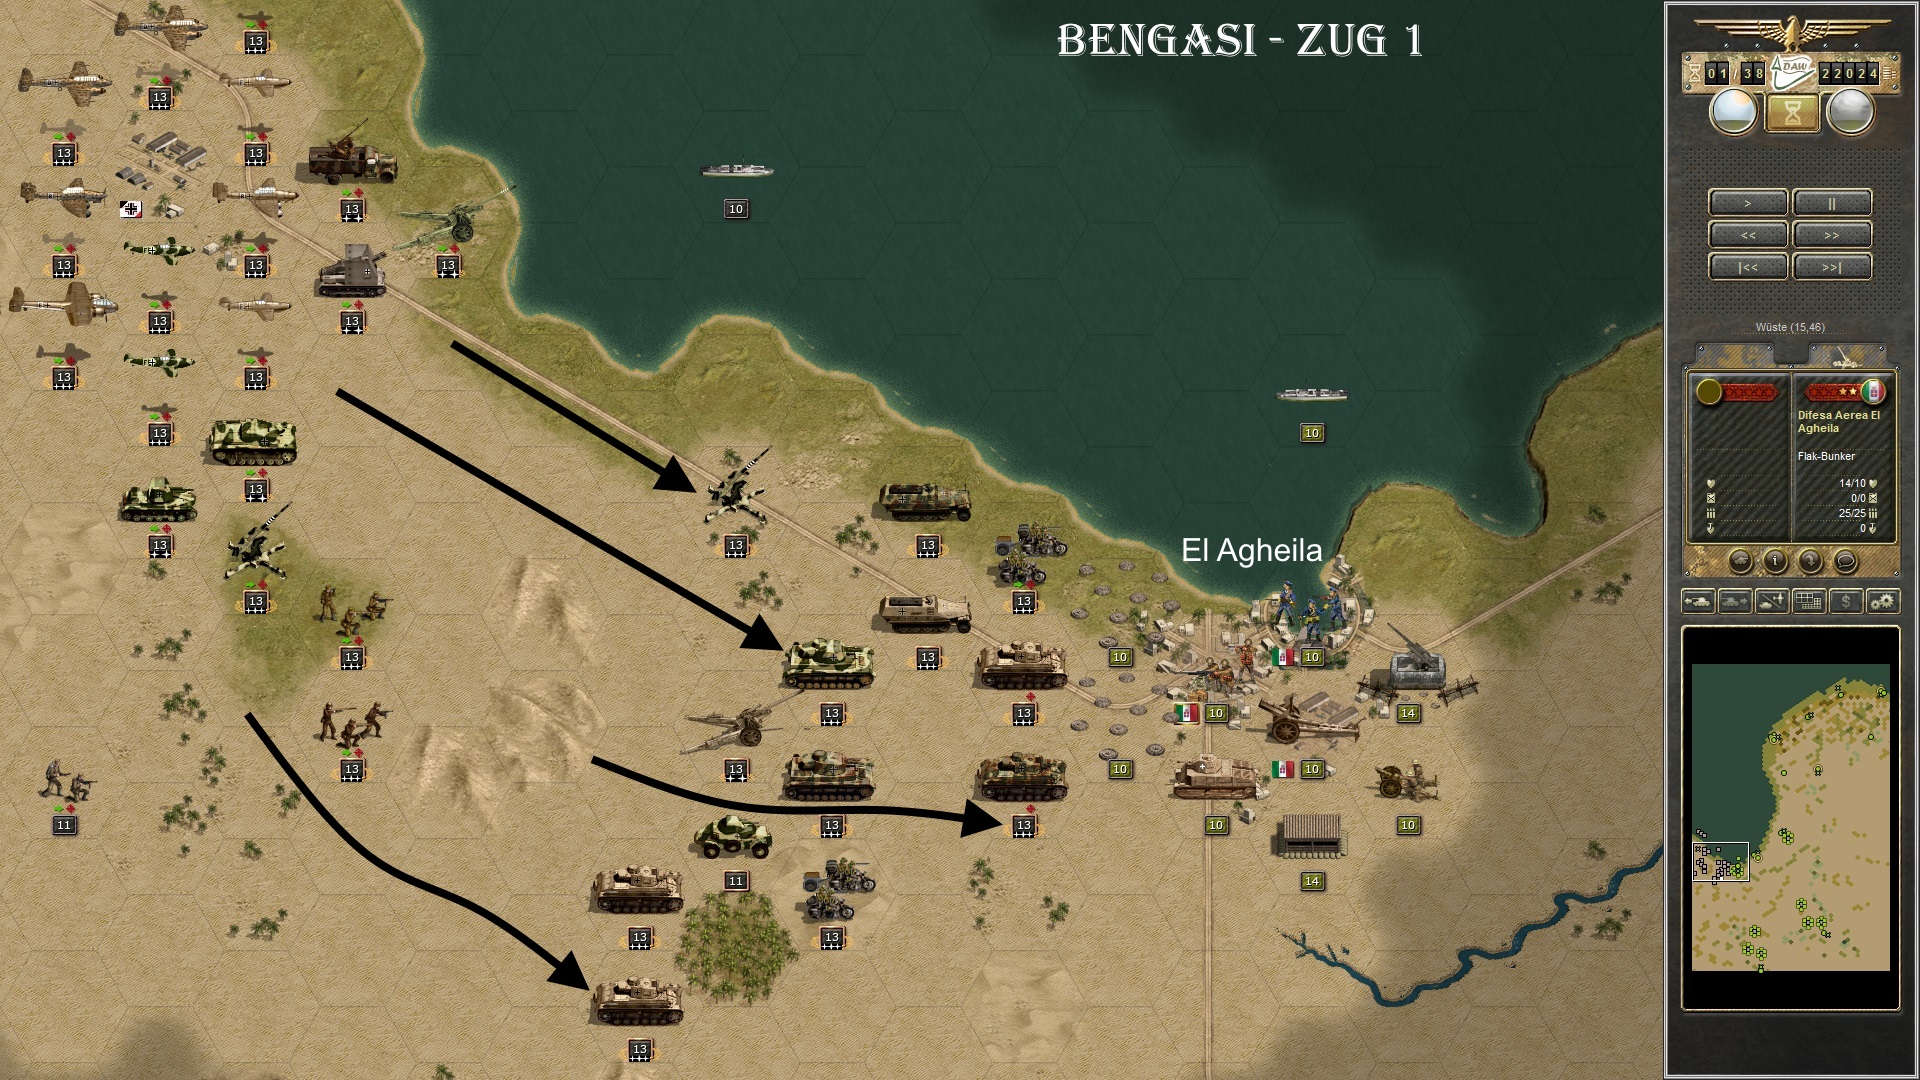
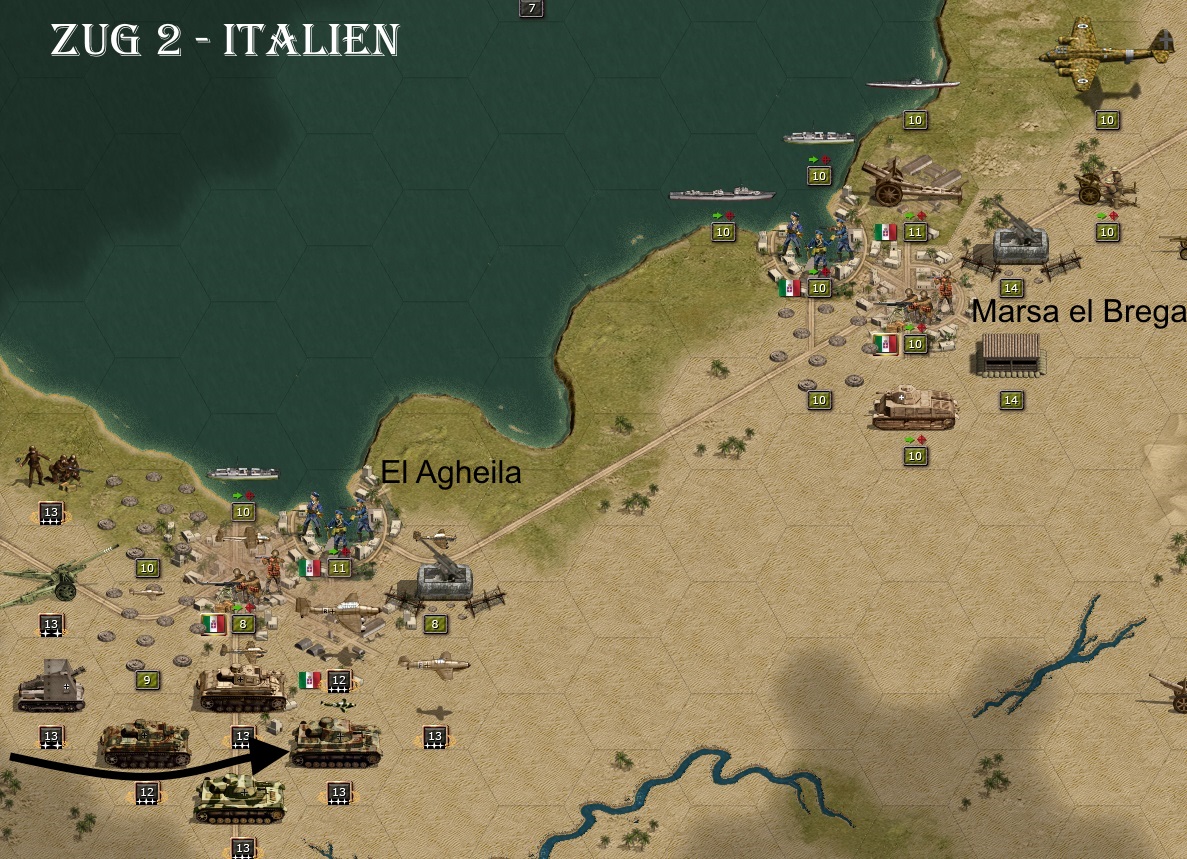
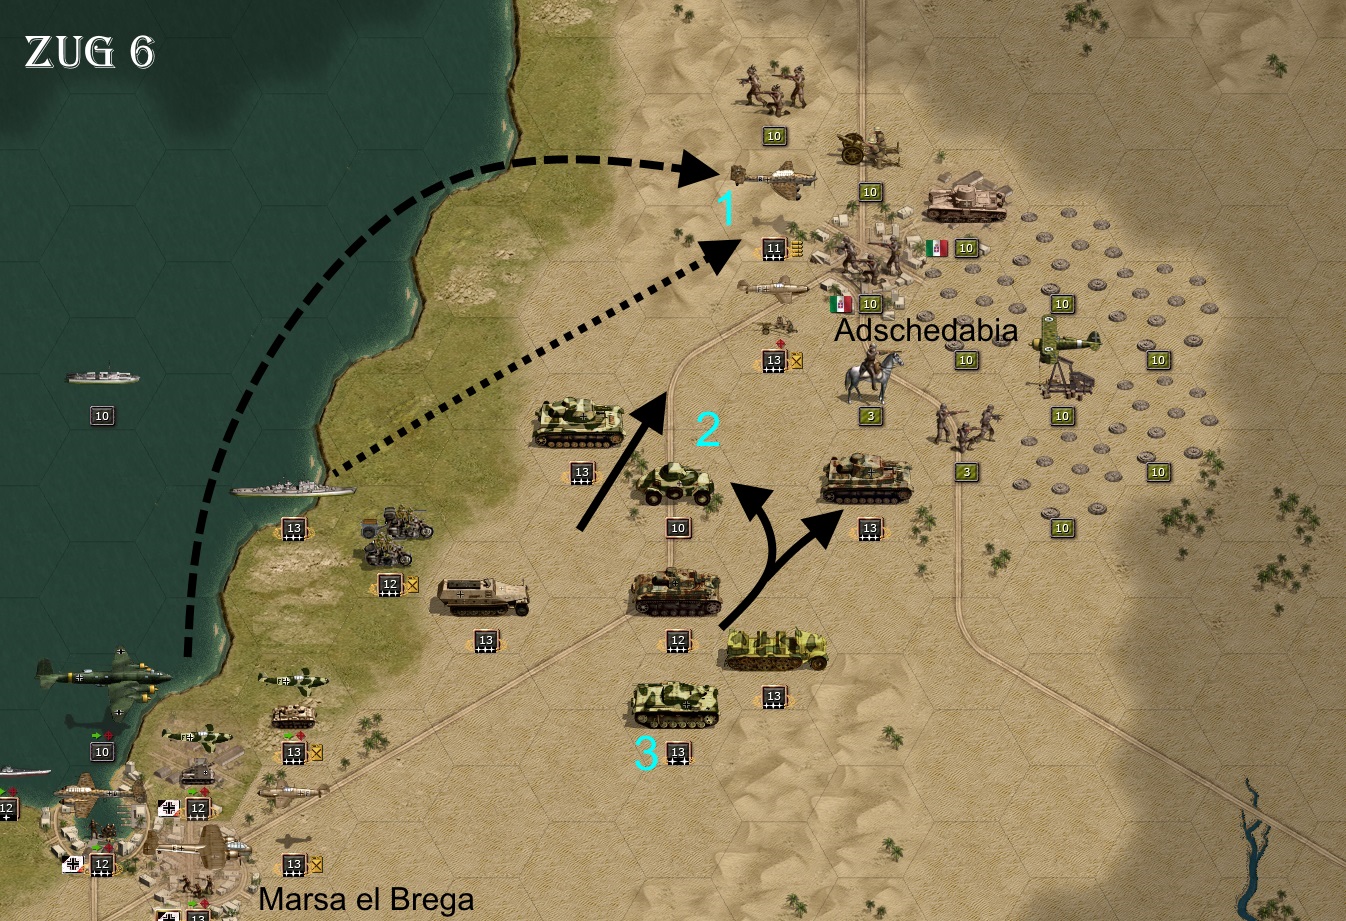
(1) The own core troops have been brought to full over-strength and, after the deployment phase, start in a south-easterly direction towards the Italian-occupied El Agheila. Minefields have been located directly in front of the city. There may also be sea minefields off the coast. One foreign and one own minesweeper (aux unit) are visible. The own air force consists of 5 x Me109, 2 x Me110, 2 x Ju87, 1 x Do217. It is an overall mixed composition of SE, elite and normal units. My prestige at this point is just under 22,000. The Italian defence in this first position is not overly strong but has a nasty flak (range 3 hexes) in the background where it is not so easy to attack.
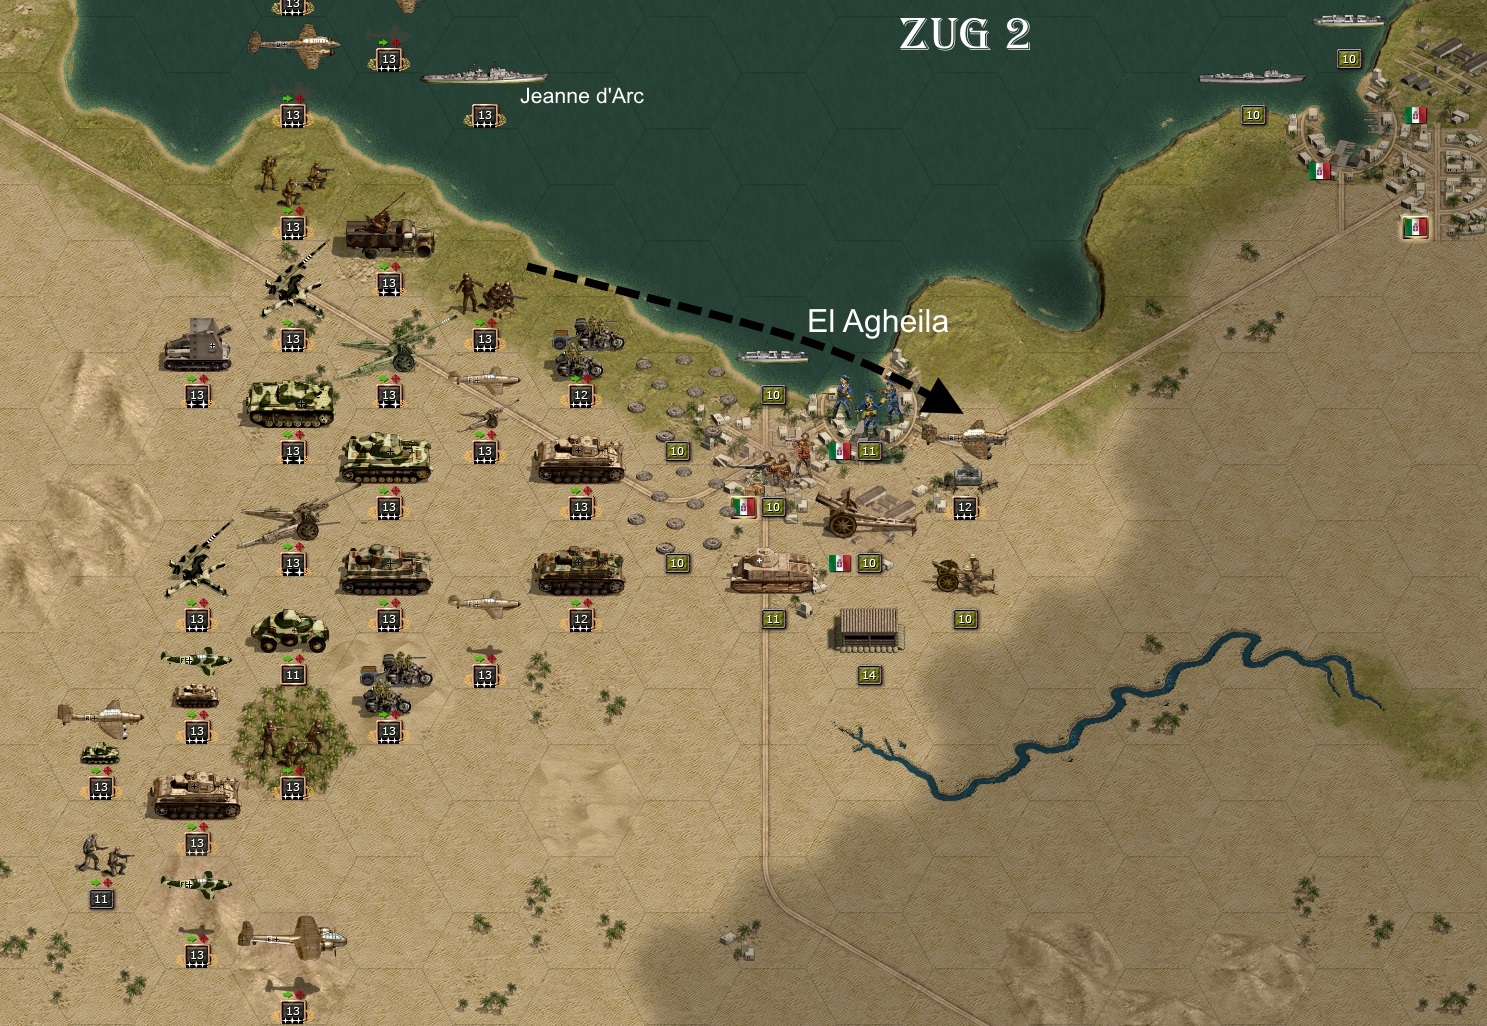
(2) The light cruiser Jeanne d'Arc captured in an earlier scenario (North Sea) brings its range advantage into play and places a shot on the enemy AA. Immediately afterwards, a Stuka (I/StG3) with a special hero figure (comparable to Rudel in GC) attacks the AA just hit and receives a strength loss itself. The aim is to open the airspace above the combat area for the own planes already lurking in the background.
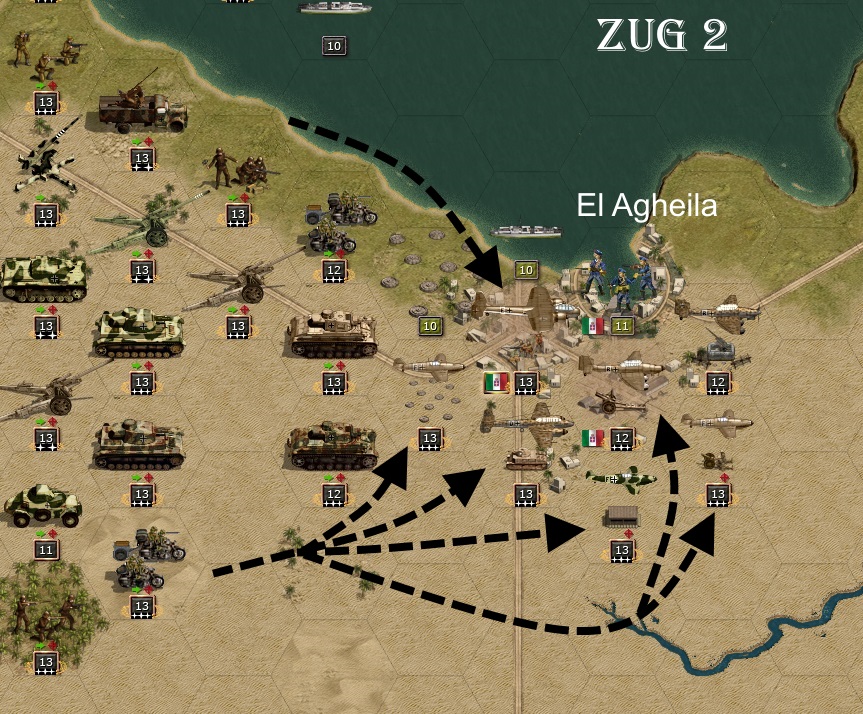
(3) Since the previously strong AA has now been weakened, an attack by own bombers on the most important targets follows (heavy infantry in the city, Somua and heavy artillery receive hits. Do not forget to cover the bombers with your own fighters. Enemy fighters can always strike from the background.
(4) This is followed by the ground attack. The Somua is smashed and the field fortifications almost destroyed. The heavy artillery is severely weakened and can hardly provide any cover. The Italians' light artillery is no threat to their own tanks.
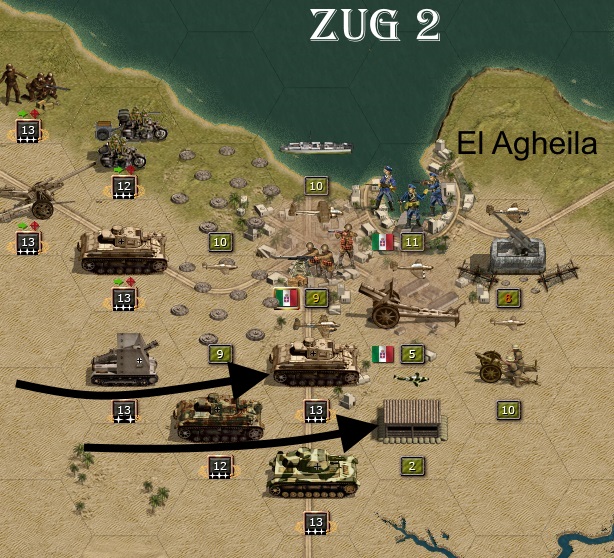
(5) After my own artillery strikes and another tank attack, the field fortifications and the enemy artillery have completely failed. The Italians drive up a level bomber (top right), which can be dangerous to my own ships and is not yet visible to me. The second position at Marsa el Brega is similar in structure to the first, which has now been breached and is barely defensible. The enemy AA still has a strength of 8 and can only take one strength point from one of my fighters. By the way, anyone wondering about these strange river fields - they are wadis (dried-up river valleys that carry water in the rainy season), which are actually there.
First of all, I have to point out that due to the advantages of the AMULET component and various special units that gradually come into play, one's own core troops receive a significant increase in combat power compared to the original game. I also deliberately didn't want any "prestige strangulation", as this seems to me similar to a car race in which you run out of fuel in the last lap and are therefore eliminated. When you fight a war, you don't fight it with the handbrake on.
In order to achieve a practicable balance in my campaigns, I had to make the opponent quantitatively and/or qualitatively stronger than in the Grand Campaign, for example. In fact, you can count on two to three times the number of units in my scenarios, which are additionally equipped with a handful of hero units with overstrength that can really hurt.
But no one needs to get anxiety attacks, everything is manageable. To demonstrate this, I have chosen the last scenario of the second campaign - Benghazi.
I will make it as detailed and hopefully comprehensible as possible, similar to an AAR (After Action Report). However, I will limit myself to rounds 1 - 19 in order not to let the scope get too large. What is important to me will in any case be recognisable.
(1) The own core troops have been brought to full over-strength and, after the deployment phase, start in a south-easterly direction towards the Italian-occupied El Agheila. Minefields have been located directly in front of the city. There may also be sea minefields off the coast. One foreign and one own minesweeper (aux unit) are visible. The own air force consists of 5 x Me109, 2 x Me110, 2 x Ju87, 1 x Do217. It is an overall mixed composition of SE, elite and normal units. My prestige at this point is just under 22,000. The Italian defence in this first position is not overly strong but has a nasty flak (range 3 hexes) in the background where it is not so easy to attack.
(2) The light cruiser Jeanne d'Arc captured in an earlier scenario (North Sea) brings its range advantage into play and places a shot on the enemy AA. Immediately afterwards, a Stuka (I/StG3) with a special hero figure (comparable to Rudel in GC) attacks the AA just hit and receives a strength loss itself. The aim is to open the airspace above the combat area for the own planes already lurking in the background.
(3) Since the previously strong AA has now been weakened, an attack by own bombers on the most important targets follows (heavy infantry in the city, Somua and heavy artillery receive hits. Do not forget to cover the bombers with your own fighters. Enemy fighters can always strike from the background.
(4) This is followed by the ground attack. The Somua is smashed and the field fortifications almost destroyed. The heavy artillery is severely weakened and can hardly provide any cover. The Italians' light artillery is no threat to their own tanks.
(5) After my own artillery strikes and another tank attack, the field fortifications and the enemy artillery have completely failed. The Italians drive up a level bomber (top right), which can be dangerous to my own ships and is not yet visible to me. The second position at Marsa el Brega is similar in structure to the first, which has now been breached and is barely defensible. The enemy AA still has a strength of 8 and can only take one strength point from one of my fighters. By the way, anyone wondering about these strange river fields - they are wadis (dried-up river valleys that carry water in the rainy season), which are actually there.
-
Sonja89_1
- Administrative Corporal - SdKfz 251/1
- Posts: 142
- Joined: Sun Jul 04, 2021 4:27 pm
- Location: Holstein, Germany
Re: DAW - Der andere Weg - The other way

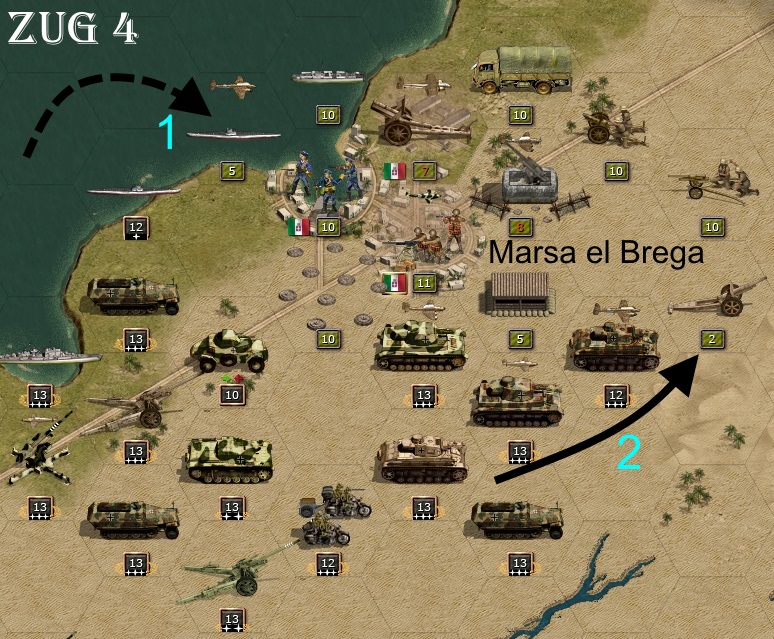
(6) The two own minesweepers (1) have a range of 1 (or the minesweeper "August der Starke" even 2 by heroes) and are able to clear landmines near the coast (Panzer Corps unfortunately/fortunately makes no difference at this point). Tank attack destroys the battered enemy AA (2). While the I/StG3 Stuka already eliminates a strong enemy AA in AT mode after previous artillery fire.

(7) The minesweeper 'August der Starke' (obtained in the 3rd scenario 'Dresden' of the first campaign, hence the name) was hit by the Italian level bomber and lost 5 strength points. It is now in the harbour for repair (1). The FW200 was also surprised by an Italian plane. It is just not possible to cover everything. Again the light cruiser fires a long-range shot at the enemy AA (2). The own submarine blocks the Italian submarine, which could otherwise be dangerous for the cruiser. Although it can also become tricky for the own submarine if an Italian tactical bomber attacks it. In any case, the I/StG3-Stuka gets the opportunity to strike a blow at the enemy AA at Marsa el Brega (3) and thus open up the airspace for the own planes. The first ground units join in. The Italians still have 4 artillery units in the area.
(8) A Me 110 attacks the Italian submarine and can take half of its strength points (1). Meanwhile, tanks attack the southern flank weakened by planes (2). The Somua and one artillery drop out. The remaining artillery is battered, the AA still has 8 strength points. The second Italian position is decisively weakened after the 4th turn.
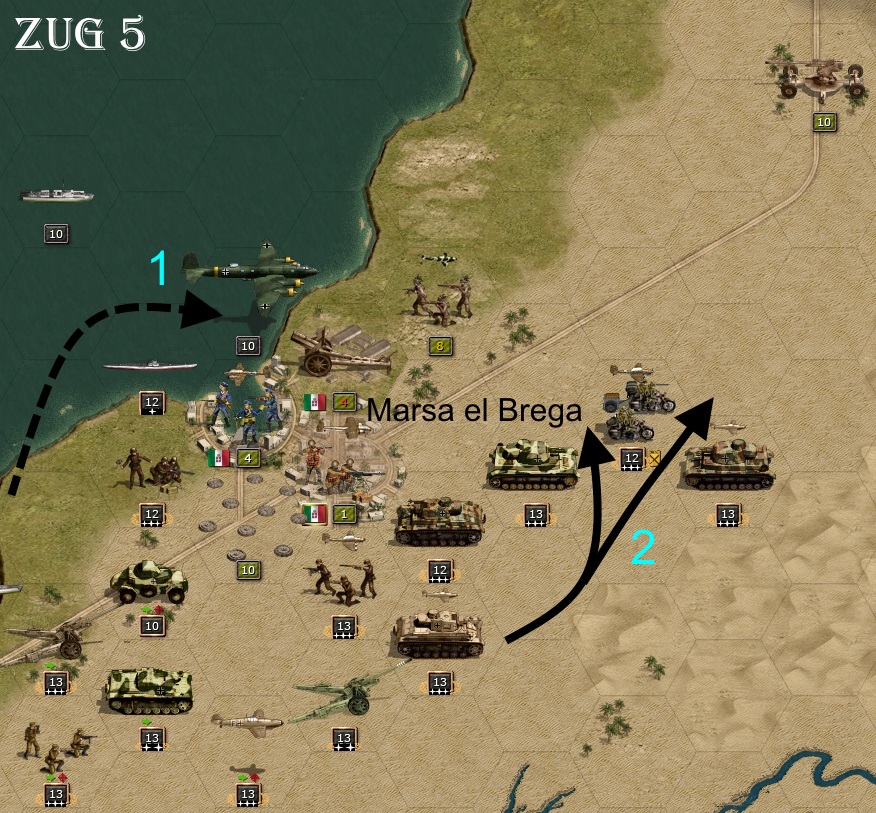
(9) The repaired FW200 throws itself at the Italian minesweeper 'Alula' and sinks it (1). The stricken submarine 'Sierena' could be completely destroyed by the Me 110. On the south-eastern flank, tanks and Krad gunners push past Marsa el Brega (2), which is now only held by weak forces that are being worn down by the following infantry together with the artillery. At the top right, the next enemy 7.5 cm AA is already shining in AT mode.
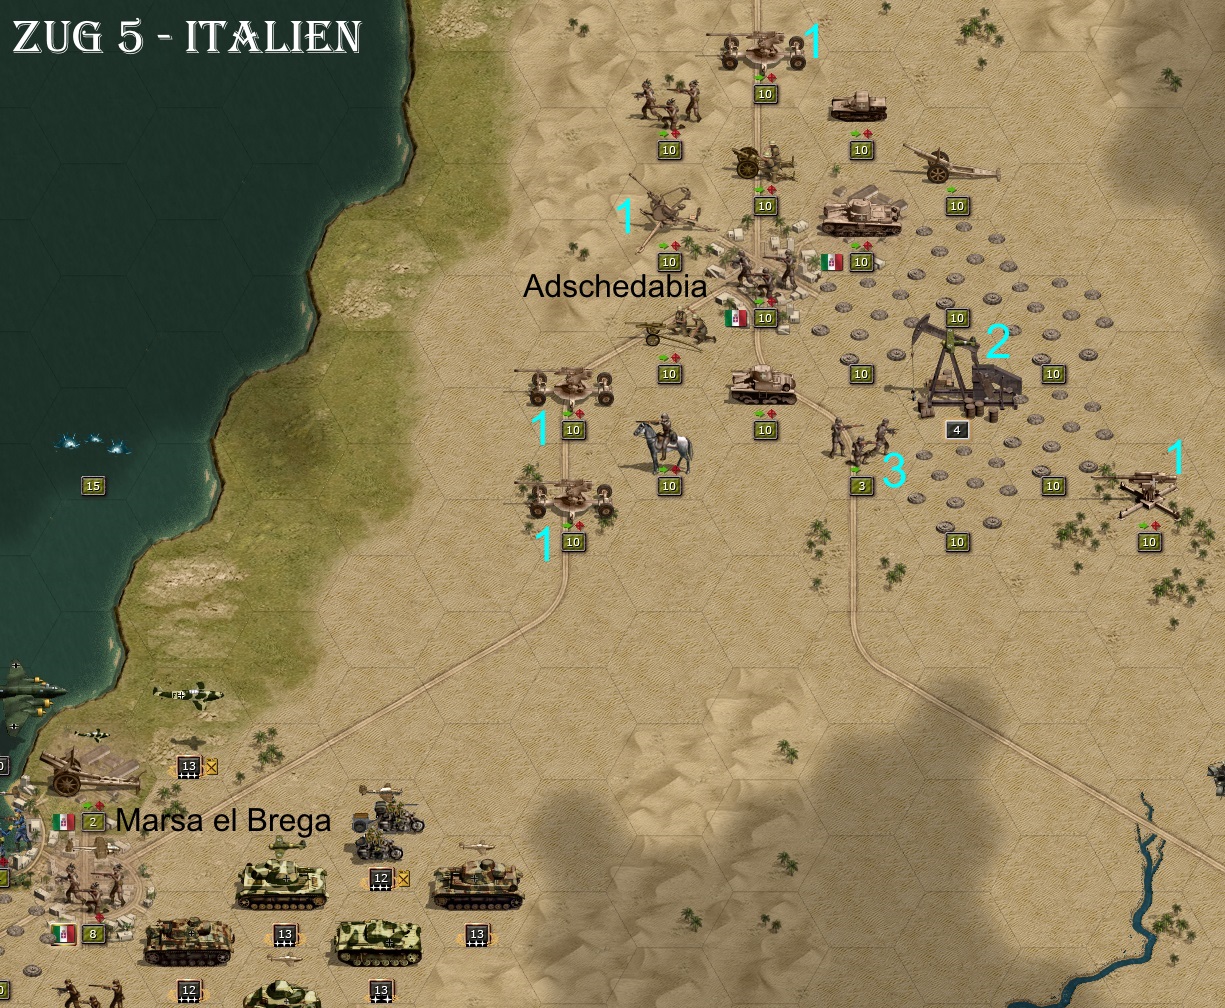
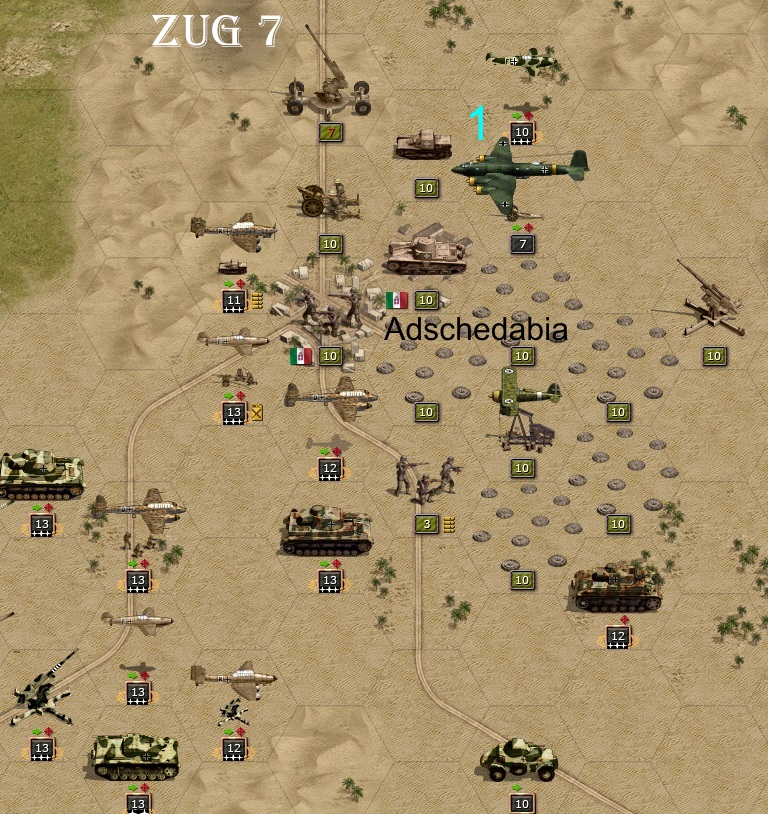
(10) The third Italian position is near Adschedabia. The abundant number (5 pieces) of AA (1) is striking. However, 4 of them are currently in AT mode. Incidentally, the AI chose this arrangement for itself when it draped a reserve group around the place like this. It should be noted that the oil field (2) should be taken in hand if possible before the Italian dismantling squad (3) completely dismantles it. The DV objective is to secure 5 of the 7 existing oil fields.
-
Sonja89_1
- Administrative Corporal - SdKfz 251/1
- Posts: 142
- Joined: Sun Jul 04, 2021 4:27 pm
- Location: Holstein, Germany
Re: DAW - Der andere Weg - The other way
(11) Also at the third position the light cruiser can give artillery support, followed by a devastating attack of the I/StG3-Stuka on the Italian AA (1). Two more AA units in the advance could be destroyed by direct tank attack. 3 of the 5 AA units are eliminated right at the beginning of the fighting! I don't know about the two others on the edge at this point, as they are still out of sight. Here I draw attention to a special unit (3). It is a StuG that can be optionally selected in the middle of the second campaign and has an additional range of 2 (so 3 in total). In the 'Gabes' scenario, I added a hero with +1 range to this unit, which thus brought me to a StuG with range 4. I know I should be ashamed of myself for being so lucky, but I'm not. I'm being quite shameless about it.
(12) With his remaining AA he shoots a Me109 and the FW200 (1).
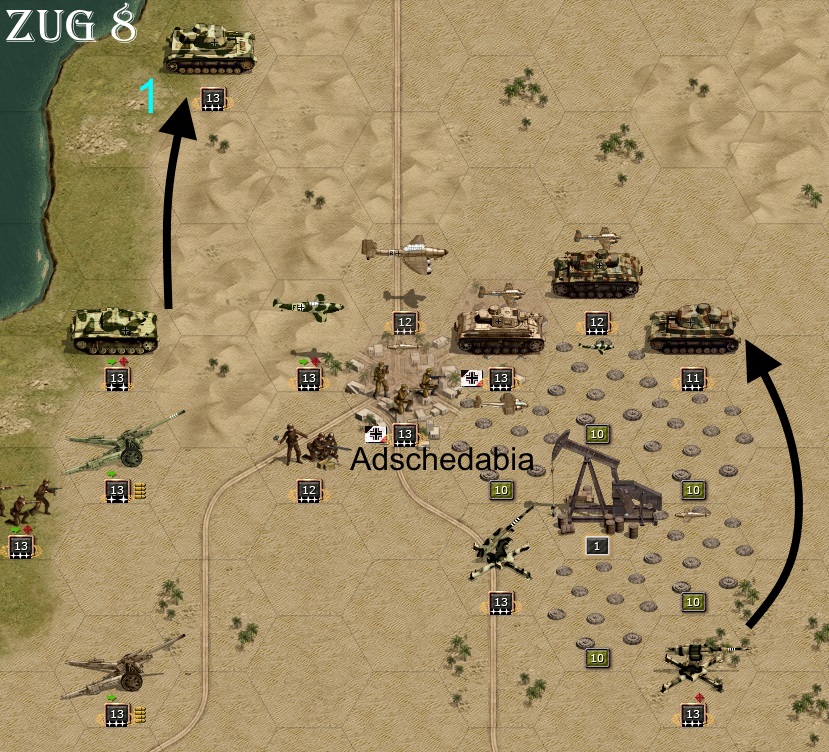
(13) During the 7th and 8th rounds, Adschedabia is taken and all enemy units there are destroyed. The oil field can be secured at the last moment. An AA is positioned next to it, which will come under fire in abundance in the following rounds. The AI tries again and again in vain to destroy the oil field and loses several planes in the process. As I advance further north, I try to target the clearest possible fields (1) in order to achieve a better supply.
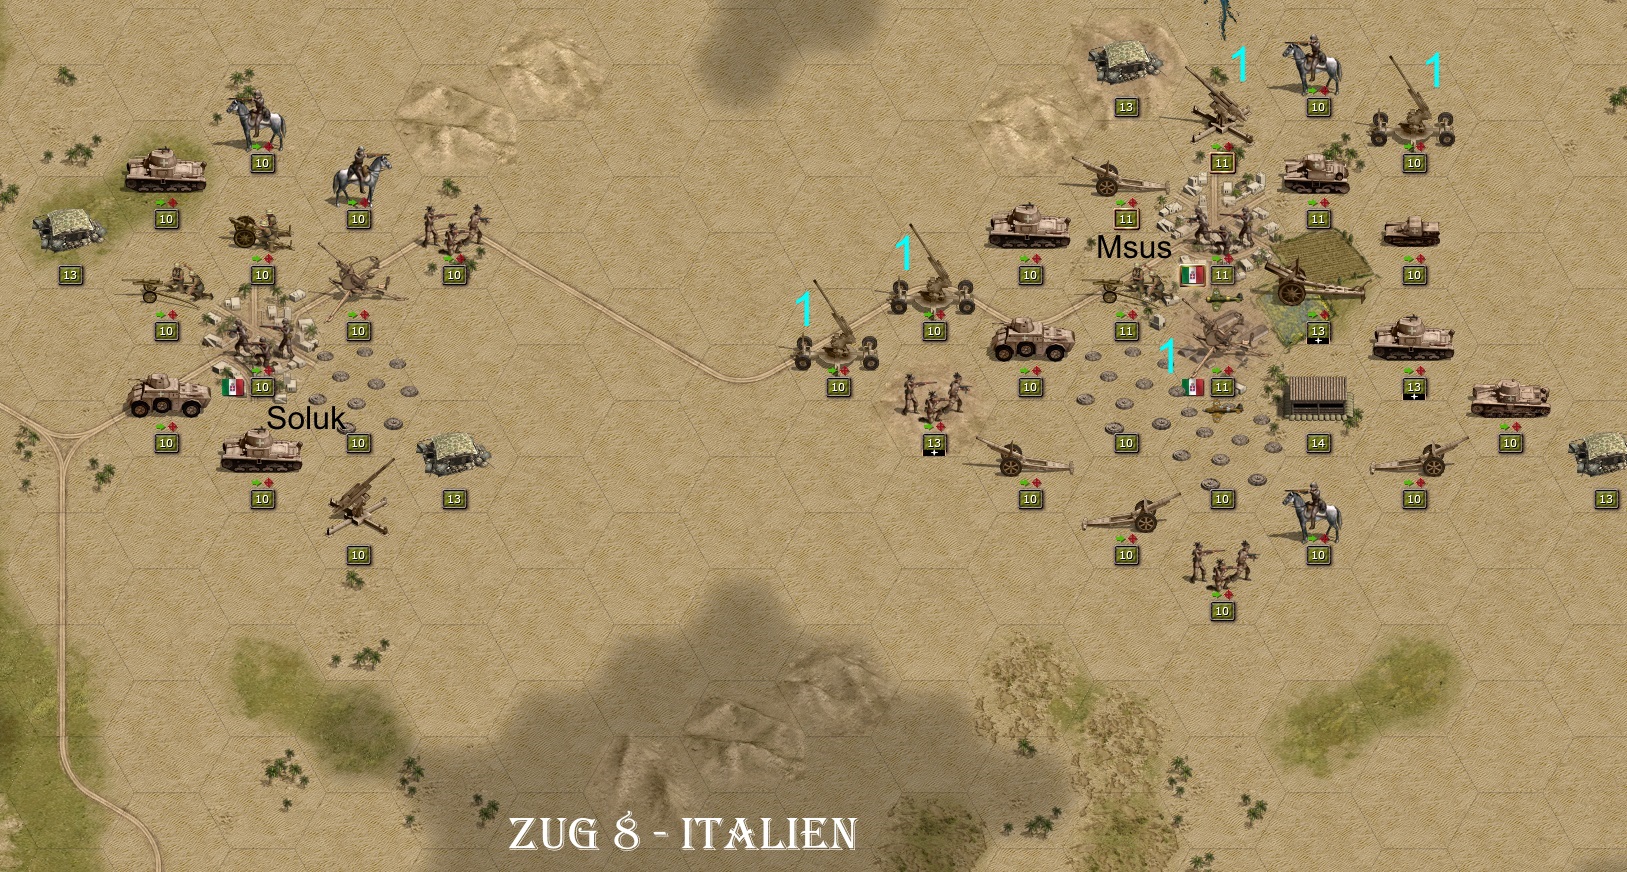
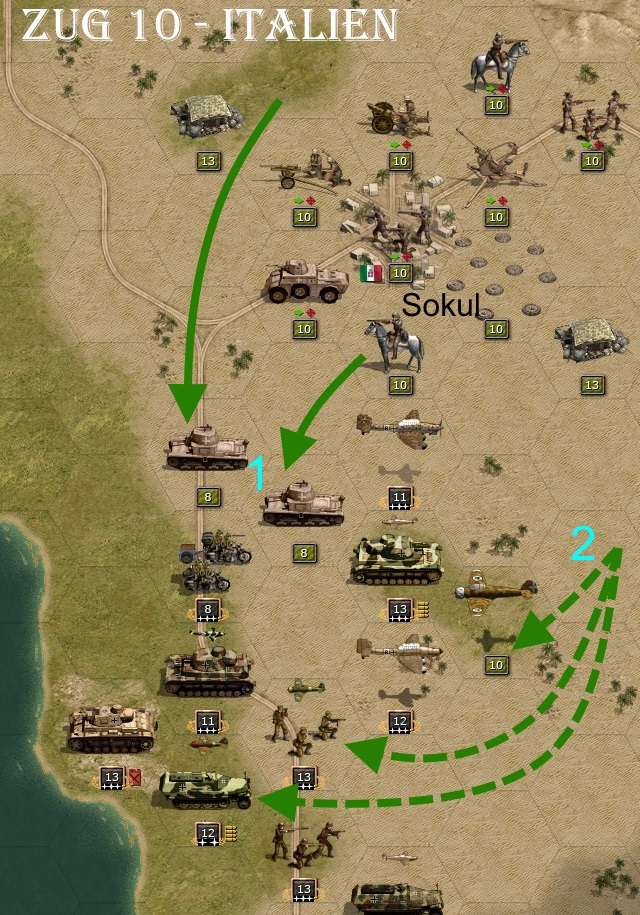
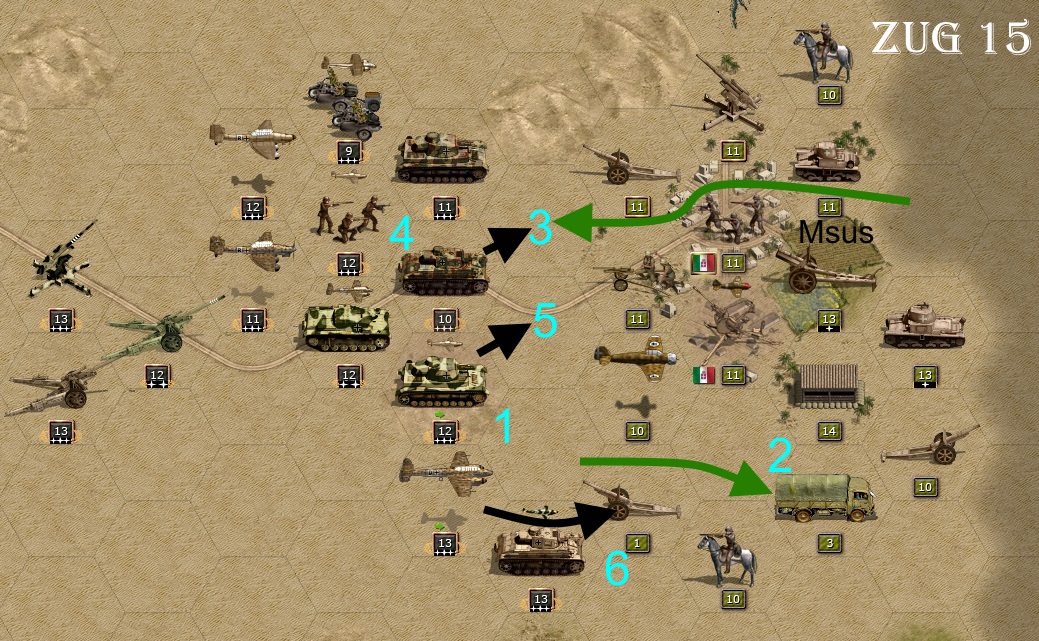
(14) Here is a view of the next two Italian positions at Soluk around Msus. Msus in particular is occupied by a large number of units. Five AA units (1) alone have to be overcome. This cannot be done in the usual surprise attack this time.
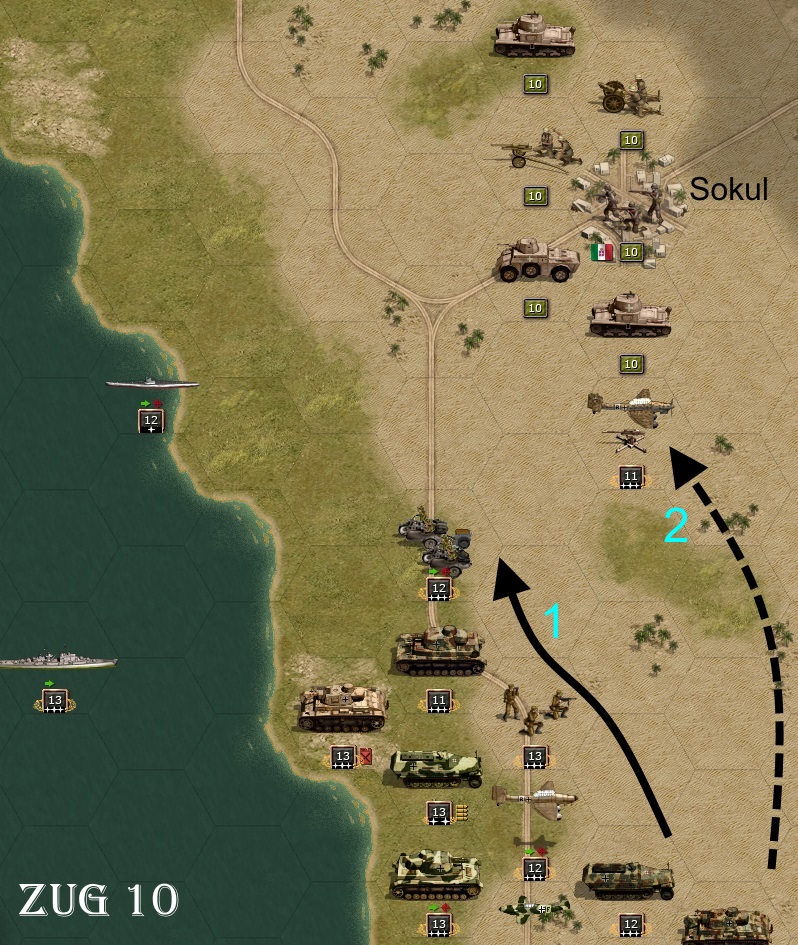
(15) The approach to Sokul takes some time (1). Fuel also has to be replenished again and again. At least the mass of units has been able to maintain its superior strength up to this point, despite the fierce fighting. The I/StG3-Stuka (2) is again attacking an AA (here in AT mode).
-
Sonja89_1
- Administrative Corporal - SdKfz 251/1
- Posts: 142
- Joined: Sun Jul 04, 2021 4:27 pm
- Location: Holstein, Germany
Re: DAW - Der andere Weg - The other way
(16) Two Italian tanks attack the leading Krad gunners (1), resulting in a loss of 4 strength points. At the same time, two Italian fighters and a bomber (2) move into my marching column, but it is well covered by 3 fighters. There are only minor losses.
(17) The counterattack is countered by (1) air attacks on the two Italian tanks and subsequent destruction and shooting down of the 3 enemy planes (2). Subsequently, the light cruiser 'Jeanne d'Arc', using the outermost range, again gives supporting fire on the AA (3), which is then almost destroyed by the I/StG3-Stuka. One strength point remains.
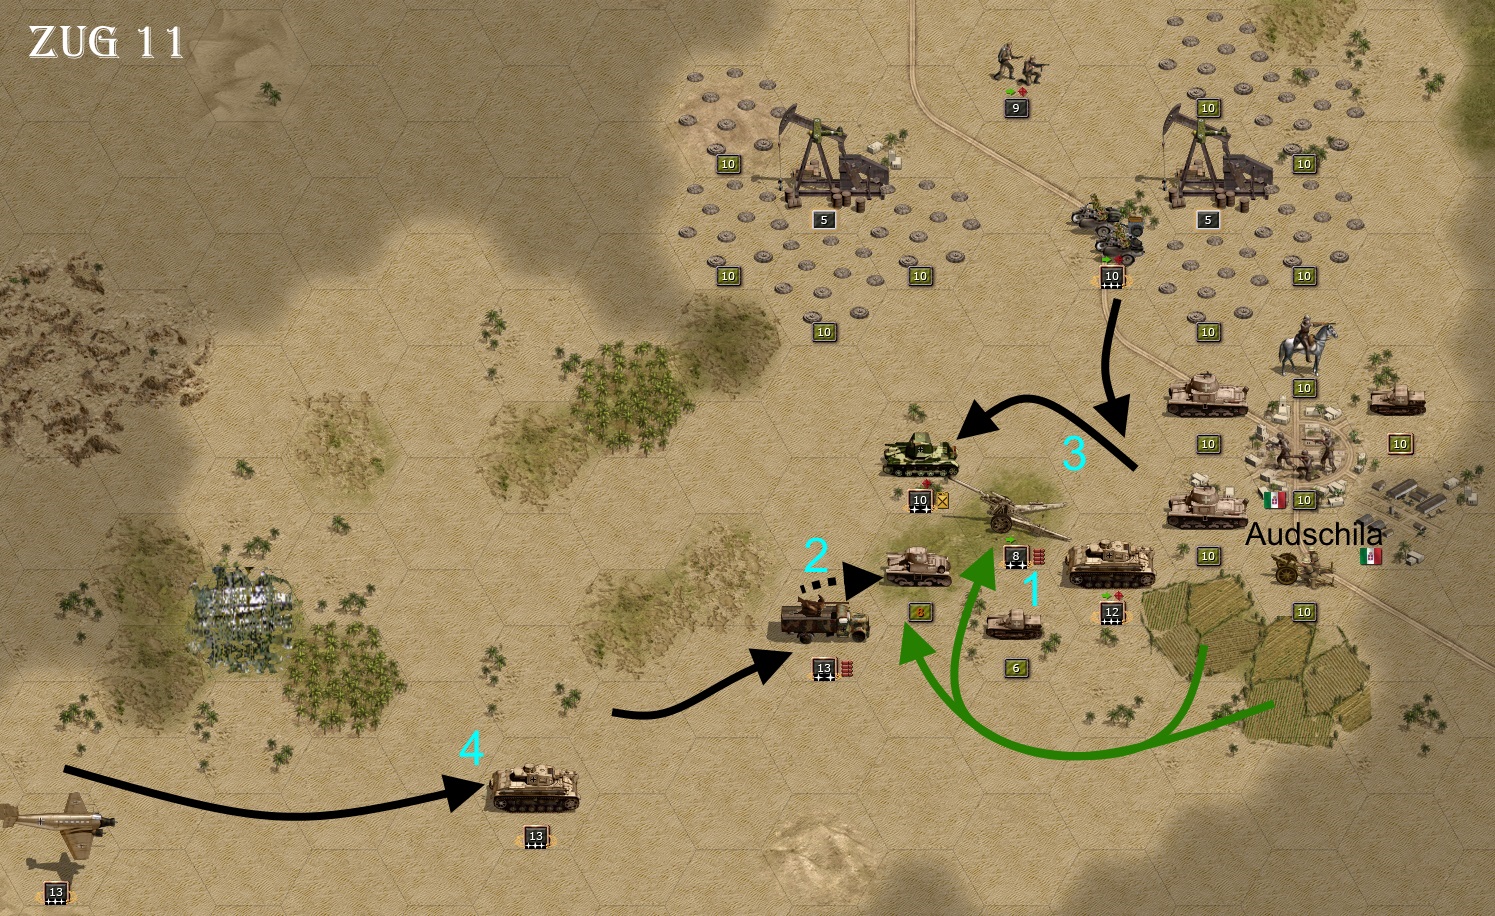
(18) A short detour to the desert town of Audshila, where the aim is to secure two more oil fields. In order to permanently eliminate the danger, I intend to capture the place. Unfortunately, I approach a little too carelessly. The AI uses the weak point in the artillery's flank and drives directly into this gap with two tanks (1). The artillery loses 5 strength points in the process. Fortunately, these are light tanks of the enemy, otherwise it could have been close. Mobile AA in ground combat mode (2) is brought in and weakens the one tank unit, which is then killed by the tank destroyer pulled out of the front (3). The Kradschützen take its place, which is not happy, but together with the artillery in the rear, which has been brought back to 10 strength points, it holds reasonably well. The Panzer III destroys the second light tank and remains in place. Another Panzer III (4) and a transport plane with paratroopers approach from the west. The crisis caused by my recklessness is overcome.
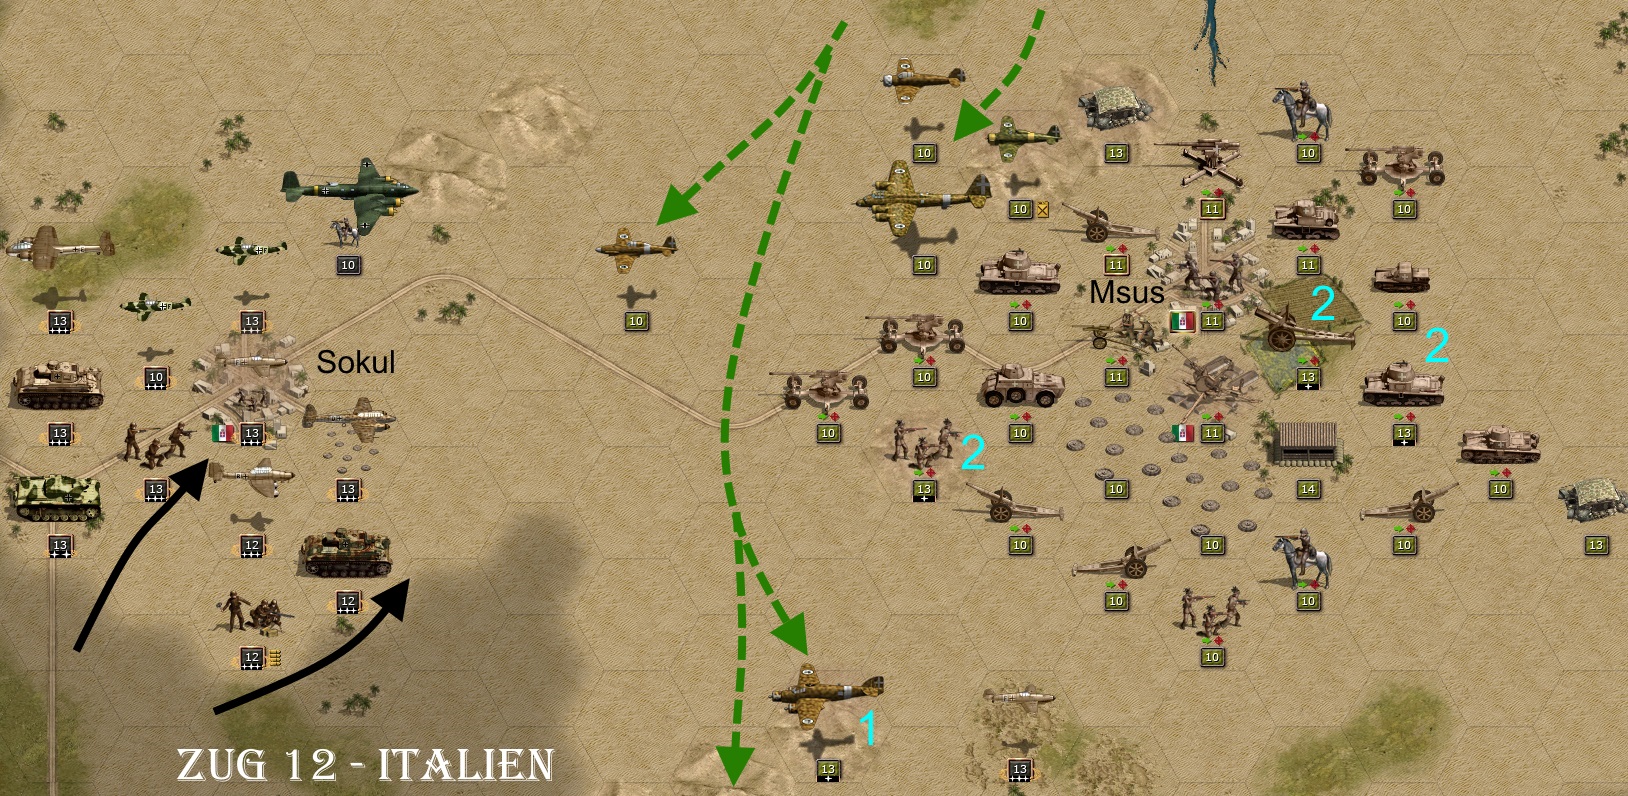
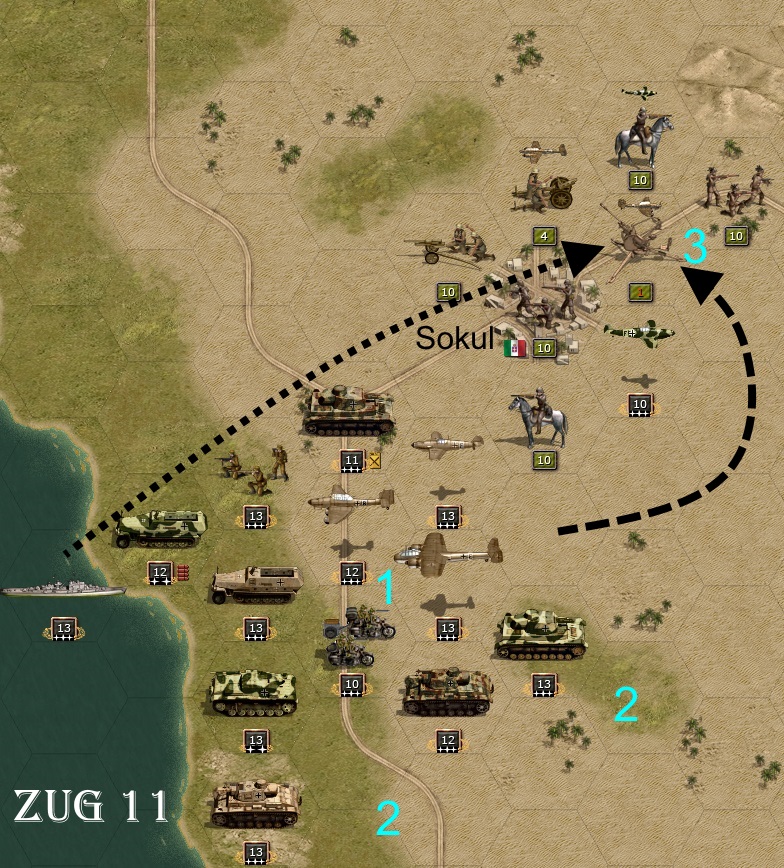
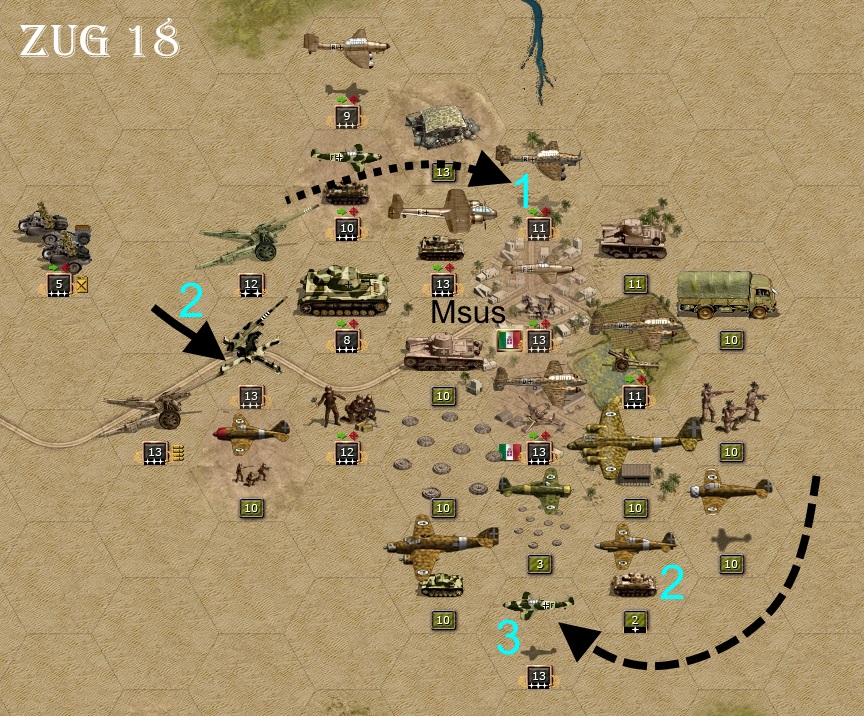
(19) The defences of Sokul have been destroyed except for the garrison. In front of Msus, 6 additional enemy planes (one outside the picture) have appeared, including a bomber with a hero (1). Also with the ground forces are 3 hero units that should be given special attention (2).
(20) My first two tank detachments (Panzer III + IV) advance on Msus, destroy the forward AA, make contact with the second of 5 Italian AA units (1) and thus open the battle for Msus. The high enemy AA presence makes a cautious approach necessary. At the same time, one must arm oneself against air attacks.
-
Sonja89_1
- Administrative Corporal - SdKfz 251/1
- Posts: 142
- Joined: Sun Jul 04, 2021 4:27 pm
- Location: Holstein, Germany
Re: DAW - Der andere Weg - The other way
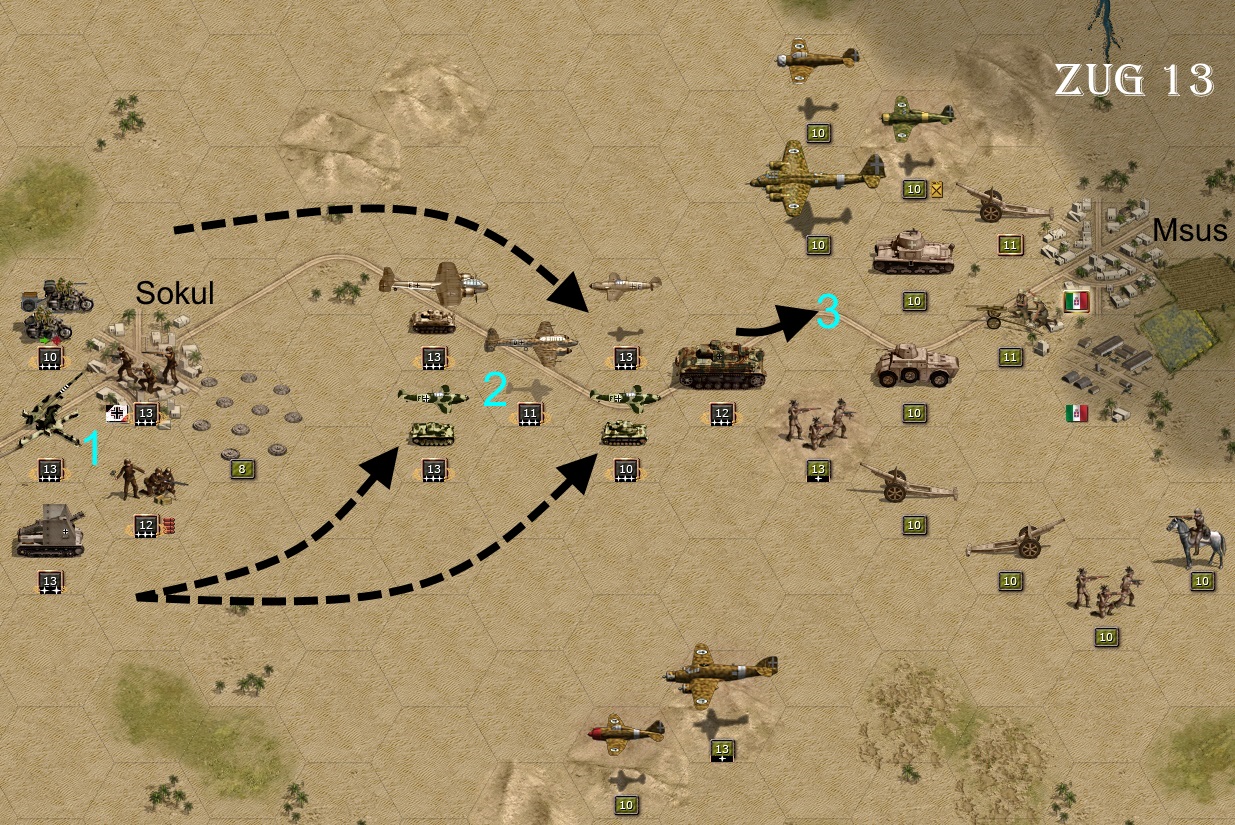
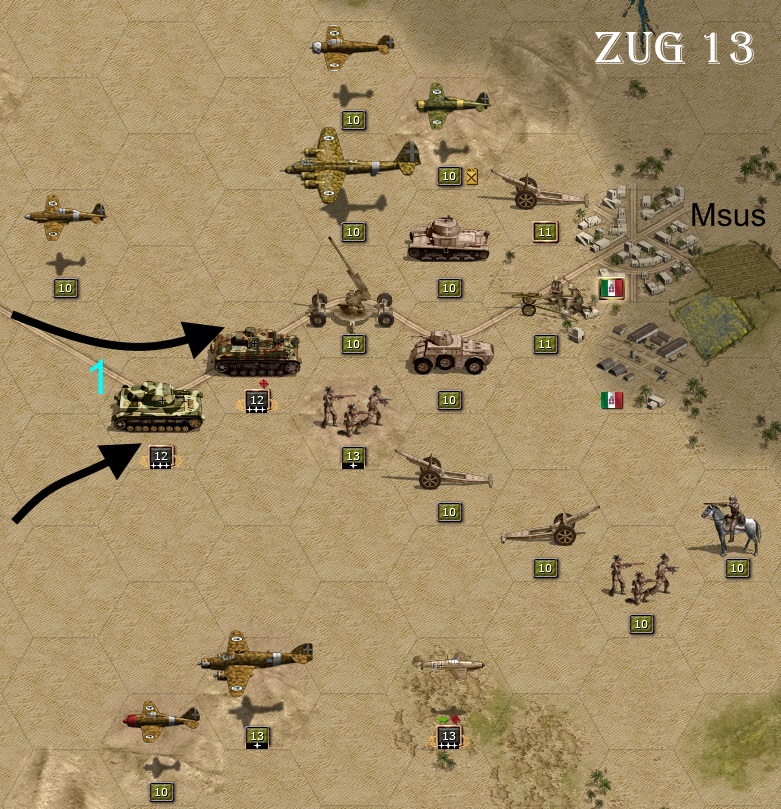
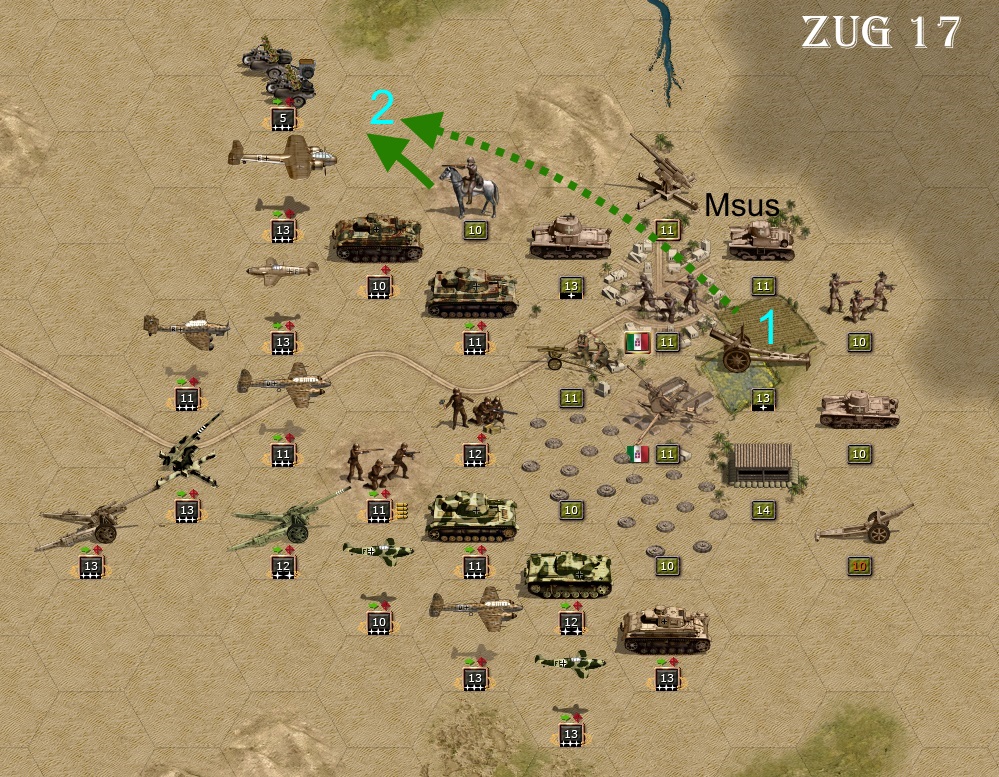
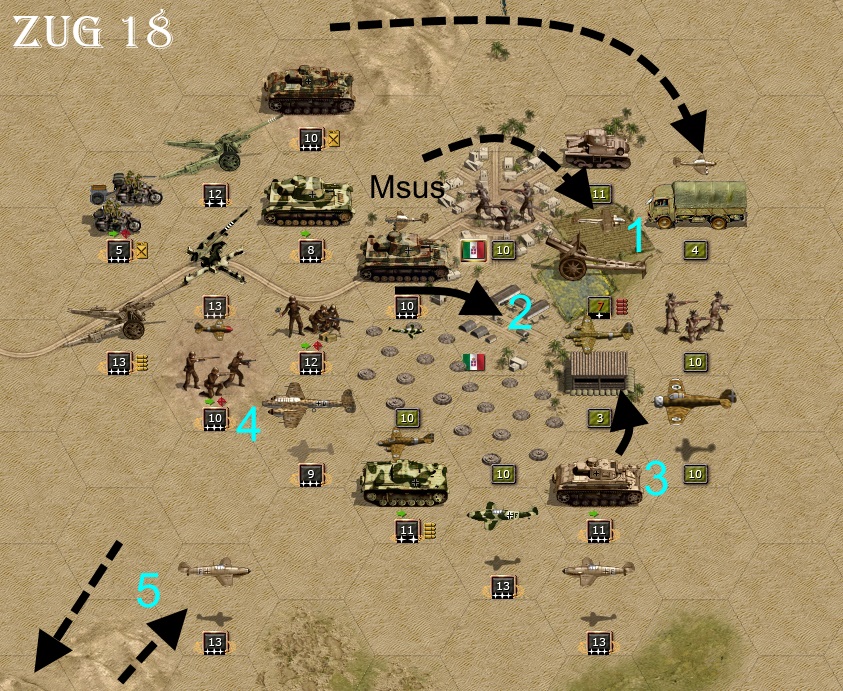
(21) Sokul has been taken. The forces there are rallying around our own AA (1). The 3 tank units and the StuG detachment are covered by 3 Me109s with two bombers in tow (2). Earlier, an Italian fighter has already been shot down. The second Italian AA is destroyed (3). Let's see how the Italian planes react now.
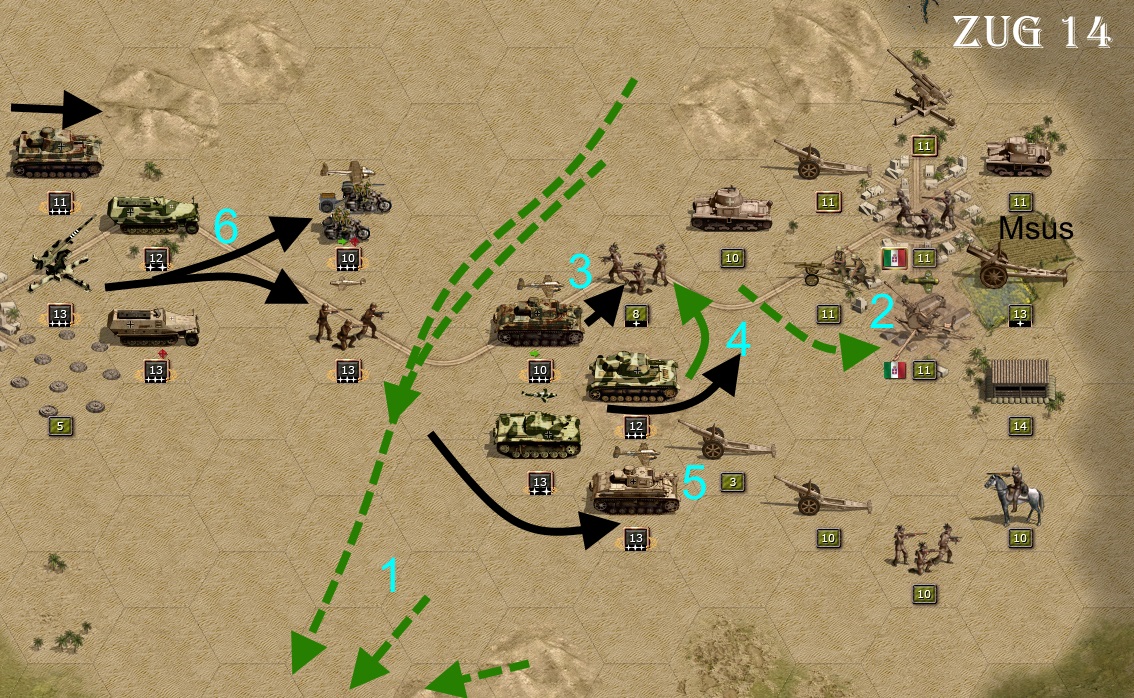
(22) 4 Italian planes leave the area to the south (there is still the inviting oil field with only one strength point, but covered by an AA), as they do not find any attackable targets here (1). A fighter plane refuels at Msus (2). The Bersaglieri hero unit has nicely left its hill and is attacked by the neighbouring tank unit, which loses 2 strength points in the process. The Italians lose 5 strength points (3). The armoured unit occupying the hill surrenders the Italian reconnaissance unit after artillery fire (4). Before that, the third tank detachment had hit the temptingly exposed artillery heavily (5). From the west, own infantry, AA and artillery approach (6).
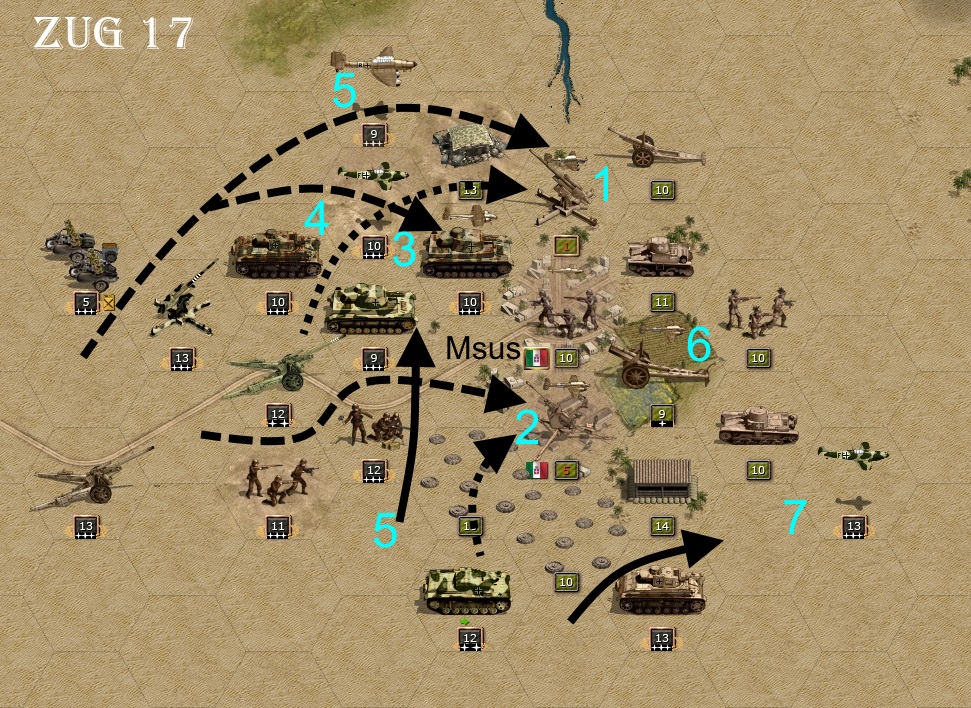
(23) The Italian hero bomber, by the way, had killed itself in the 14th round during the attack on the oil field by a Me109 refuelling on the neighbouring field and the posted AA. The refuelled Italian fighter moves forward slightly and is then shot down by own fighters (1). 2 more enemy planes come to Msus to refuel. The AI sensibly withdraws the battered artillery (2). Instead, it drives a 7.5 cm AA in a truck unreasonably directly to the front (3), where it is wiped away by a tank division together with the Kradschützen (3). Before that, the battered Bersaglieri hero unit had been routed by German infantry and artillery (4). In addition, the M14 tank (5) was destroyed and another artillery badly hit (6). The friendly air force has not yet been able to make more of an impact because the nearest friendly airfield is relatively far away and the enemy AA is still in too good a position.
(24) During the 16th turn, the AI lost the two planes, but on the other hand was able to take 2 strength points from a Stuka group. The Italians also lost 2 artillery units, a cavalry unit and a light tank unit. Instead, they countered with the hero artillery (1), whose bonus +5 attack, +3 defence, +2 range makes them very unpleasant, and a cavalry attack on the poor Krad gunners, who always have to take the hit when there's trouble (2). Luckily the Italian hero tank (+6 attack, +4 defence) didn't get to the Kradschützen before, otherwise.... At least everything is now ready to attack.
(25) The decisive moment has come. The two remaining AA units are weakened by 2 artillery strikes. Subsequently, the I/StG3-Stuka moves on the 9cm AA (1) and a Me110 on the light enemy AA (2). Only 1 and 5 strength points respectively remain. The AA is at least temporarily down. The airspace is open. The Do217 attacks the Italian hero tank (3). The cavalry is eliminated by a tank and ultimately with the help of the battered Kradschützen, which can then finally retreat(4). With 2 armoured units losing 3 strength points and a Stuka, the Italian hero tank unit is finally smashed (5). Another Me110 weakens the enemy hero artillery by 4 strength points (6). The southern tank unit destroys another artillery in interaction with an Me109 (7).
-
Sonja89_1
- Administrative Corporal - SdKfz 251/1
- Posts: 142
- Joined: Sun Jul 04, 2021 4:27 pm
- Location: Holstein, Germany
Re: DAW - Der andere Weg - The other way
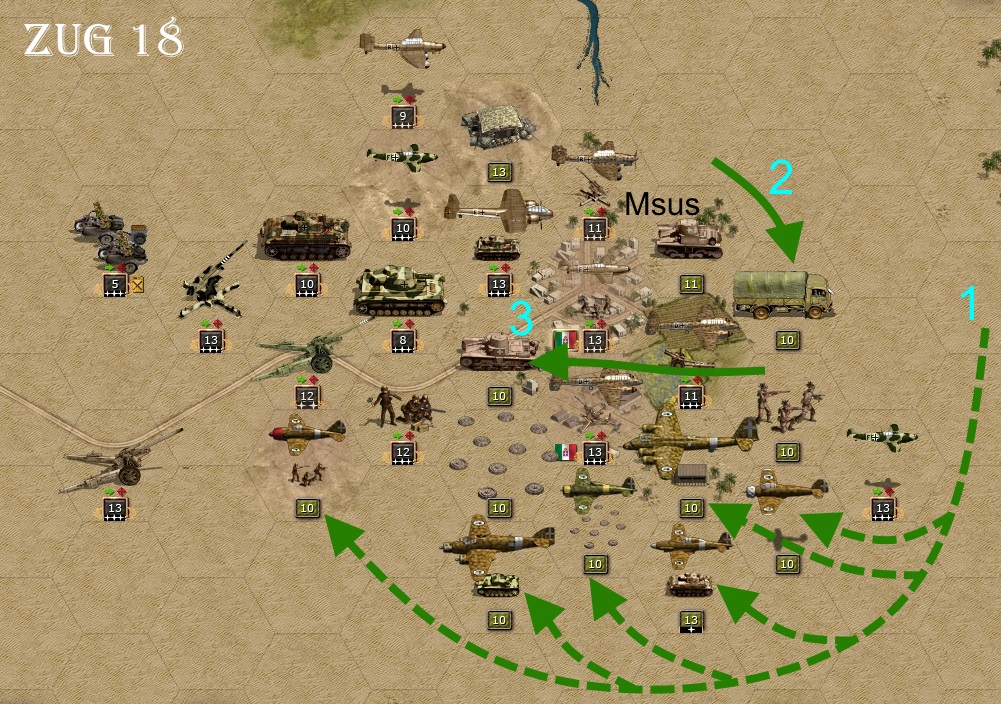
(26) Now the battle could almost be over, but the AI brings another 6 new plane groups into play (1). Among them is a hero fighter (+5 attack, +3 defence, +2 initiative). With the attacks he hits 3 ground units lightly (together 4 strength points loss). Further, he moves one artillery to the rear (2) and one of the two remaining tank units to the front (3).
(27) The artillery eliminates the 9cm AA (1). The friendly AA (with a range +1 hero) moves one hex to the southeast and fires at the enemy hero fighter, which loses 11 (!) strength points (2). A Me109 turns back and attacks a second fighter, which loses 7 strength points (3).
(28) With a Stuka and the Do217, the two artillery units are further weakened (1). The Me110 destroys the last remaining AA (2) and then moves to its own airfield due to lack of fuel. One tank unit attacks the field fortifications, but remains in place so that it can continue to be covered by the fighters that previously shot down the two stricken Italian fighters. The second Me110 attacks the last remaining enemy fighter and halves its strength (4). A Me109 approaches from the south (5) and can intervene in the next turn. The enemy still keeps his 3 bombers fully intact, but has only one fighter left with half its strength. This means that my bombers can manage without cover for a short time.
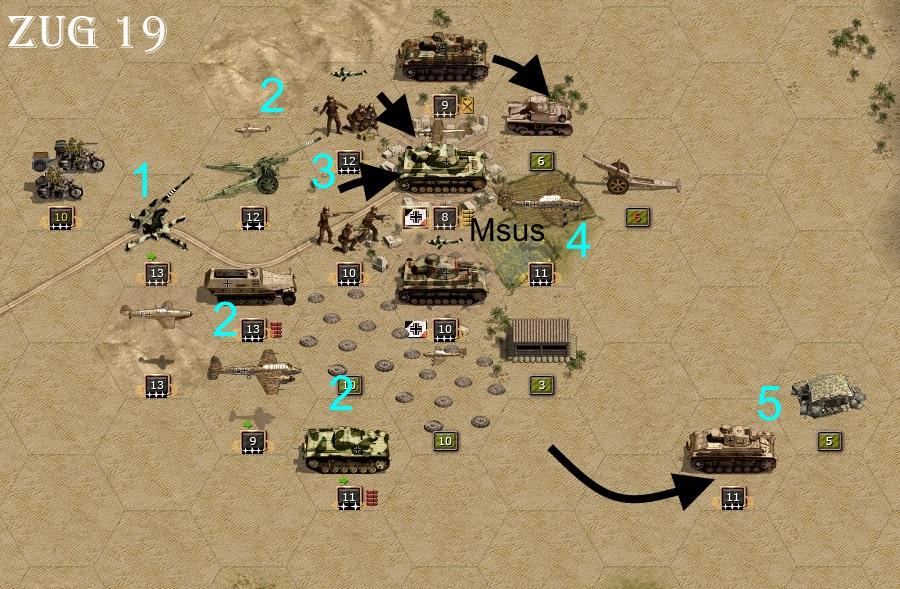
(29) The enemy bombers hardly find a point of attack and can only cause minor damage. Subsequently the fighter is shot down by the AA (1) and the 3 bombers (2) by the Me109 and a Me110. With infantry and artillery Msus is taken (3). The I/StG3 Stuka destroys the battered hero artillery (4). While a tank unit (5) rushes into a camouflaged MG position and loses 2 strength points (5). However, this only slightly delays the successful conclusion of the battles at Msus.
This last scenario of the second campaign will run for another 19 turns until the two main objectives Bengasi and Derna have been conquered. But I will not go into that here, if only because of the otherwise excessive length. My aim is to present one possible way of successfully mastering the campaign. There may also be other variants, and each player will certainly have his or her own preferences. In my observations or descriptions so far, however, I have noticed that most people regard the AA as ballast and do not give it any special attention. Again and again I see Lets Plays where even otherwise good players forget the AA, even though it is present on the map, against enemy planes or only use it after their own fighters have been deployed as sweepers. I consider this to be a crucial mistake.
It is true that mobile AA in particular has only a low efficiency at the beginning. In addition, in the original game mobile AA can only be used against planes, and in the Grand Campaign up to 1941 there are not very many of them. Nevertheless, I recommend including an 8.8 from 1939 and a mobile AA from 1940 in the core area to slowly build them up and give them experience. In all further battles this will clearly pay off if they are then not forgotten on the battlefield.
In every scenario, and indeed in every game, you have to ask yourself at the beginning what the key position is. In Panzer Corps, in my opinion, it is clearly the mastery of airspace. In this respect, it must be said that the developers of this game were completely right, because air domination was the clear guarantee of victory in World War 2. Only rarely did the side win a battle that did not dominate the airspace. Arnhem in September 1944 was such an exception. Anyone who has ever dropped his paratroopers into too heavily defended terrain knows why. Why the planes are so important now can be seen from how uniquely fast a centre of gravity can be formed with them. Within a very short time, an enormous density of fire can be concentrated on a limited, decisive area, which means that even a strong defence cannot hold out for long.
I think many players will agree with me on this. They also like to equip their core troops with bombers and fighters in sufficient numbers. In this respect, the makers of the game should perhaps have called it 'Air Fleet' or something similar, instead of Panzer Corps. Now, as far as the key position of the game is concerned, one should go a step further and ask how air supremacy is achieved. Basically quite simple - the enemy planes must be destroyed and the enemy AA eliminated.
The enemy planes can be decimated by fighters (and some tactical bombers like the Me110) and your own AA. Here the sequence must be observed. Shots by AA are preferable to fighter attacks, as the AA does not receive counterfire. The AA acts here similarly to artillery in ground combat. So the AA shoots first - and at whom? It is a matter of air superiority first. The enemy bombers act on ground targets, so they are secondary in terms of pure air superiority. So the enemy fighters, who are a danger to the bombers and the fighters, are to be eliminated in the first place. At the same time, the area over which the planes are moving plays an important role. Is the area occupied by own or foreign ground troops. Does the enemy have AA nearby that can intervene in the air battles? If so, it should be eliminated as a matter of priority in order to keep losses low, especially among the fighters. How do I effectively eliminate AA? One way is to put a tank next to the AA and hit it - boom. Now, you are usually not lucky enough to have the enemy AA exposed, but it works from the rear. It gets really nice when several AA units are encountered with an overlapping field of fire. Then it gets tricky. Here, own artillery with a long range is an important tool. That is why I rarely equip myself with launchers, which are usually only designed for short range. With an artillery strike, the enemy AA can be suppressed to some extent and usually be hit a little. This is immediately followed by an attack with a tactical bomber as strong as possible. A Stuka is particularly useful here, as it can hit the AA precisely and damage it badly, or even destroy it completely if you are lucky. Once the AA is out of play, the enemy planes are attacked by the fighters and the enemy ground units by the remaining bombers. A massive centre of gravity build-up takes place, first softening up the enemy line and then causing it to collapse.
To me, this gives the primary order of attack - enemy AA, then fighters, bombers, artillery and only then tanks and other targets. Conversely, this also means that when I have friendly fighter cover, I prefer my bombers to ground units. Ground troops can usually withstand an air strike sooner than a bomber. Moreover, a ground unit can usually only receive one air strike per turn. In contrast, a friendly bomber may well be attacked by 2 or 3 of the enemy's fighters in one turn, which can easily be its end. In order to provide cover for the ground troops, the own AA comes into play again, which also has an important defensive effect, whereby a series of enemy air strikes can be defeated at a high loss for the AI.
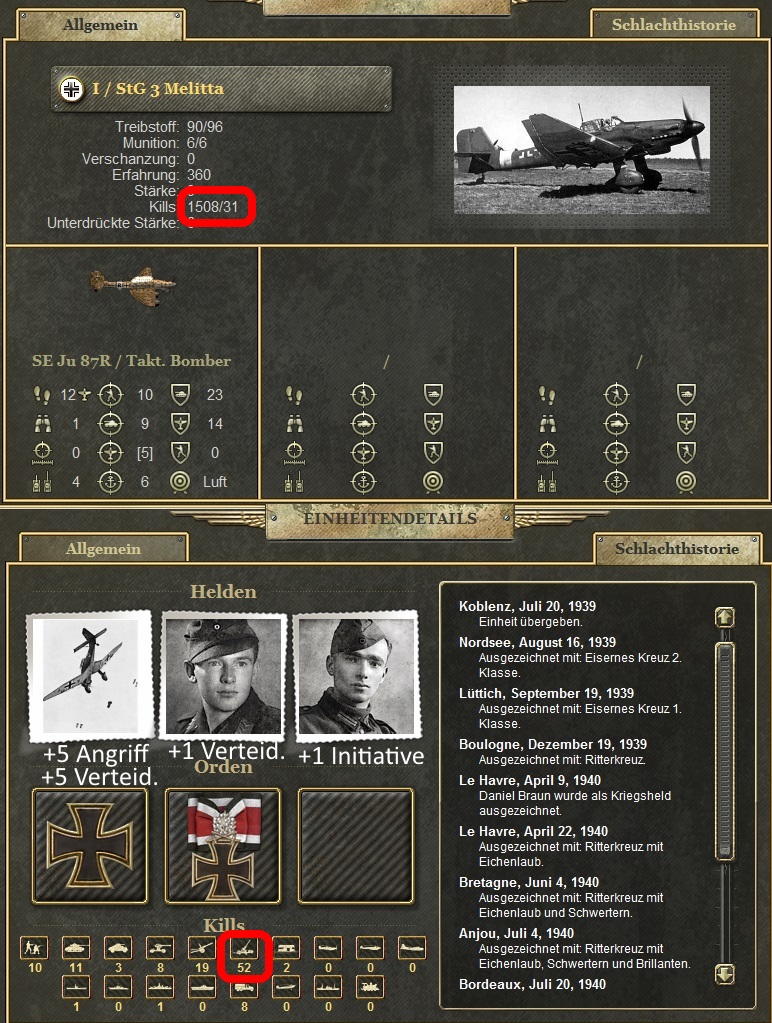
Ultimately, however, each player must follow his own intention. There is not only one way to reach the goal. Finally, I would like to draw attention to a unit that played an important role in my little presentation. It is the Special Stuka (I/ StG3), which is equipped with the heroine Melitta von Stauffenberg (+5 attack, +5 defence) and is handed over in the 3rd scenario of the 2nd campaign (Koblenz). The figure is similar to the 'Rudel-Stuka' (+9 attack, +9 defence, +1 movement there) in the Grand Campaign. As soon as this flier has some experience, which does not take long with the many battles, this unit can become a real killer, a unit that can take out enemy figures with one blow. If you then find the right field of activity for it, it can develop into a real killer squad, as you can see in the last picture. Where do you ever find a unit that destroys 52 AA units in 18 scenarios !?

Re: DAW - Der andere Weg - The other way
Judging by the description and pictures, we are waiting for the great history of the Reich without Hitler))
http://alternathistory.com/ai-vselennay ... a-vojna-2/
https://stopgame.ru/blogs/topic/56975
https://www.youtube.com/watch?app=deskt ... y%22Steven
https://www.youtube.com/watch?v=QfU1lYA ... el=Red2net
When to wait for at least a Demo ?
http://alternathistory.com/ai-vselennay ... a-vojna-2/
https://stopgame.ru/blogs/topic/56975
https://www.youtube.com/watch?app=deskt ... y%22Steven
https://www.youtube.com/watch?v=QfU1lYA ... el=Red2net
When to wait for at least a Demo ?
-
Thunderhog
- Sergeant First Class - Panzer IIIL

- Posts: 350
- Joined: Wed Feb 05, 2020 6:38 am
Re: DAW - Der andere Weg - The other way
It's fully releasedVano2004 wrote: ↑Mon Jan 31, 2022 1:32 am Judging by the description and pictures, we are waiting for the great history of the Reich without Hitler))
http://alternathistory.com/ai-vselennay ... a-vojna-2/
https://stopgame.ru/blogs/topic/56975
https://www.youtube.com/watch?app=deskt ... y%22Steven
https://www.youtube.com/watch?v=QfU1lYA ... el=Red2net
When to wait for at least a Demo ?
Re: DAW - Der andere Weg - The other way
I'm on stage Paris, and the truth is that the campaign is very good. I think this very long scenarios in turns is very successful so as not to be too stuck with time/objectives. Looking forward to starting the Benghazi stage
-
Sonja89_1
- Administrative Corporal - SdKfz 251/1
- Posts: 142
- Joined: Sun Jul 04, 2021 4:27 pm
- Location: Holstein, Germany
Re: DAW - Der andere Weg - The other way
To go all the way through all 4 campaigns you need a lot of endurance. I estimate that you play about double as long as the official Grand Campaign. It is mainly for players who like Panzer Corps a lot.
If you're already on the "Paris" scenario (2nd campaign), you've made good progress. Be careful with "Sizilien" (Sicily), it's easy to underestimate. Good luck furthermore - and also note my tips on combat tactics a few posts above (from 30 January 2022).
-
Sonja89_1
- Administrative Corporal - SdKfz 251/1
- Posts: 142
- Joined: Sun Jul 04, 2021 4:27 pm
- Location: Holstein, Germany
Re: DAW - Der andere Weg - The other way
Here I place 10 screenshots from the second campaign (1939-41). I had already presented these a few years ago in the DMP forum, which was closed at the end of last year.
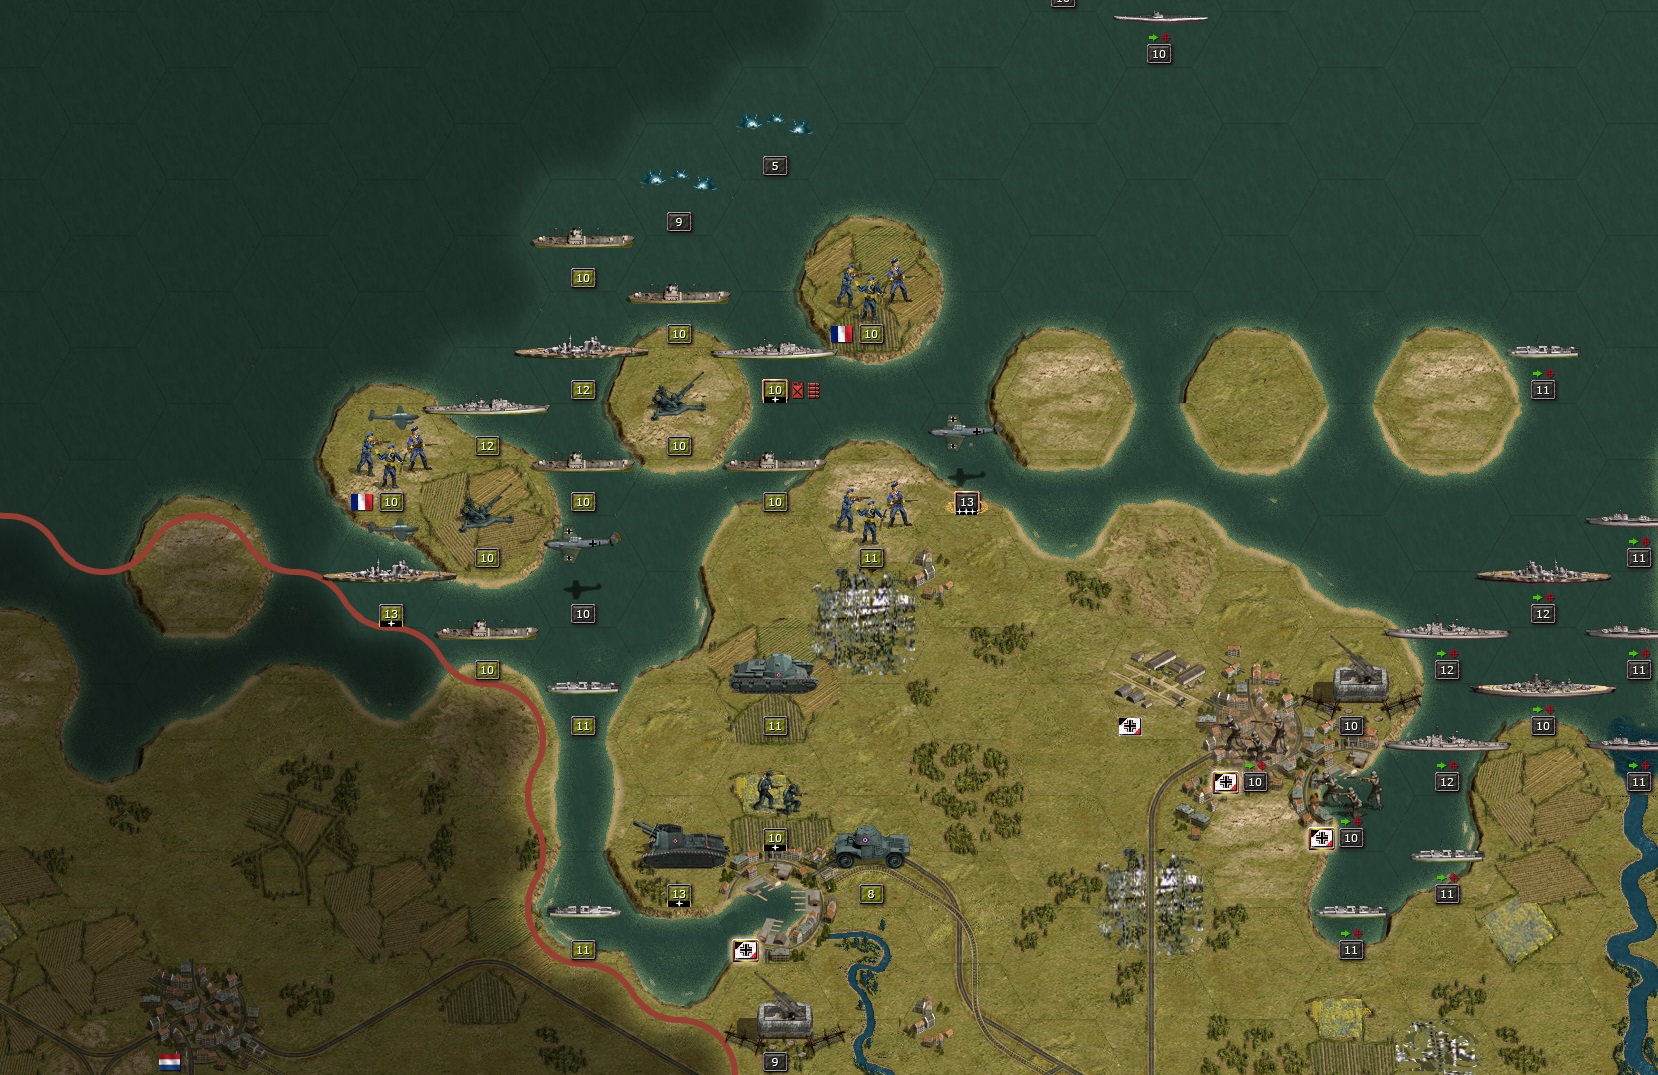
In this picture from the "Nordsee (North Sea)" scenario, you can see the neutral Netherlands at the bottom left, Emden with the mouth of the Ems at the bottom centre and Wilhelmshaven on the right. Further up are the East Frisian islands (not quite complete) from Borkum, Juist and Norderney, which are occupied by the enemy, to Wangerooge. The French have also already landed on the mainland and are advancing towards Emden and Wilhelmshaven. The aim is the unconditional defence of Wilhelmshaven as a naval base, which is the target of the French Atlantic fleet. Still conspicuous are the French heavy cruiser Colbert south of Borkum in the border area to the Netherlands, which has a hero unit, and the light cruiser Jeanne d'Arc, which has run aground on a sandbank near Norderney and is waiting for salvage, unable to manoeuvre. A salvage party of you (engineers) is already waiting in Cuxhaven. If you land this party on Norderney, you can win this light cruiser for your core troops.
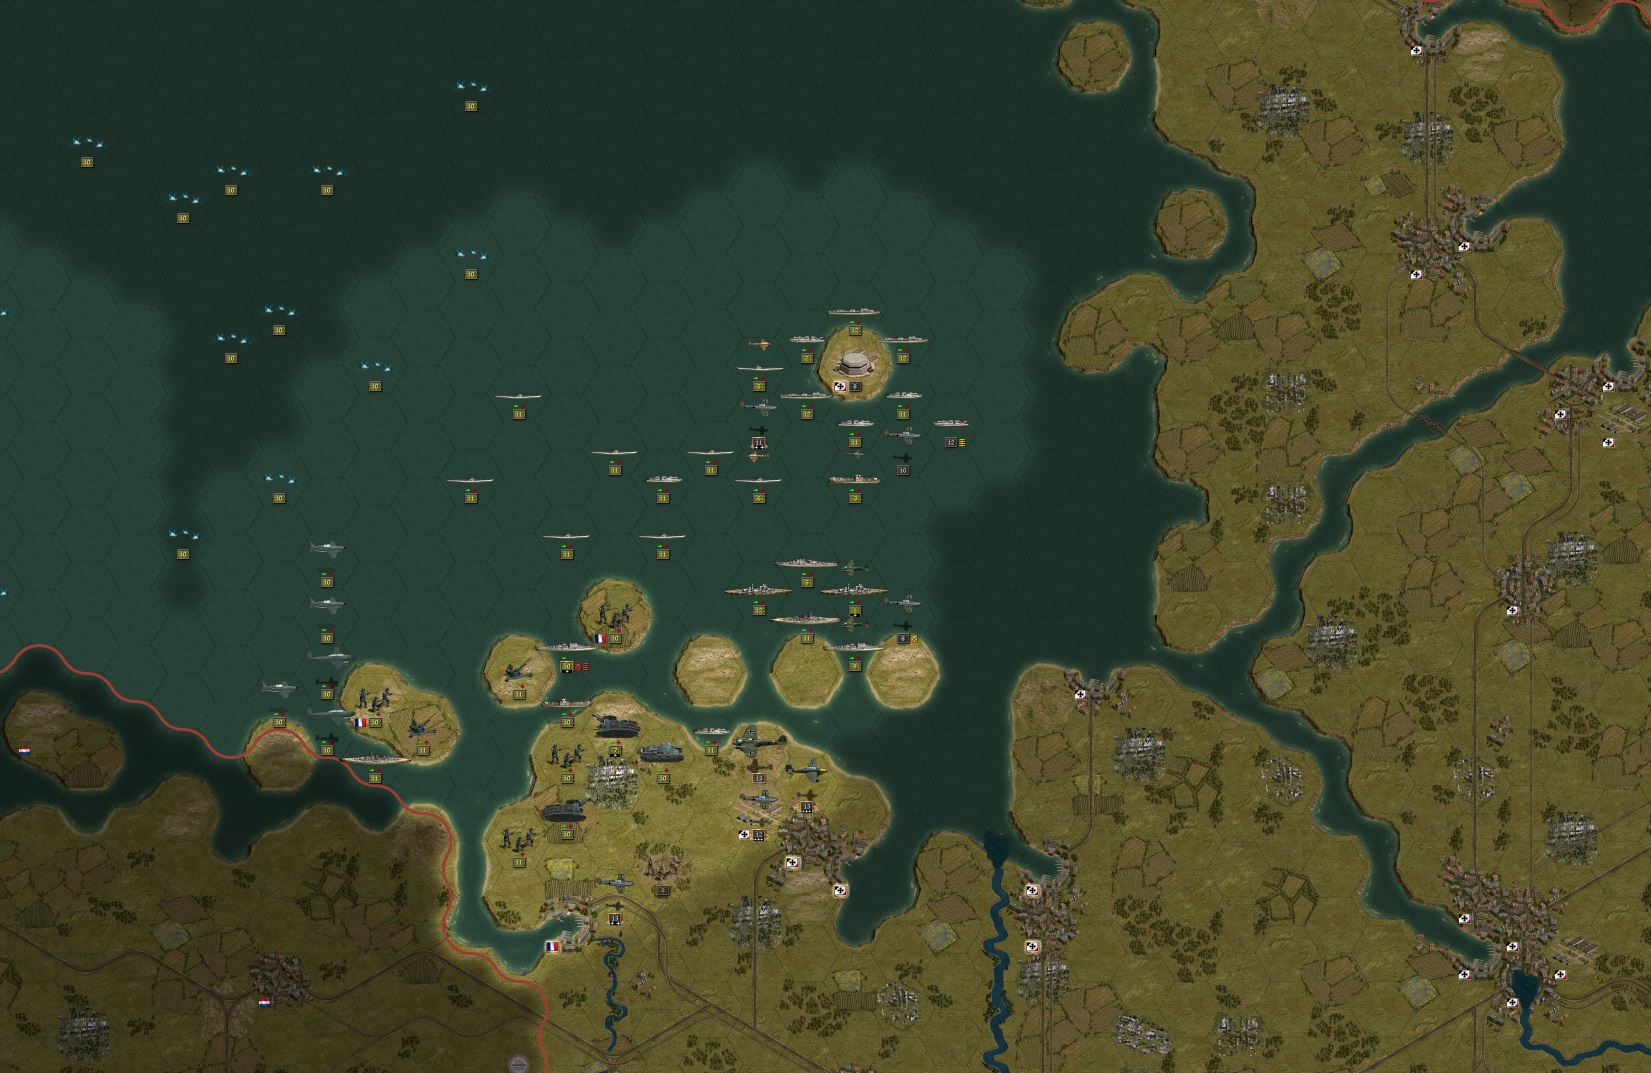
Here again is a more expansive picture with Flensburg, Schleswig and Kiel on the top right and the Kiel Canal. Hamburg is at the bottom right. The French fleet is fighting its way eastwards between Helgoland, which is completely besieged, and the East Frisian Islands. Further out are numerous minefields laid by the enemy.
The French submarines look quite numerous in the picture (8 in the picture), because they are coming in concentrated. In fact, the French navy had a large number of submarines at its disposal in 1939, with 77 units. By comparison, the German Reich had 56 submarines at the outbreak of the war and even Great Britain only had 57. The number of heavy cruisers and battleships was much smaller (only 7 each) and they also had only one carrier.
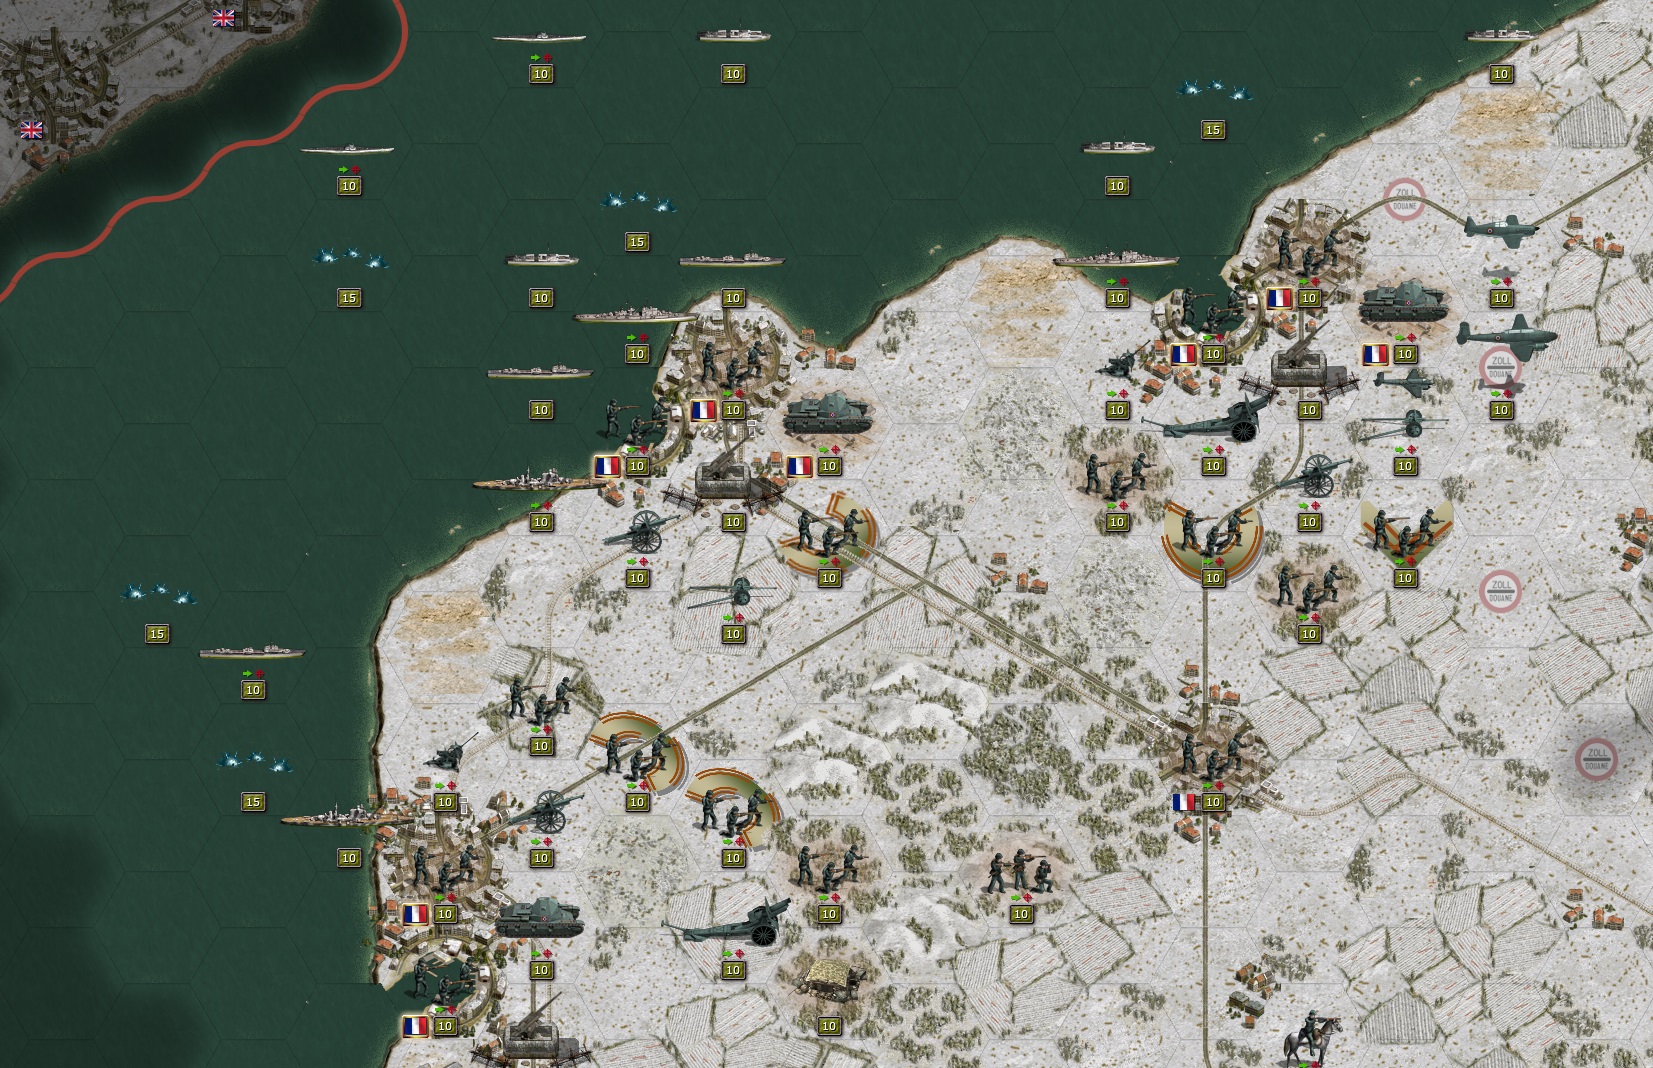
Here we see from the scenario 'Boulogne' the French defence of Dunkirk, Calais and Boulogne (from top right to bottom left). The English Channel coast can be seen at the top left. The scenario is set in December 1939 in appropriate weather (for those who have forgotten what snow looks like - it is close to the white areas in the picture).
From the same scenario, another picture of fighting on the Somme. Abbeville near the Channel coast could be taken, while French units southeast of it near Amiens still hold a bridgehead north of the river. The mud hinders the advance.
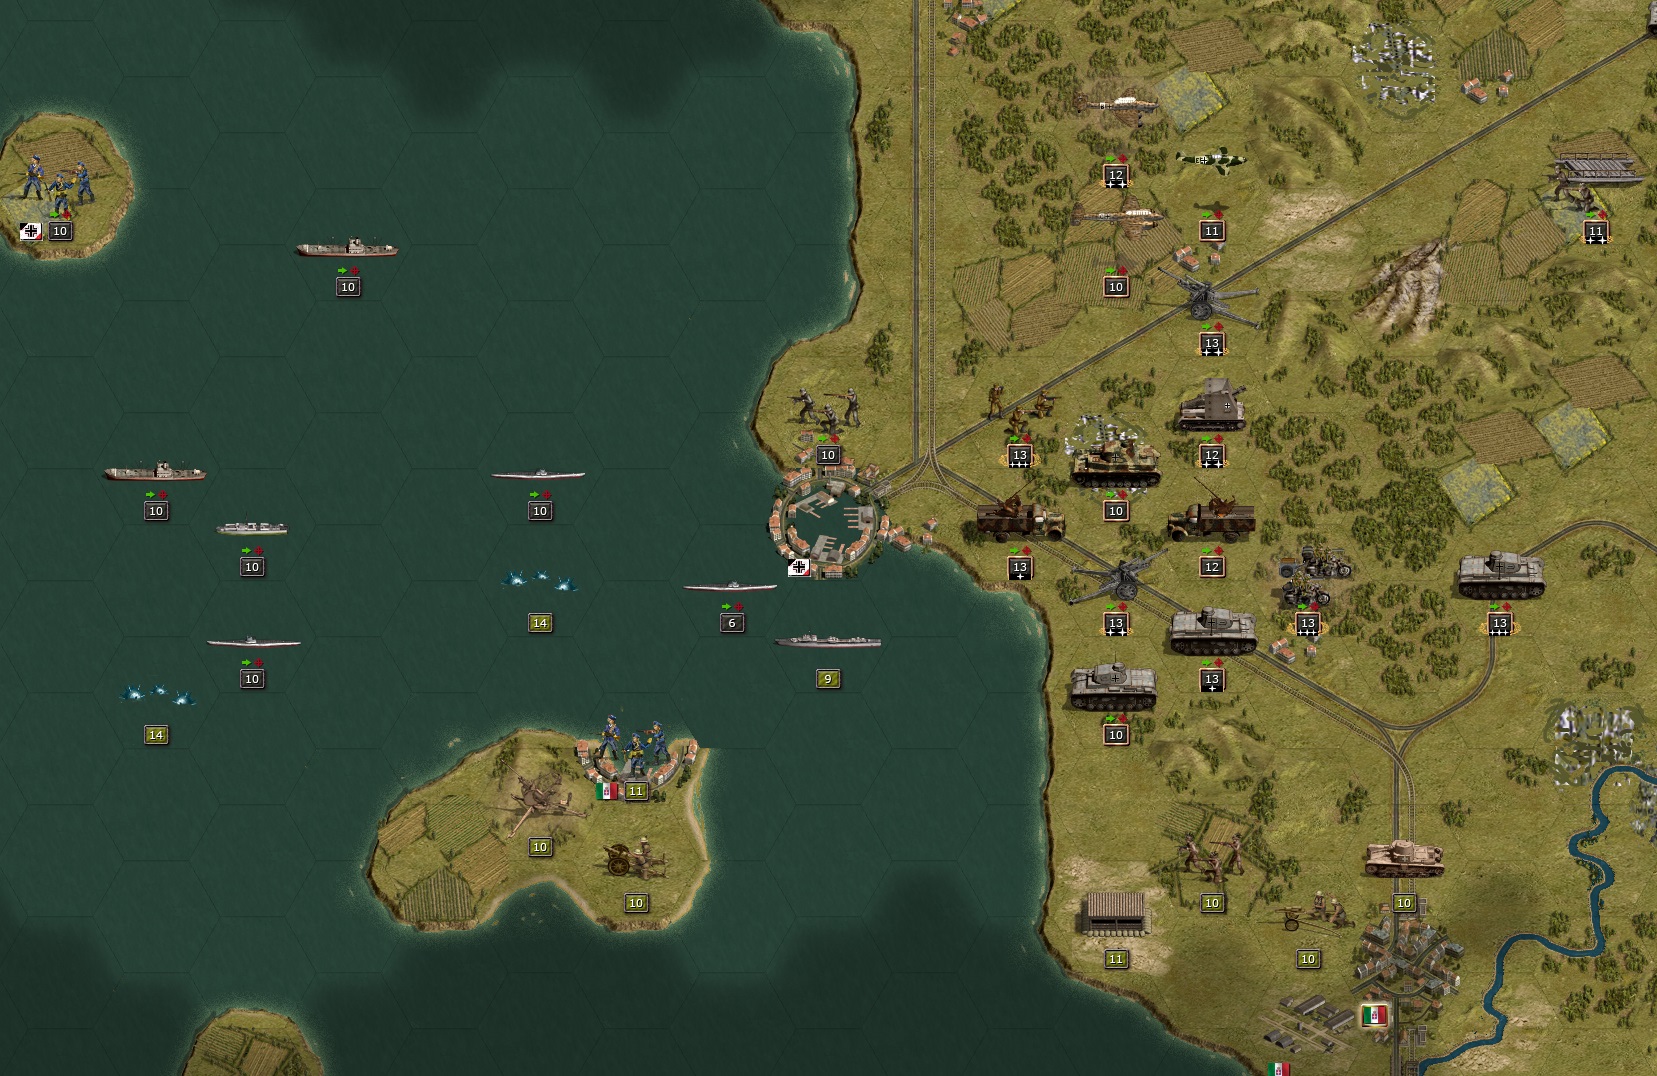
This example image is from the scenario "Umbria". We see German light naval forces (submarines, minesweepers, transporters) heading south off the coast of Tuscany. The target is the island of Elba, defended by Italian marines, anti-aircraft and light artillery. Sea mines, which first have to be removed by the minesweeper (river boat), hinder progress. On the coast, German units advance southwards towards Grosseto. At the top left is the small island of Caprai, already occupied by German marines.
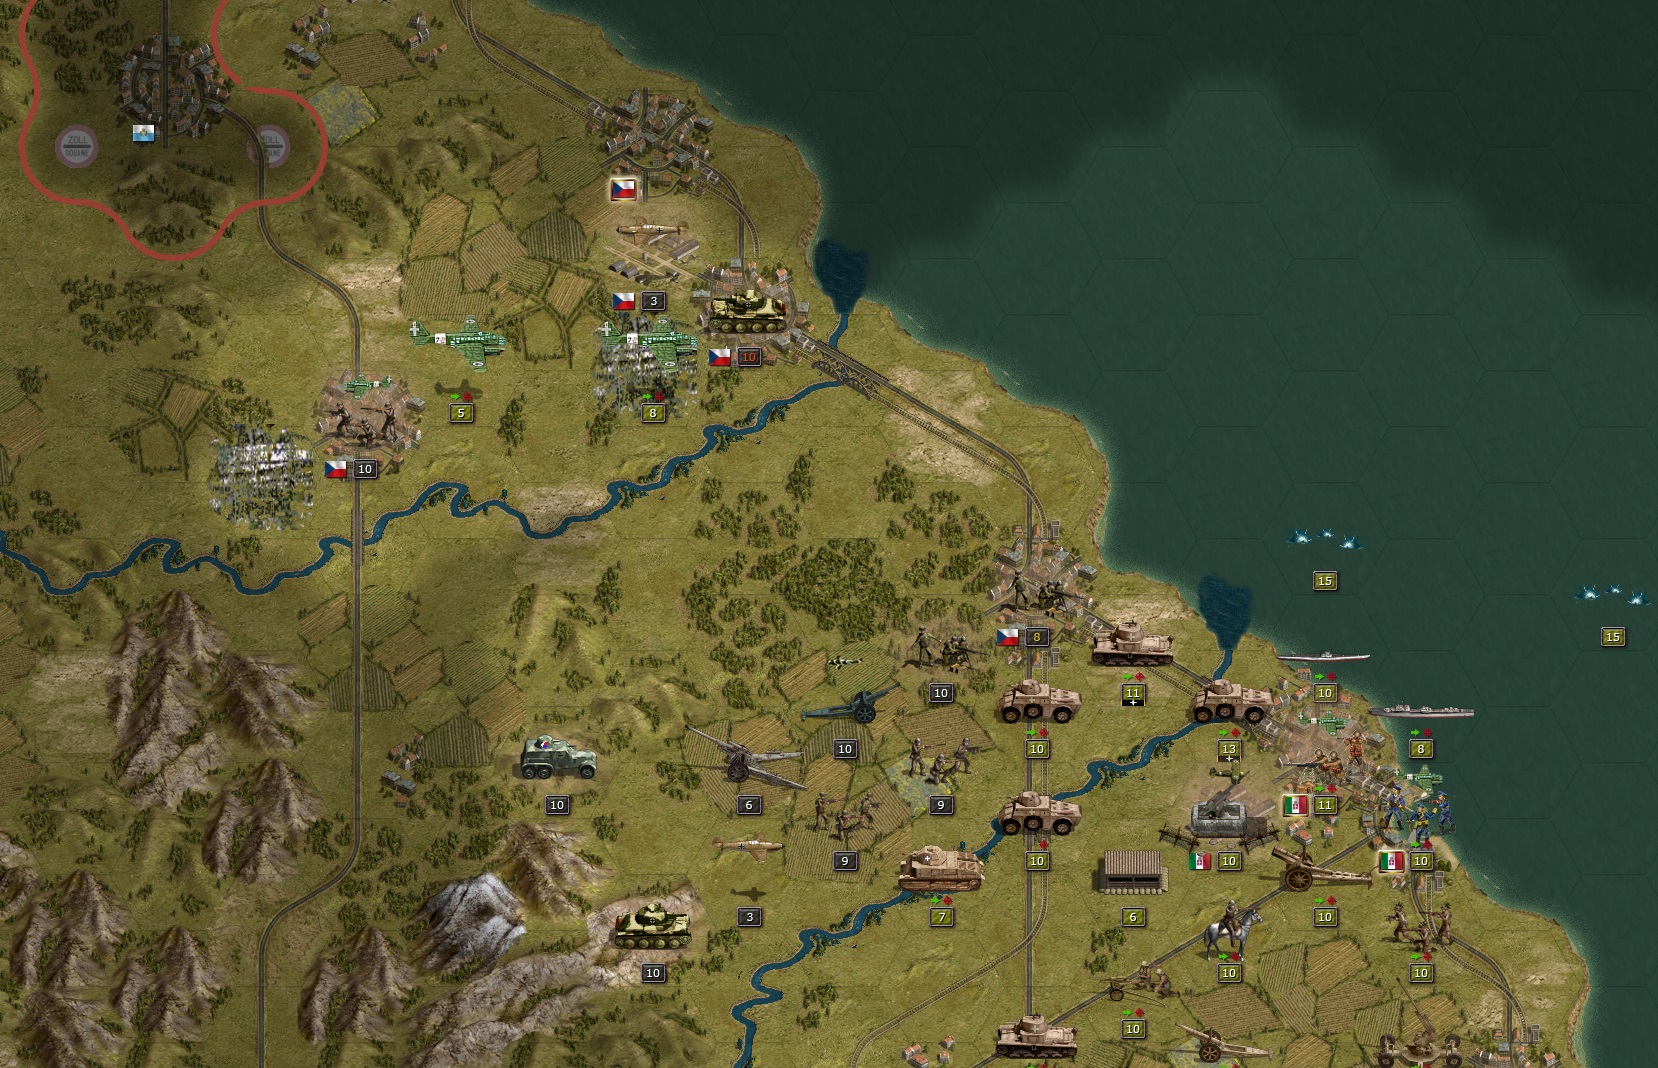
From the same scenario on the Adriatic side, Czechoslovak Aux troops are fighting. Their advance on the important coastal town of Ancona has come to a halt as a heavy counterattack by the Italians begins. An Italian Somua overcomes the Esino River and attempts a breakthrough through the CSR mountain troops. On the coast, the crossing has already succeeded. But heavy Czech infantry still holds the enemy. In addition, the Italians deploy paratroopers beyond the Metauro to seize the CSR airfield. Incidentally, neutral San Marino can be seen at the top left. Thanks to the flag mod component by Soldberg with the correct white-sky-blue flag of this state.
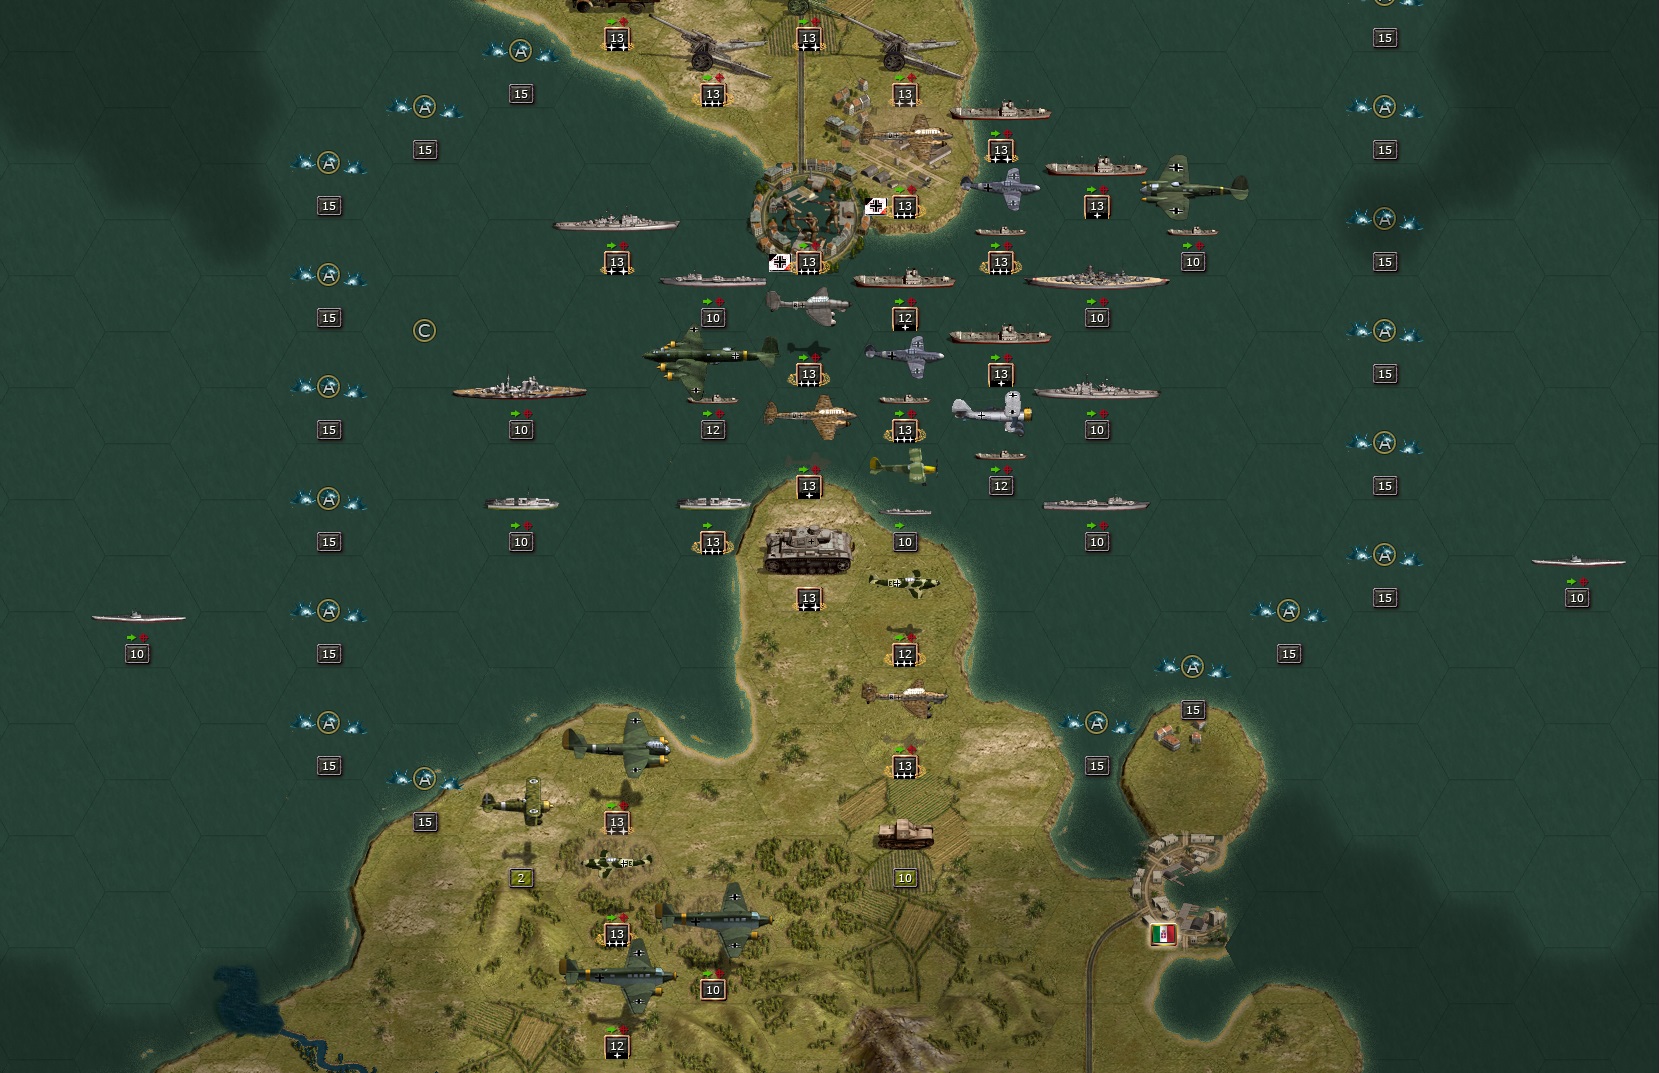
This example image is from the scenario "Sardinia". It shows the Strait of Bonifacio (Corsica above, Sardinia below), where German landing ships are heading for the coast of Sardinia. A tank unit has already landed. The own planes shield the airspace. Since the German naval forces are not too numerous, mines have been laid flanking them. This is optional in the scenario. You can decide for yourself whether to call up the mine protection, which costs some prestige (enter the 'C' field with a minelayer). However, it prevents you from being surprised by enemy naval units. Over Sardinia there are own transport planes with parachutists to shield the bridgehead that is forming.
From the same scenario, after the troops have fought their way through the island from north to south. Own ships are about to enter the Gulf of Cagliari, which is still defended by Italian ships. 4 French parachute units are circling in transports over the south of the island and want to rush to the aid of their allies. They could become easy prey for their own fighter planes. But there are still Italian anti-aircraft defences and a 9 cm gun just west of Cagliari that is currently in Pak mode - so watch out.

The following example image is from the scenario "Algier", which is set in the spring of 1941. After the fighting in the Mediterranean and the landing in North Africa, the own troops advance westwards from Tunisia. Here Contantine has just been taken and the adjacent desert zone to the south has been reached (see also the small map outlined in red below right). During a sandstorm, three of our own planes have ventured in front of the Algerian town of Biskra, which is defended by Foreign Legionnaires. Since there is strong anti-aircraft protection (the 47-mm flak of the French should not be underestimated!), our planes will have to turn away immediately. But at least we have already got a view of the situation and can approach accordingly.
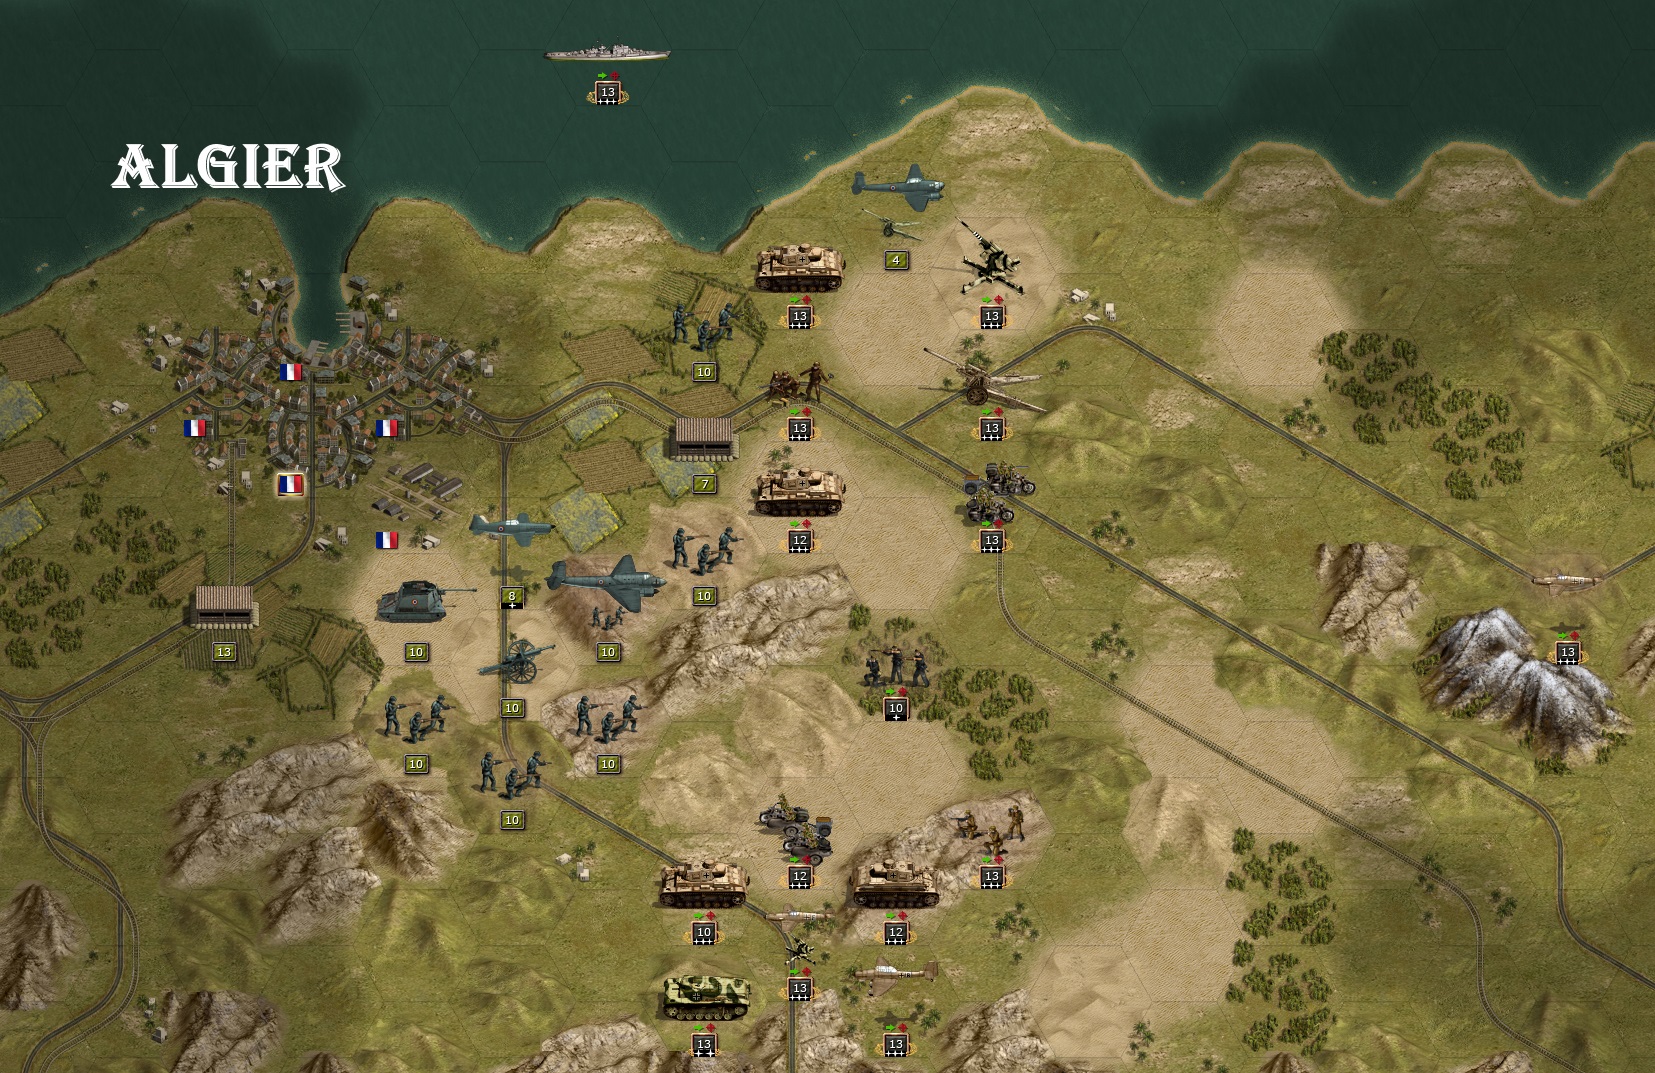
From the same scenario, you can see the approach of our own troops to the Algerian capital. The enemy naval forces have already been largely defeated, but their planes are still giving our troops a hard time. An important submarine was almost sunk (not in the picture here), but only just managed to save itself. One problem is the relatively distant airfield, which means that the planes can only provide cover for a short time. The airport near Algiers should therefore be taken quickly. But do not be too impetuous, as the enemy can strike meanly.
In this picture from the "Nordsee (North Sea)" scenario, you can see the neutral Netherlands at the bottom left, Emden with the mouth of the Ems at the bottom centre and Wilhelmshaven on the right. Further up are the East Frisian islands (not quite complete) from Borkum, Juist and Norderney, which are occupied by the enemy, to Wangerooge. The French have also already landed on the mainland and are advancing towards Emden and Wilhelmshaven. The aim is the unconditional defence of Wilhelmshaven as a naval base, which is the target of the French Atlantic fleet. Still conspicuous are the French heavy cruiser Colbert south of Borkum in the border area to the Netherlands, which has a hero unit, and the light cruiser Jeanne d'Arc, which has run aground on a sandbank near Norderney and is waiting for salvage, unable to manoeuvre. A salvage party of you (engineers) is already waiting in Cuxhaven. If you land this party on Norderney, you can win this light cruiser for your core troops.
Here again is a more expansive picture with Flensburg, Schleswig and Kiel on the top right and the Kiel Canal. Hamburg is at the bottom right. The French fleet is fighting its way eastwards between Helgoland, which is completely besieged, and the East Frisian Islands. Further out are numerous minefields laid by the enemy.
The French submarines look quite numerous in the picture (8 in the picture), because they are coming in concentrated. In fact, the French navy had a large number of submarines at its disposal in 1939, with 77 units. By comparison, the German Reich had 56 submarines at the outbreak of the war and even Great Britain only had 57. The number of heavy cruisers and battleships was much smaller (only 7 each) and they also had only one carrier.
Here we see from the scenario 'Boulogne' the French defence of Dunkirk, Calais and Boulogne (from top right to bottom left). The English Channel coast can be seen at the top left. The scenario is set in December 1939 in appropriate weather (for those who have forgotten what snow looks like - it is close to the white areas in the picture).
From the same scenario, another picture of fighting on the Somme. Abbeville near the Channel coast could be taken, while French units southeast of it near Amiens still hold a bridgehead north of the river. The mud hinders the advance.
This example image is from the scenario "Umbria". We see German light naval forces (submarines, minesweepers, transporters) heading south off the coast of Tuscany. The target is the island of Elba, defended by Italian marines, anti-aircraft and light artillery. Sea mines, which first have to be removed by the minesweeper (river boat), hinder progress. On the coast, German units advance southwards towards Grosseto. At the top left is the small island of Caprai, already occupied by German marines.
From the same scenario on the Adriatic side, Czechoslovak Aux troops are fighting. Their advance on the important coastal town of Ancona has come to a halt as a heavy counterattack by the Italians begins. An Italian Somua overcomes the Esino River and attempts a breakthrough through the CSR mountain troops. On the coast, the crossing has already succeeded. But heavy Czech infantry still holds the enemy. In addition, the Italians deploy paratroopers beyond the Metauro to seize the CSR airfield. Incidentally, neutral San Marino can be seen at the top left. Thanks to the flag mod component by Soldberg with the correct white-sky-blue flag of this state.
This example image is from the scenario "Sardinia". It shows the Strait of Bonifacio (Corsica above, Sardinia below), where German landing ships are heading for the coast of Sardinia. A tank unit has already landed. The own planes shield the airspace. Since the German naval forces are not too numerous, mines have been laid flanking them. This is optional in the scenario. You can decide for yourself whether to call up the mine protection, which costs some prestige (enter the 'C' field with a minelayer). However, it prevents you from being surprised by enemy naval units. Over Sardinia there are own transport planes with parachutists to shield the bridgehead that is forming.
From the same scenario, after the troops have fought their way through the island from north to south. Own ships are about to enter the Gulf of Cagliari, which is still defended by Italian ships. 4 French parachute units are circling in transports over the south of the island and want to rush to the aid of their allies. They could become easy prey for their own fighter planes. But there are still Italian anti-aircraft defences and a 9 cm gun just west of Cagliari that is currently in Pak mode - so watch out.
The following example image is from the scenario "Algier", which is set in the spring of 1941. After the fighting in the Mediterranean and the landing in North Africa, the own troops advance westwards from Tunisia. Here Contantine has just been taken and the adjacent desert zone to the south has been reached (see also the small map outlined in red below right). During a sandstorm, three of our own planes have ventured in front of the Algerian town of Biskra, which is defended by Foreign Legionnaires. Since there is strong anti-aircraft protection (the 47-mm flak of the French should not be underestimated!), our planes will have to turn away immediately. But at least we have already got a view of the situation and can approach accordingly.
From the same scenario, you can see the approach of our own troops to the Algerian capital. The enemy naval forces have already been largely defeated, but their planes are still giving our troops a hard time. An important submarine was almost sunk (not in the picture here), but only just managed to save itself. One problem is the relatively distant airfield, which means that the planes can only provide cover for a short time. The airport near Algiers should therefore be taken quickly. But do not be too impetuous, as the enemy can strike meanly.
-
Sonja89_1
- Administrative Corporal - SdKfz 251/1
- Posts: 142
- Joined: Sun Jul 04, 2021 4:27 pm
- Location: Holstein, Germany
Re: DAW - Der andere Weg - The other way
Here I place another 9 screenshots from the third campaign (1941-43). First of all, it is the 2nd scenario "Ionische Inseln (Ionian Islands)".
By way of explanation, it should be mentioned that the campaign begins in Greece. In the run-up to the conflict, the Soviet Union succeeded in bringing large parts of the Balkans under its control without a fight. Romania, Bulgaria and Yugoslavia are allies of the USSR here. In Greece, however, a communist coup failed and the Greek military successfully fought back. This was followed by an invasion by the Bulgarians and Yugoslavs with the support of the Soviet Union. With Britain tied up in East Asia because of an impending war, the Greeks asked the German Empire for support, which was reluctantly granted. The German Empire thus "slid" into a war against the Soviet Union. In DAW's alternative history one is also reminded of the present of 2022.
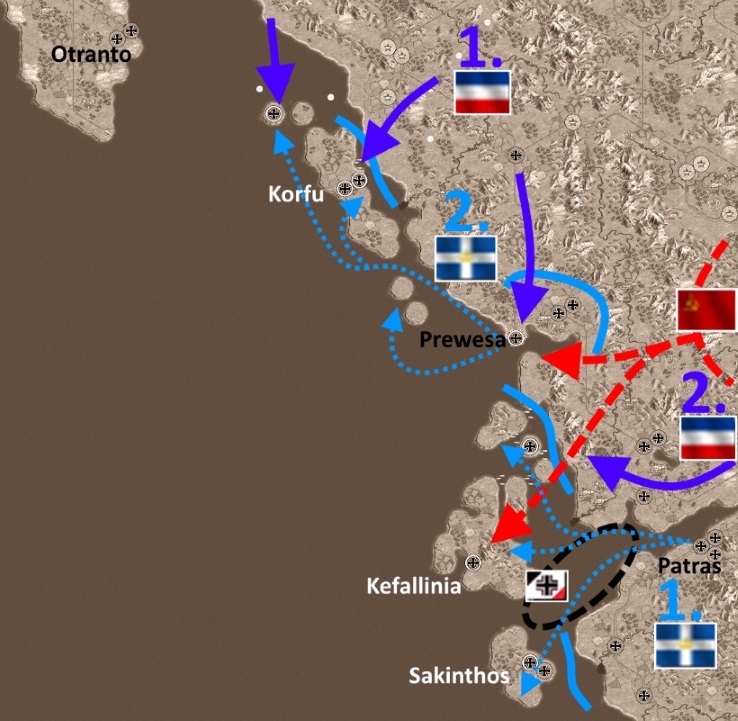
On the general map you can see the group of islands in the west of Greece. The Strait of Otranto, considered the gateway to the Adriatic, is still visible at the top left. The Greek resistance on the mainland is abandoned and an evacuation is initiated. The player must now ship the Greek units and place them on specific points on the islands. The player's own ground core troops are not yet available in the first two scenarios. They are still on their way back from North Africa (see end of 2nd campaign). On the other side, however, only Soviet planes and paratroopers are in action. The actual ground combat in this scenario is fought by Yugoslavs and Greeks. The evacuation ports are Prewesa and Patras.
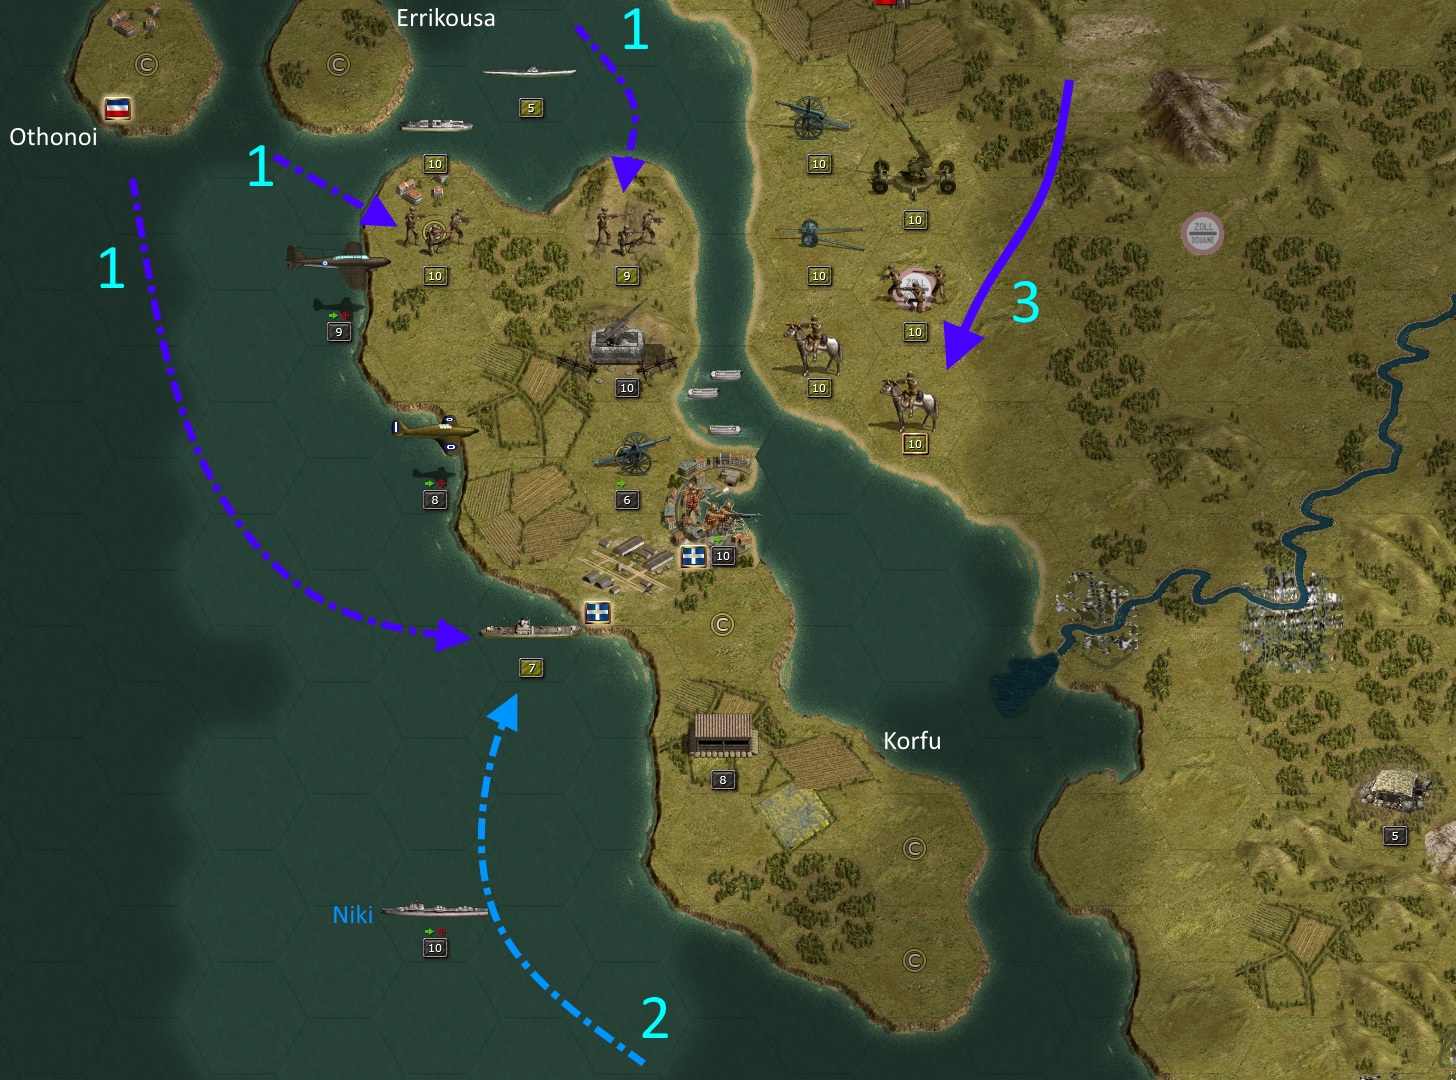
Here we see the island of Corfu in the centre in the northern section. The small Yugoslav naval forces are supporting some landings in the north and west of the island (1). The Greek destroyer 'Niki' is on an intercept course and will be able to inflict heavy losses on the Yugoslav transporter (2). More enemy troops are advancing from the north-east, intending to use the narrow crossing point to the island (3). Corfu is held by only a few Greek troops, but can soon be defended by German paratroopers.
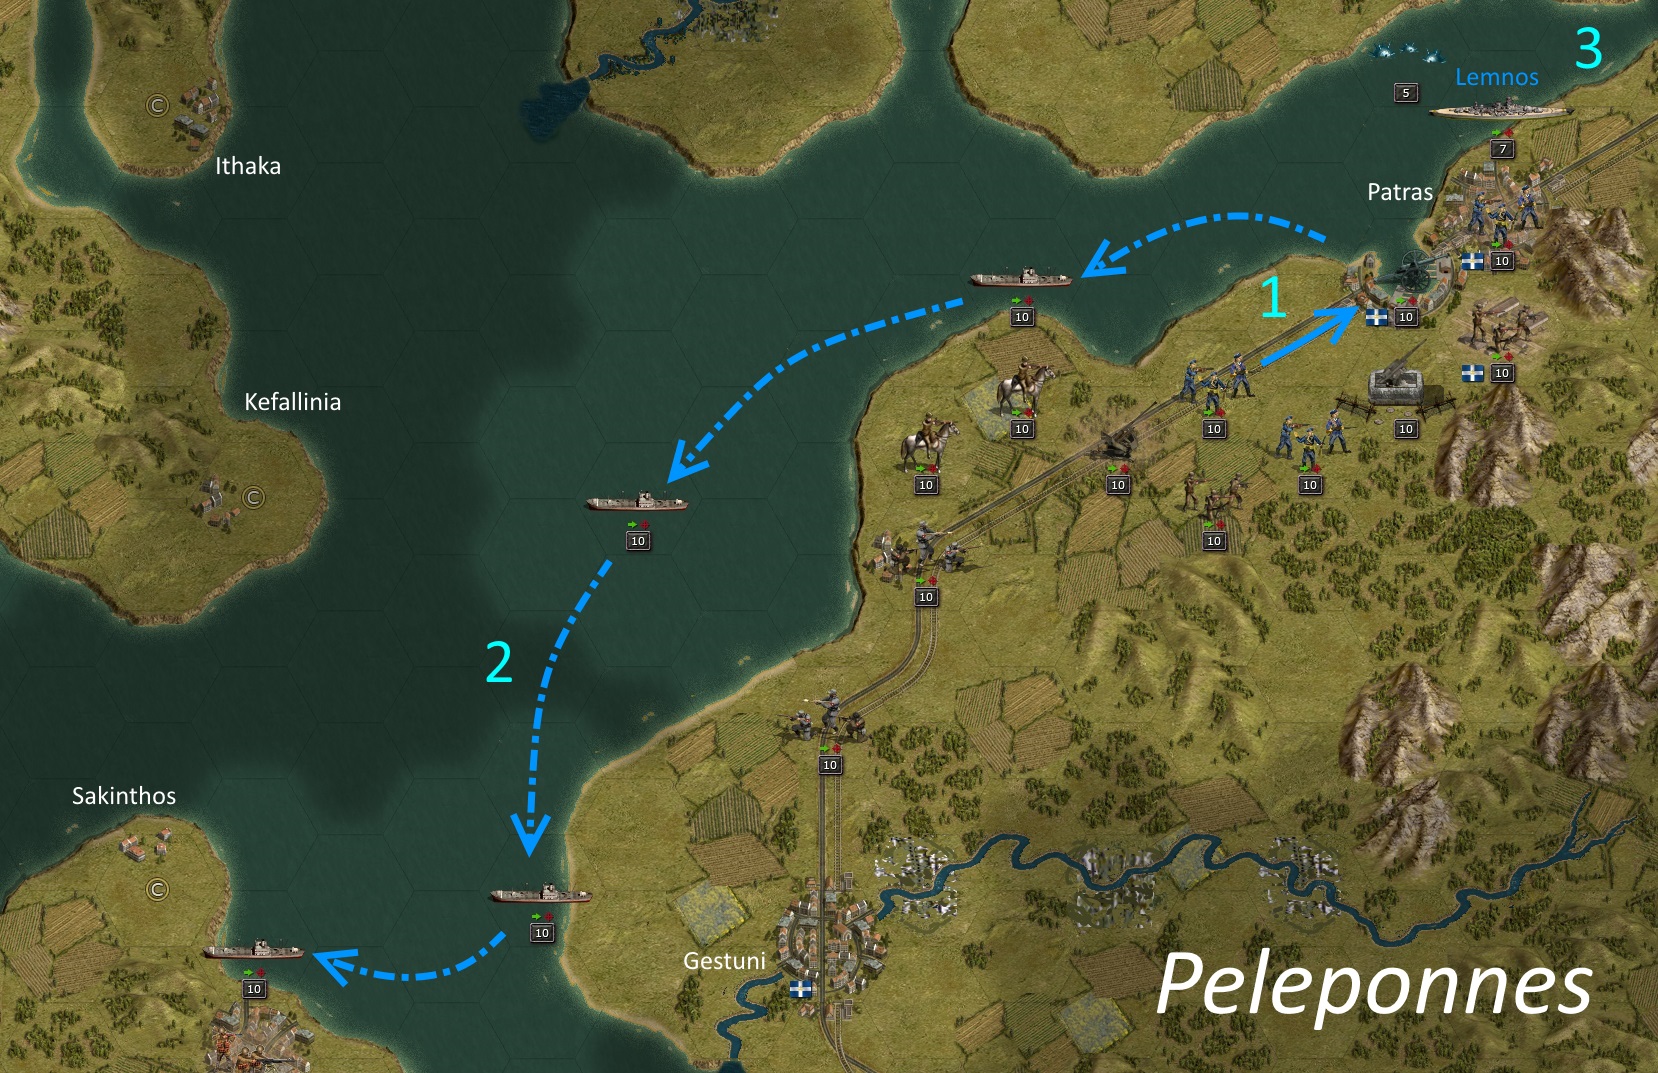
In the southern section, the evacuation via Patras has begun (1). The ships set course for Sakinthos, Kefallinia and Ithaca (as Odysseus once did) to occupy the hexes marked 'C' (2). The old Greek battleship Lemnos covers the withdrawal (3). But the enemy attacks are taking place further north.
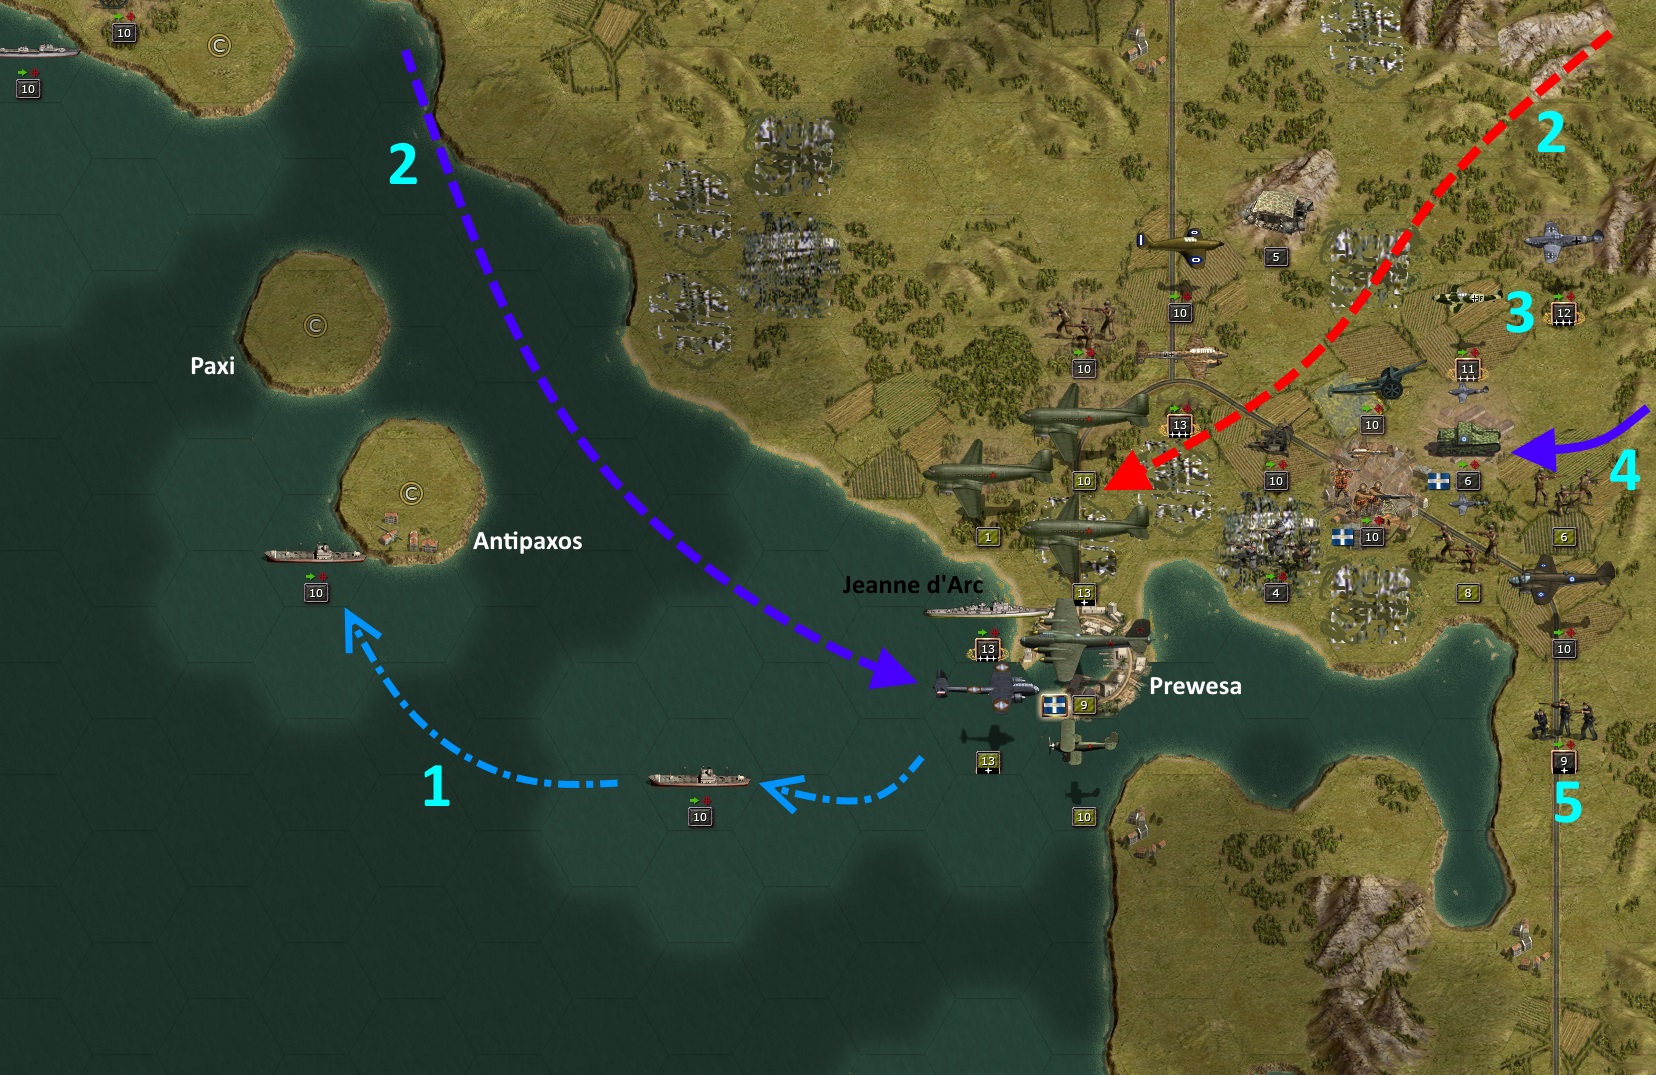
The evacuation has also started in the central section. Two smaller islands are already being approached (1). Here, however, enemy aircraft are already appearing. A Yugoslavian and a Soviet level bomber head for Prewesa and narrowly miss our own light cruiser Jeanne d'Arc (2). In addition, Soviet paratroopers in transport planes try to land near Prewesa. Conveniently, our own fighters are already on the ground (3), for whom the transports are easy prey. However, there is not much time left for the remaining Greeks to embark at this point, because Yugoslav ground units are already appearing on the right edge, pushing towards the harbour (4). German mountain troops, brought in by cargo ships, will help to cover the retreat.
Here is the 4th scenario "Ungarn (Hungary)" of the third campaign:
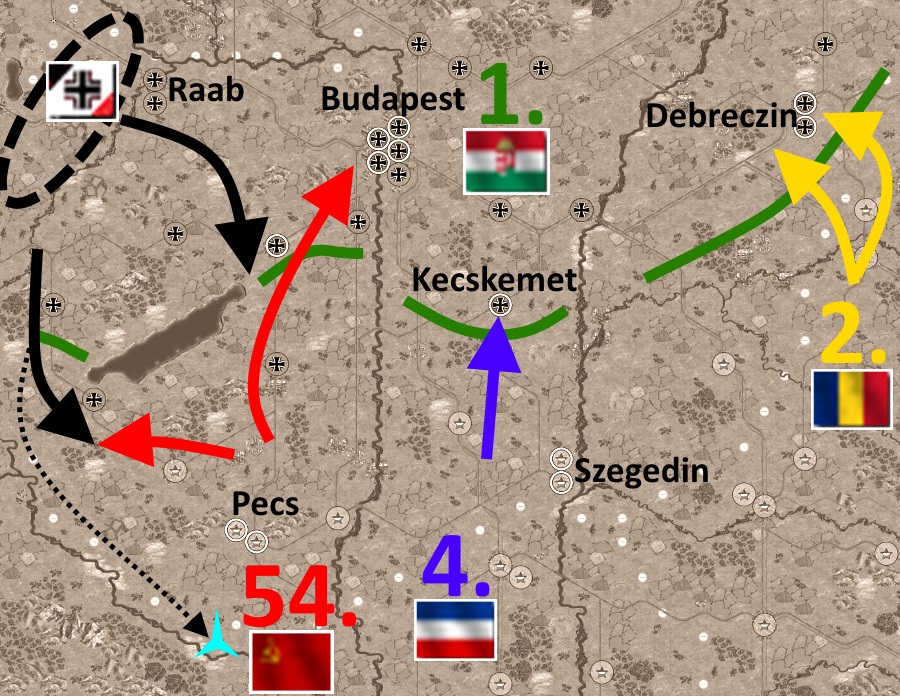
The overview map shows Lake Balaton (Plattensee), the Danube and the Tisza as larger bodies of water (from left to right). The 54th Soviet, 4 Yugoslav and 2 Romanian armies attack Budapest, Kecskemet and Debreczin to the north. The comparatively weak Hungarian forces must hold their positions as long as possible until our Core troops arrive via Raab for relief. In addition, a camp with Hungarian prisoners must be liberated as a special mission.
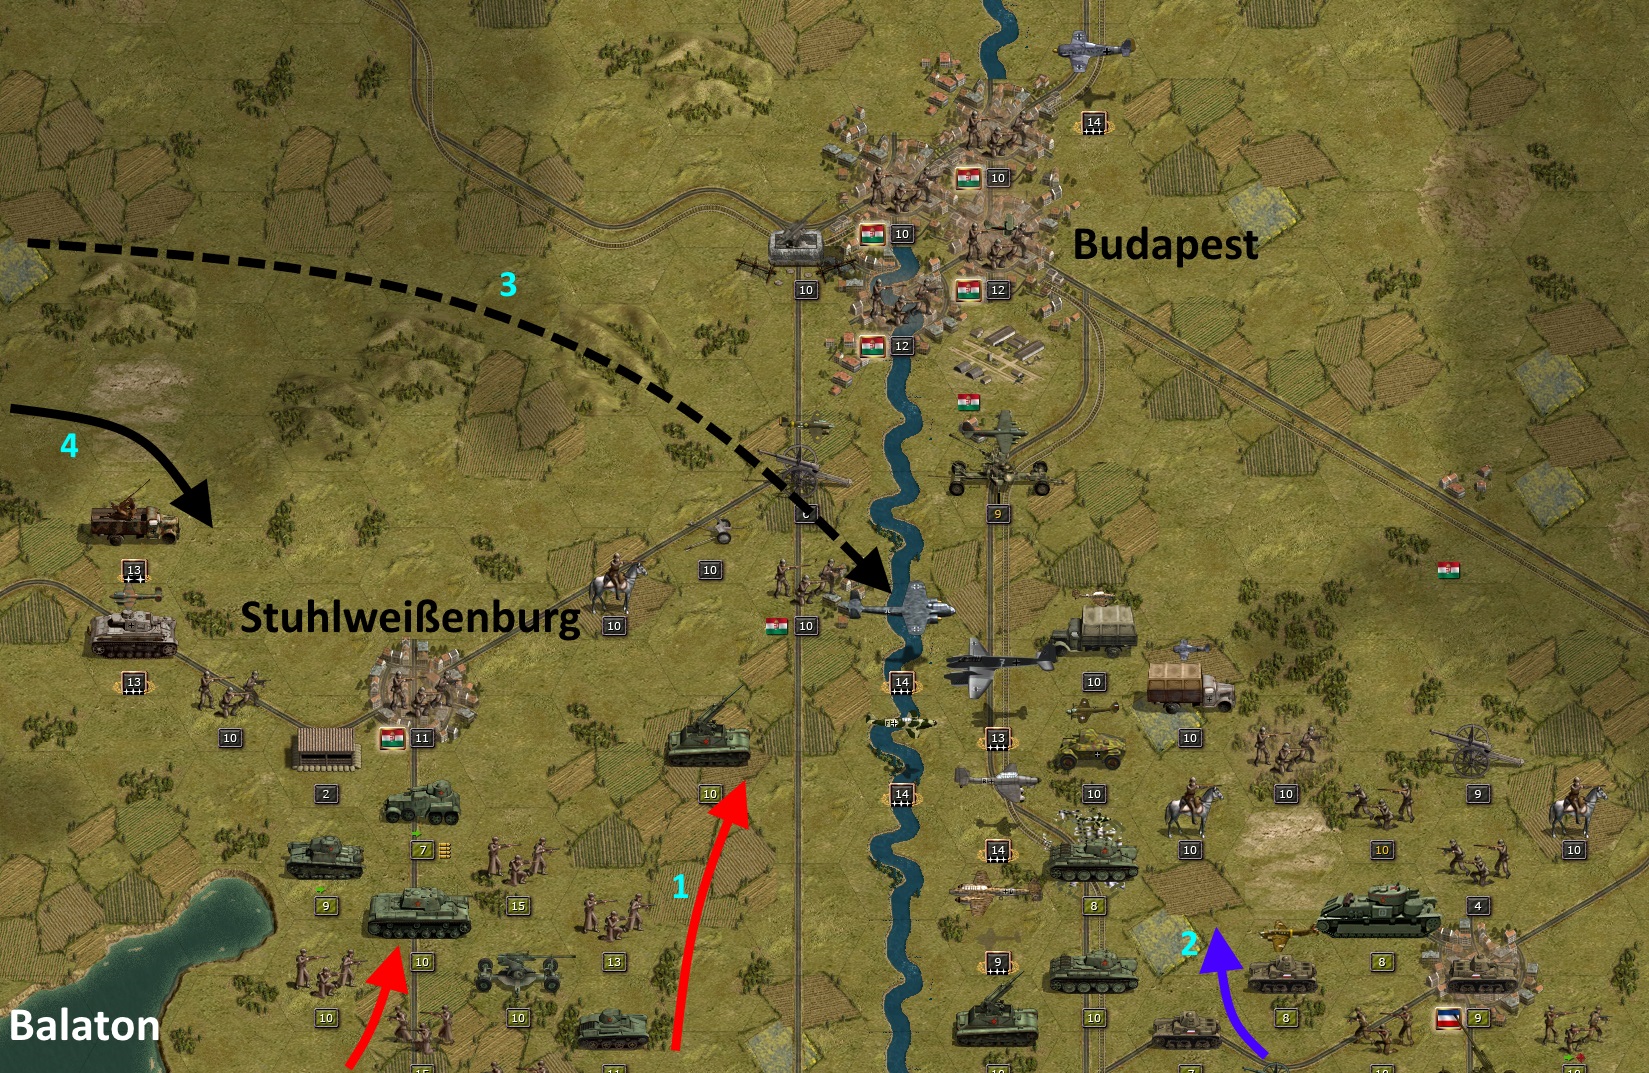
Turn 3. Soviets and Yugoslavs advance northwards on both sides of the Danube (1 + 2). Budapest is no longer far away. The own air units can already intervene in the fighting (3). However, the mobile flak of the Soviets will bring some losses. The own ground forces follow only gradually (4). The front is still mainly held by the Hungarian 1st Army.

At the same time, further east, superior Romanian forces attack Debreczin (1). After heavy artillery fire from the enemy, the Hungarians evacuate the town before they are annihilated (2). The Romanian artillery immediately follows (3). It is questionable whether the bridgehead on the other side of the Tisza can be held.
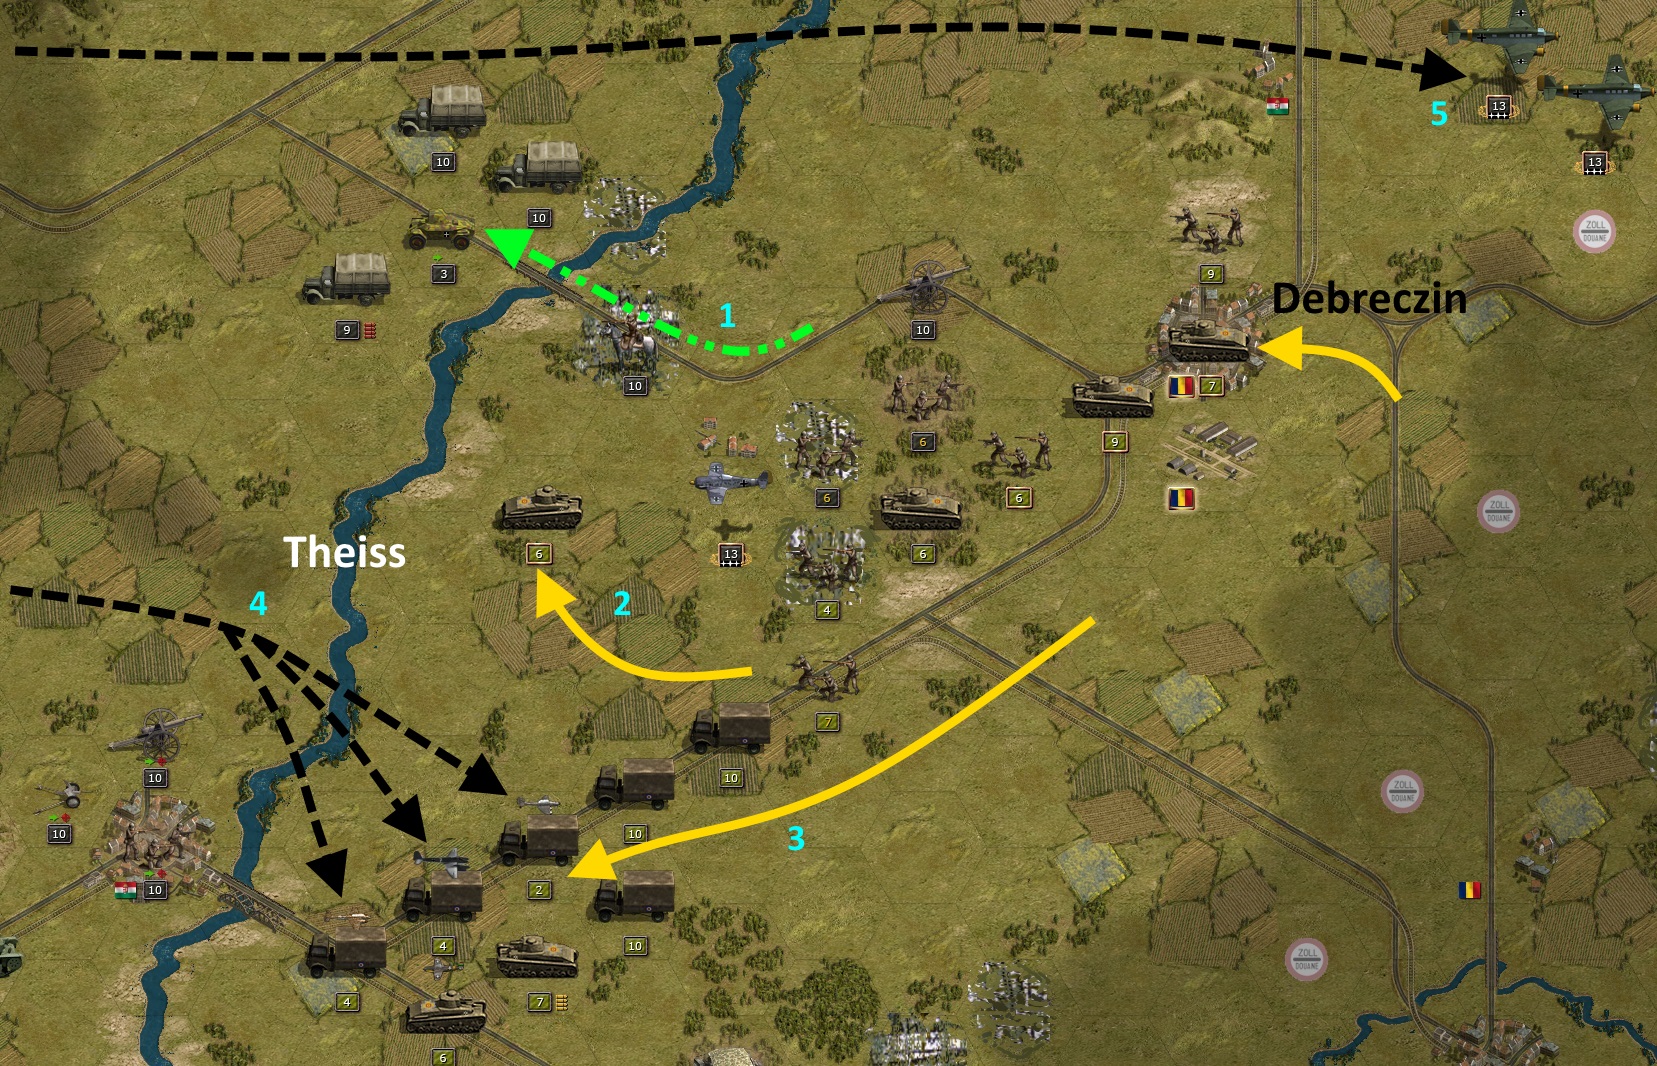
Turn 5. 2 turns later Debreczin has fallen and part of the Hungarian troops have been evacuated to the west side of the Tisza (1). Only a few slower units have stayed behind, covering the retreat and sacrificing themselves. A few Romanian units push on (2), while the mass is already heading for a new objective (3). However, the new Romanian advance is not covered well enough and is a wonderful invitation for my experienced bombers, which decimates the open transport column considerably (4). At the same time, on the far upper edge, two paratrooper detachments are still moving eastwards unnoticed to land northeast of Debreczin and retake the town (5).
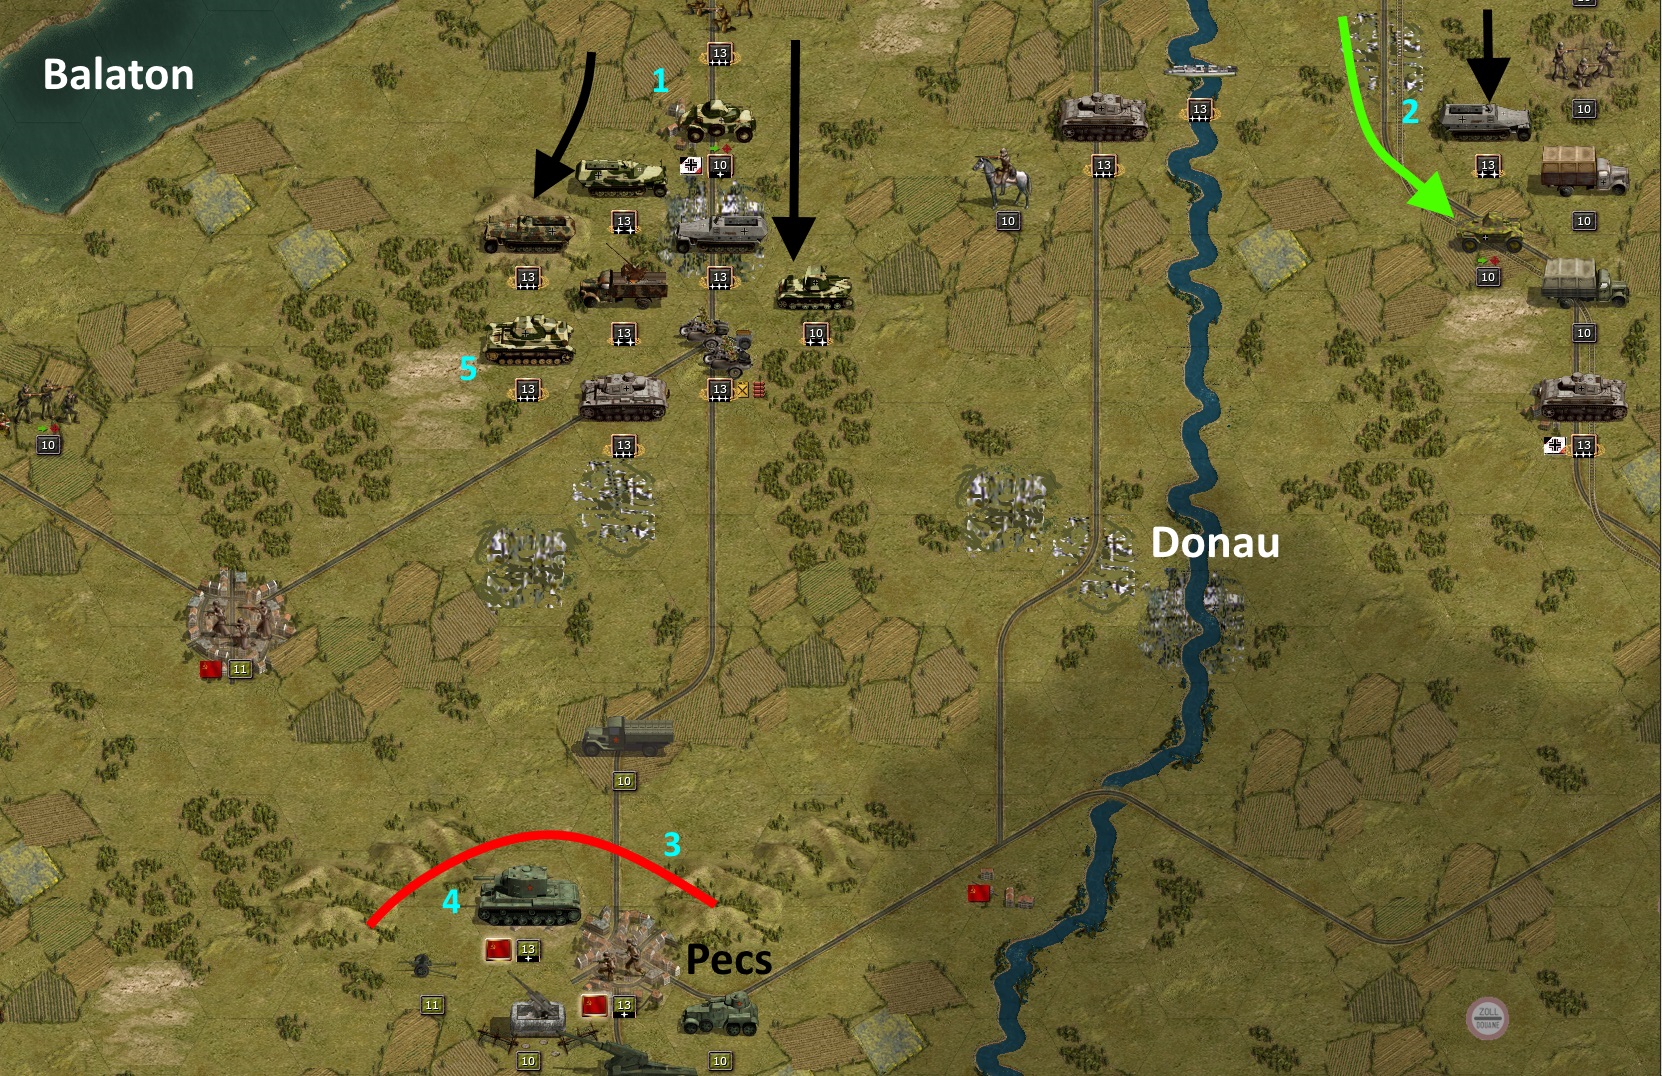
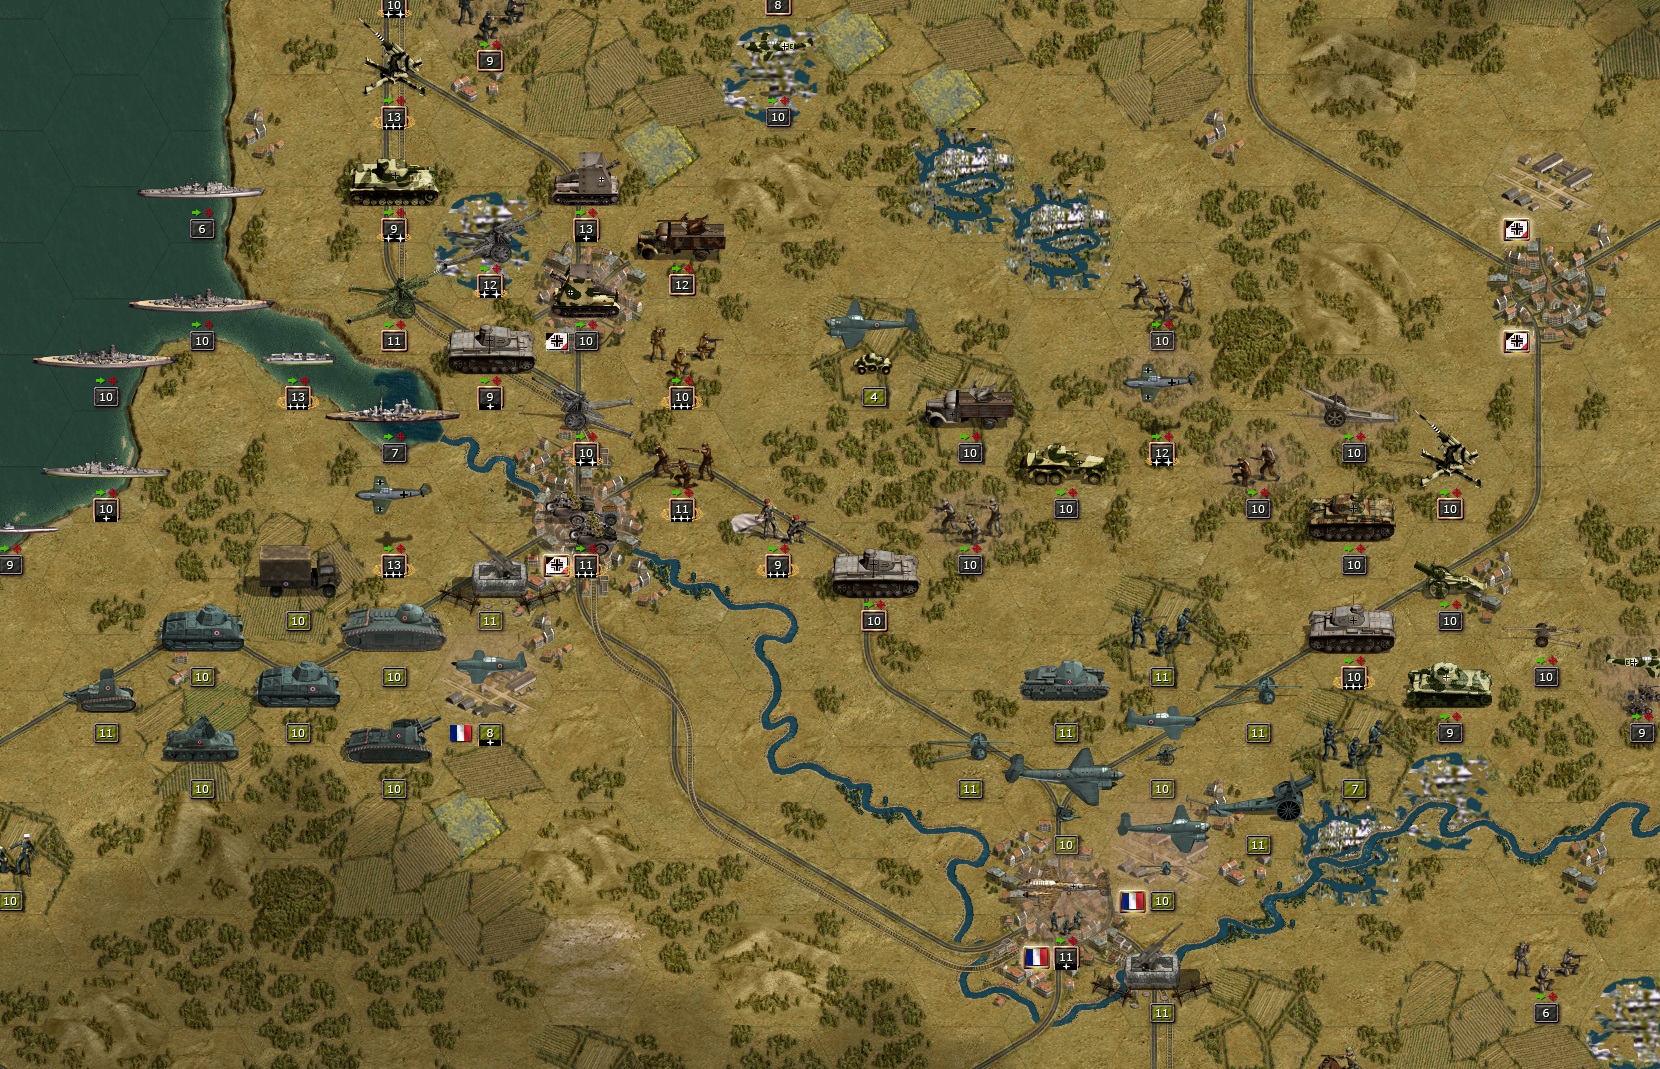
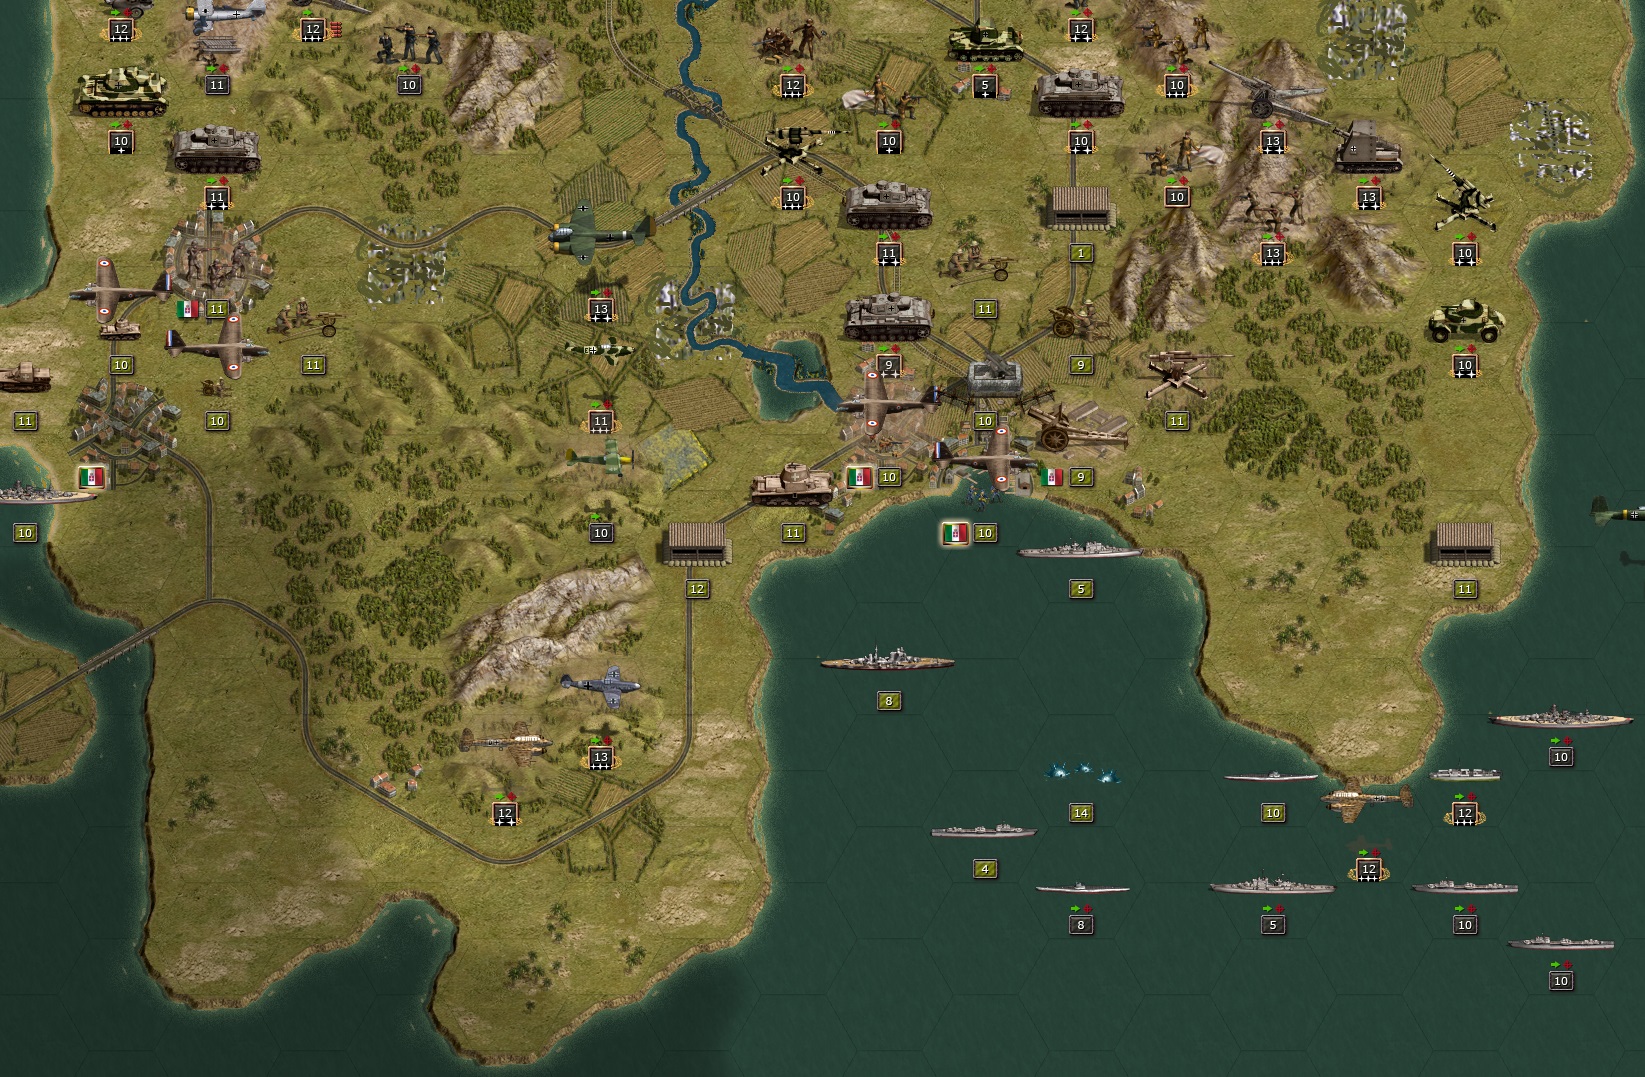
Turn 10. After the enemy attack troops have been crushed between Lake Balaton and the Danube, the own ground troops can advance southwards (1). East of the Danube, a mixed group is advancing (2). Near Pecs there is still a Soviet blocking force (3), including a KV2 tank with overstrength and heroes (4). The thing will beat up my Elite Panzer IV (5) quite badly a little later, so that it has to be pulled out of the line and is out for further turns of the scenario. Fortunately, the KV 2s don't have too much of an ammo supply. This allows them to take him down with air strikes and attacks from several ground units. Achilles, too, eventually had his heel.
By way of explanation, it should be mentioned that the campaign begins in Greece. In the run-up to the conflict, the Soviet Union succeeded in bringing large parts of the Balkans under its control without a fight. Romania, Bulgaria and Yugoslavia are allies of the USSR here. In Greece, however, a communist coup failed and the Greek military successfully fought back. This was followed by an invasion by the Bulgarians and Yugoslavs with the support of the Soviet Union. With Britain tied up in East Asia because of an impending war, the Greeks asked the German Empire for support, which was reluctantly granted. The German Empire thus "slid" into a war against the Soviet Union. In DAW's alternative history one is also reminded of the present of 2022.
On the general map you can see the group of islands in the west of Greece. The Strait of Otranto, considered the gateway to the Adriatic, is still visible at the top left. The Greek resistance on the mainland is abandoned and an evacuation is initiated. The player must now ship the Greek units and place them on specific points on the islands. The player's own ground core troops are not yet available in the first two scenarios. They are still on their way back from North Africa (see end of 2nd campaign). On the other side, however, only Soviet planes and paratroopers are in action. The actual ground combat in this scenario is fought by Yugoslavs and Greeks. The evacuation ports are Prewesa and Patras.
Here we see the island of Corfu in the centre in the northern section. The small Yugoslav naval forces are supporting some landings in the north and west of the island (1). The Greek destroyer 'Niki' is on an intercept course and will be able to inflict heavy losses on the Yugoslav transporter (2). More enemy troops are advancing from the north-east, intending to use the narrow crossing point to the island (3). Corfu is held by only a few Greek troops, but can soon be defended by German paratroopers.
In the southern section, the evacuation via Patras has begun (1). The ships set course for Sakinthos, Kefallinia and Ithaca (as Odysseus once did) to occupy the hexes marked 'C' (2). The old Greek battleship Lemnos covers the withdrawal (3). But the enemy attacks are taking place further north.
The evacuation has also started in the central section. Two smaller islands are already being approached (1). Here, however, enemy aircraft are already appearing. A Yugoslavian and a Soviet level bomber head for Prewesa and narrowly miss our own light cruiser Jeanne d'Arc (2). In addition, Soviet paratroopers in transport planes try to land near Prewesa. Conveniently, our own fighters are already on the ground (3), for whom the transports are easy prey. However, there is not much time left for the remaining Greeks to embark at this point, because Yugoslav ground units are already appearing on the right edge, pushing towards the harbour (4). German mountain troops, brought in by cargo ships, will help to cover the retreat.
Here is the 4th scenario "Ungarn (Hungary)" of the third campaign:
The overview map shows Lake Balaton (Plattensee), the Danube and the Tisza as larger bodies of water (from left to right). The 54th Soviet, 4 Yugoslav and 2 Romanian armies attack Budapest, Kecskemet and Debreczin to the north. The comparatively weak Hungarian forces must hold their positions as long as possible until our Core troops arrive via Raab for relief. In addition, a camp with Hungarian prisoners must be liberated as a special mission.
Turn 3. Soviets and Yugoslavs advance northwards on both sides of the Danube (1 + 2). Budapest is no longer far away. The own air units can already intervene in the fighting (3). However, the mobile flak of the Soviets will bring some losses. The own ground forces follow only gradually (4). The front is still mainly held by the Hungarian 1st Army.
At the same time, further east, superior Romanian forces attack Debreczin (1). After heavy artillery fire from the enemy, the Hungarians evacuate the town before they are annihilated (2). The Romanian artillery immediately follows (3). It is questionable whether the bridgehead on the other side of the Tisza can be held.
Turn 5. 2 turns later Debreczin has fallen and part of the Hungarian troops have been evacuated to the west side of the Tisza (1). Only a few slower units have stayed behind, covering the retreat and sacrificing themselves. A few Romanian units push on (2), while the mass is already heading for a new objective (3). However, the new Romanian advance is not covered well enough and is a wonderful invitation for my experienced bombers, which decimates the open transport column considerably (4). At the same time, on the far upper edge, two paratrooper detachments are still moving eastwards unnoticed to land northeast of Debreczin and retake the town (5).
Turn 10. After the enemy attack troops have been crushed between Lake Balaton and the Danube, the own ground troops can advance southwards (1). East of the Danube, a mixed group is advancing (2). Near Pecs there is still a Soviet blocking force (3), including a KV2 tank with overstrength and heroes (4). The thing will beat up my Elite Panzer IV (5) quite badly a little later, so that it has to be pulled out of the line and is out for further turns of the scenario. Fortunately, the KV 2s don't have too much of an ammo supply. This allows them to take him down with air strikes and attacks from several ground units. Achilles, too, eventually had his heel.
-
rubyjuno
- Sergeant First Class - Panzer IIIL
- Posts: 382
- Joined: Mon Sep 21, 2015 1:18 pm
- Location: Northumberland
Re: DAW - Der andere Weg - The other way
Great pictures and explanations. You've obviously put a lot of thought and work into this. Excellent!
-
Sonja89_1
- Administrative Corporal - SdKfz 251/1
- Posts: 142
- Joined: Sun Jul 04, 2021 4:27 pm
- Location: Holstein, Germany
Re: DAW - Der andere Weg - The other way
Thank you for your kind words. I was on this project from mid-2015 - mid-2020. In these 5 years, several years of work have gone into it. But I have already described elsewhere that by having fun with it, you don't really perceive it as work.
By the way, I had already presented these examples that I am posting here about DAW on the pages of DMP in German. So I am using existing material to show interested players a little more closely what is behind this MOD. This makes it easier for a player to decide whether he can do something with these campaigns.
I will also show more examples here in the coming months.
-
Sonja89_1
- Administrative Corporal - SdKfz 251/1
- Posts: 142
- Joined: Sun Jul 04, 2021 4:27 pm
- Location: Holstein, Germany
Re: DAW - Der andere Weg - The other way
Once again, there is a brief insight into a scenario of the third campaign. It is the 12th scenario "Griechenland" ("Greece") about the Balkan Path.
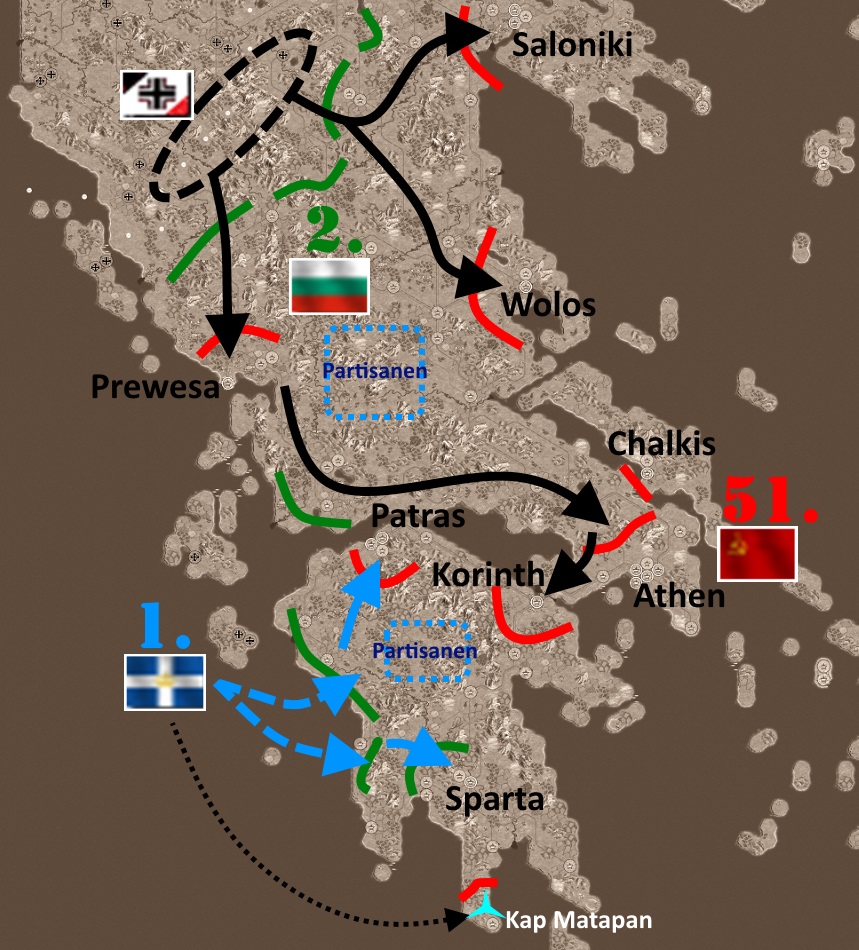
You can see large parts of Greece on the overview map. This scenario takes place on a very large map, but this does not mean that things are particularly tough. The aim is to reconquer Greece. In the process, your own core units will come from Macedonia in the north, while primarily Greek troops are to liberate the Peloponnese peninsula. In between, there are still Greek partisans fighting on their own side. The area is defended by Bulgarians and Soviets.
2nd round. Greek landing troops move towards the Peloponnese (1). In addition, Greek paratroopers land further east to screen the battle area (2). German air forces, ships and airborne troops together with a spy group (in transport aircraft) join the attack (3). The small, inserted map (4) shows how large the entire map of this mission is.
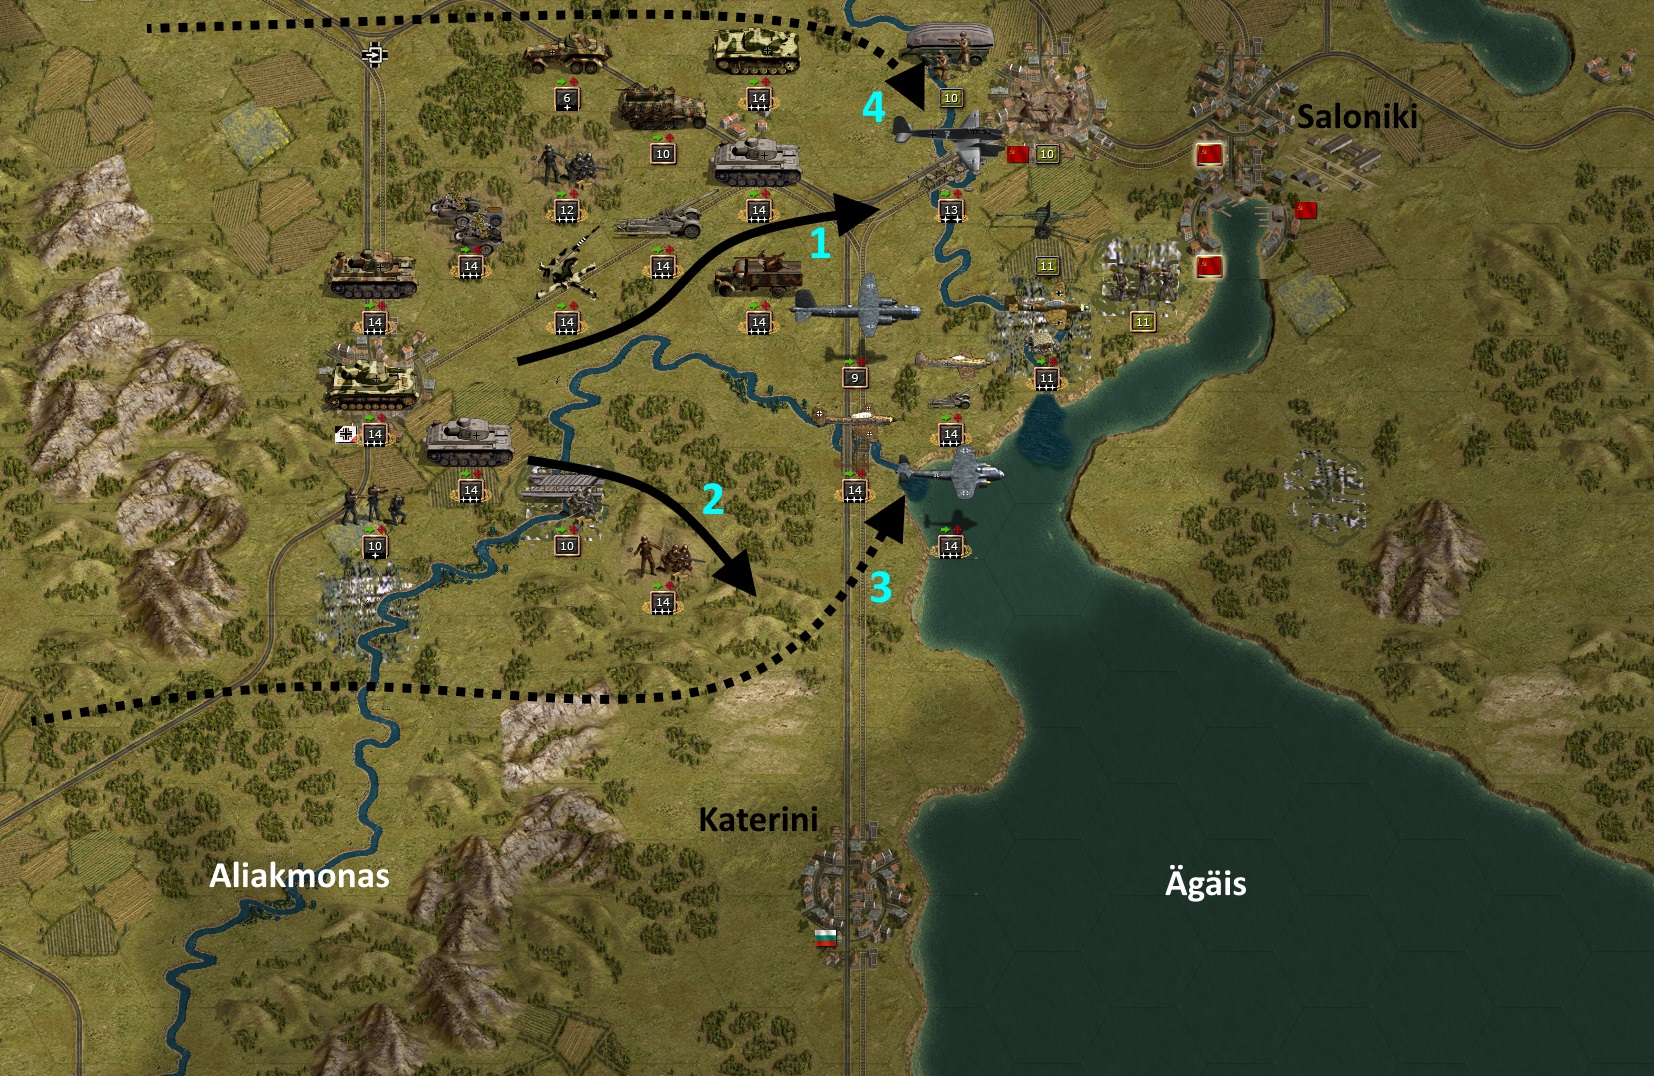
Turn 6. In the far north, the own core units go over to the attack on the important port city of Salonika, which is defended by Soviets (1). At the same time, infantry crosses the Aliakmonas River and is already oriented towards the south in order to advance along the east coast (2). The own planes are proceeding in a concentrated manner (3). Among them is a FW 187, which intervenes in the ground fight (4).
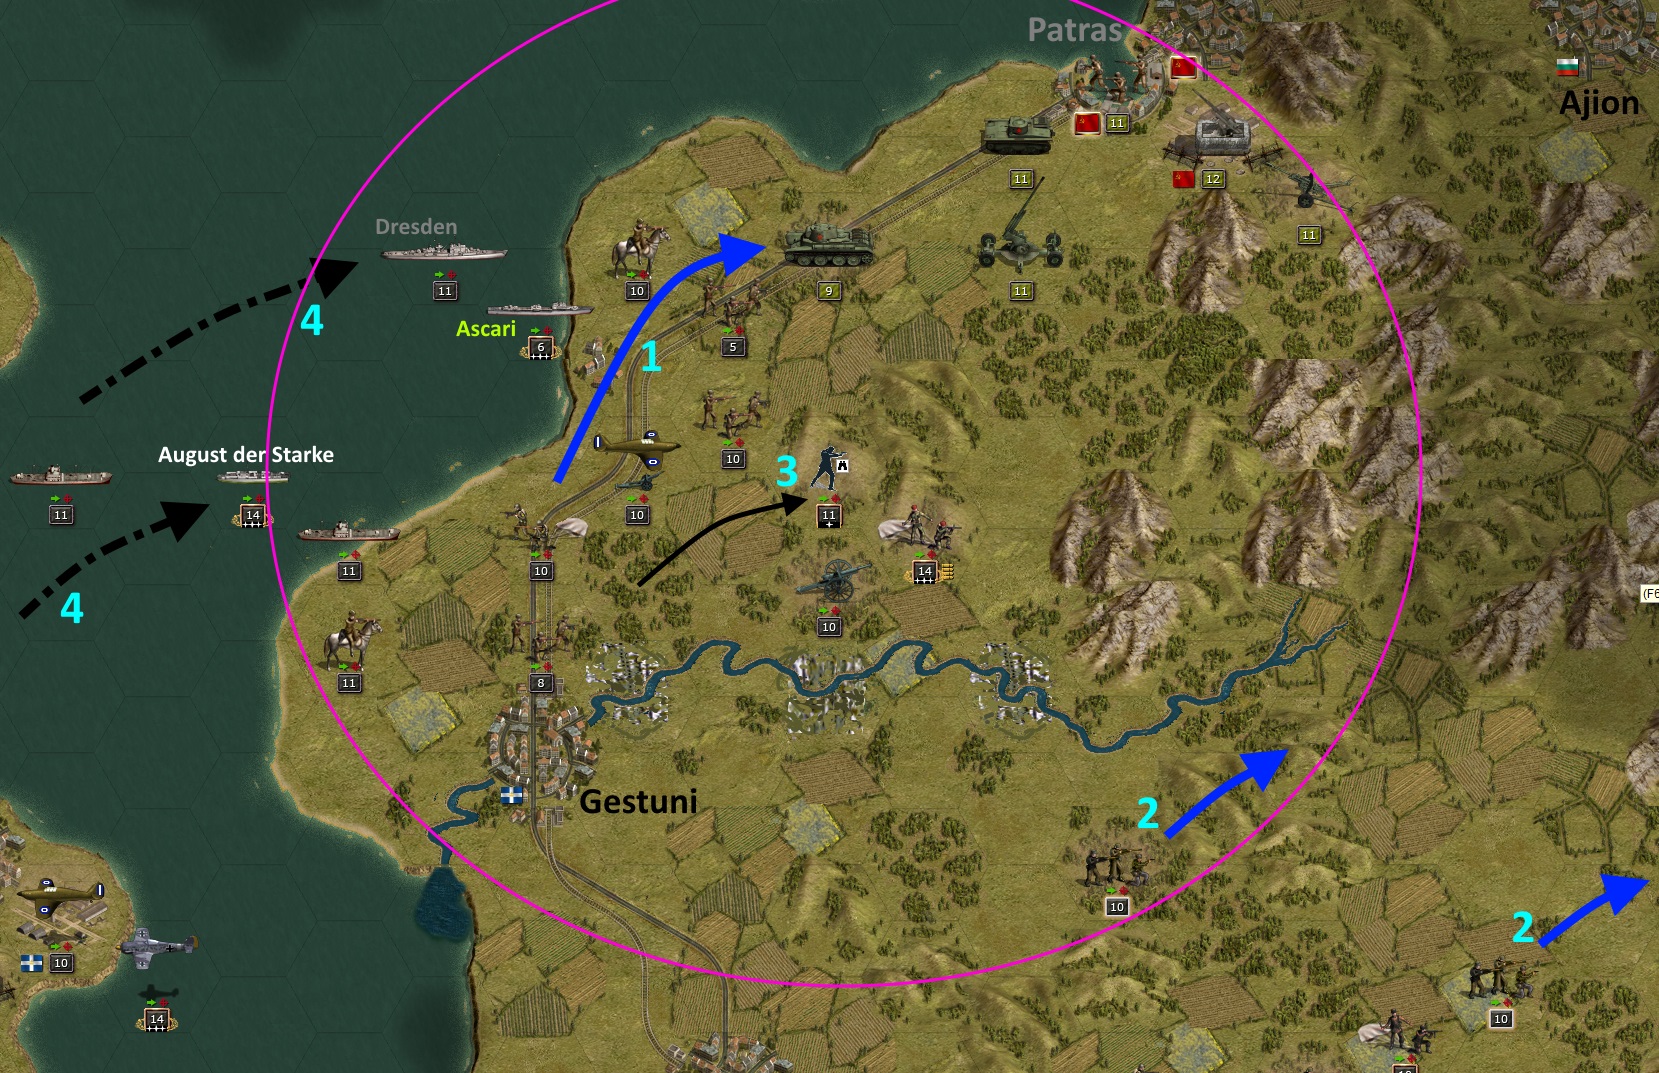
10th round. In the meantime, the Greeks have gained a foothold on the Peloponnese peninsula and are advancing on Patras. Soviet units interpose themselves (1). Greek partisans flank in support (2). An own spy group probes the apron up to Patras and provides important information (field of view approximately within the pink circle)(3). Own ships cover the northern flank (4). Among them is the Italian destroyer "Ascari", which is one of the own core forces and was previously damaged by a Bulgarian level bomber.
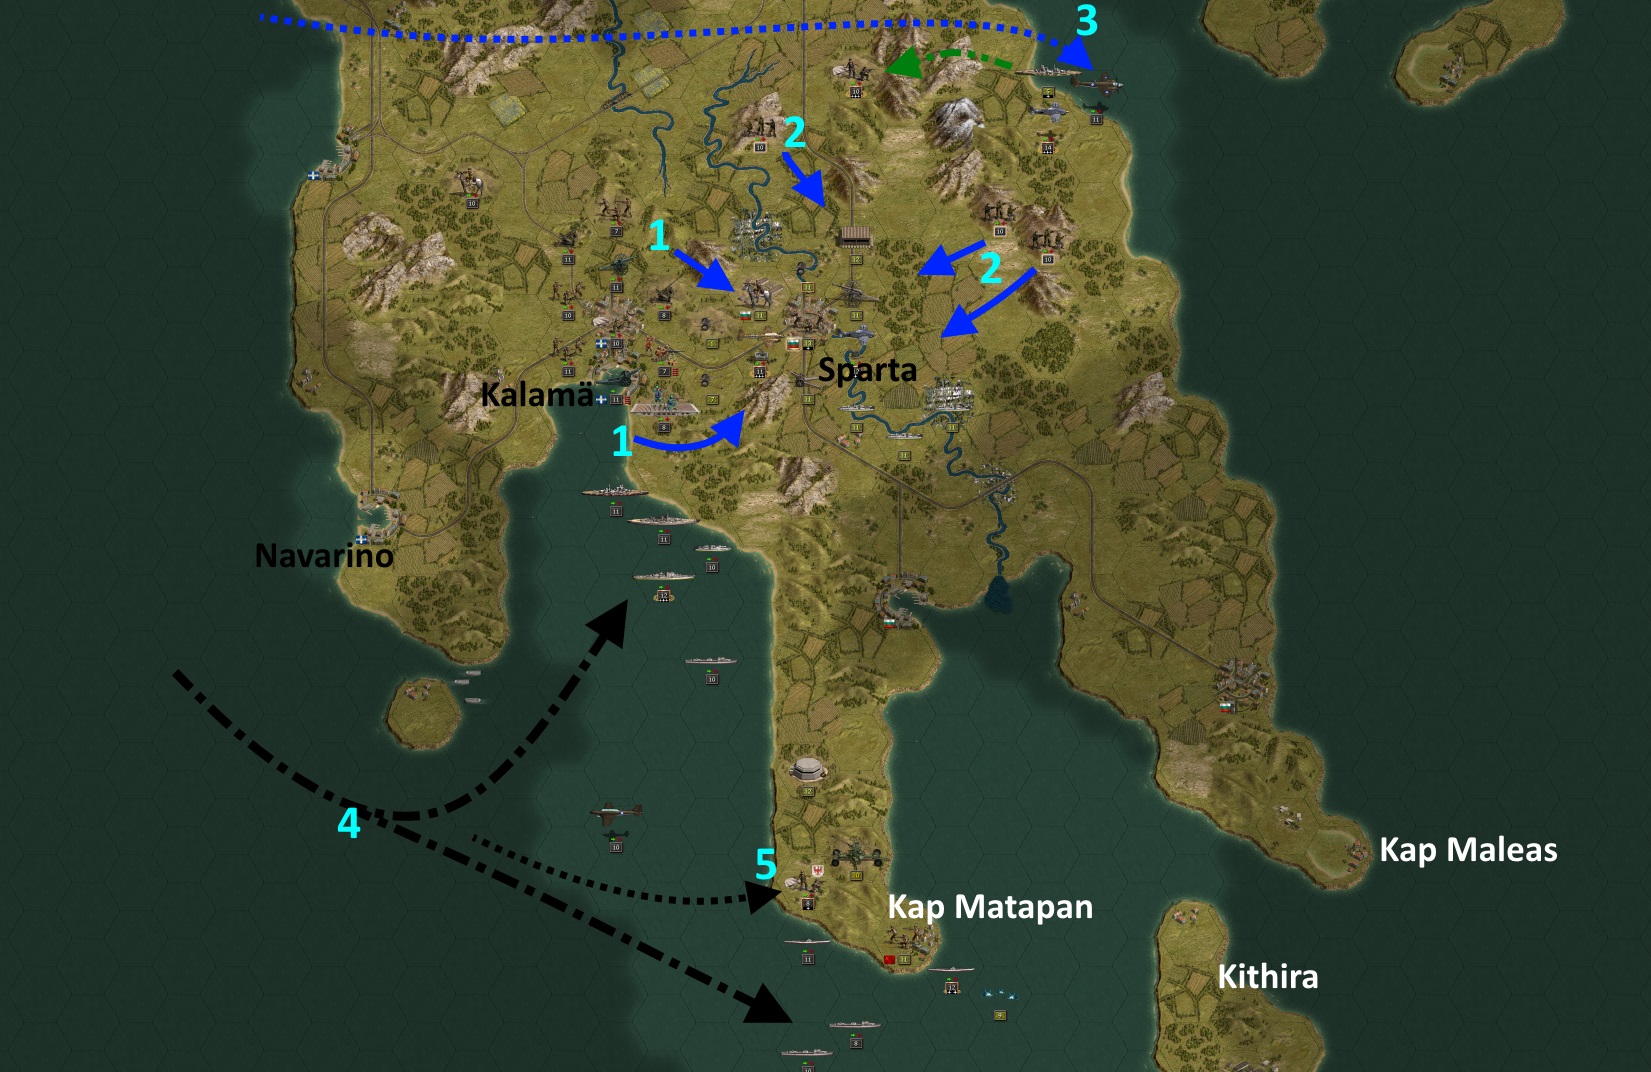
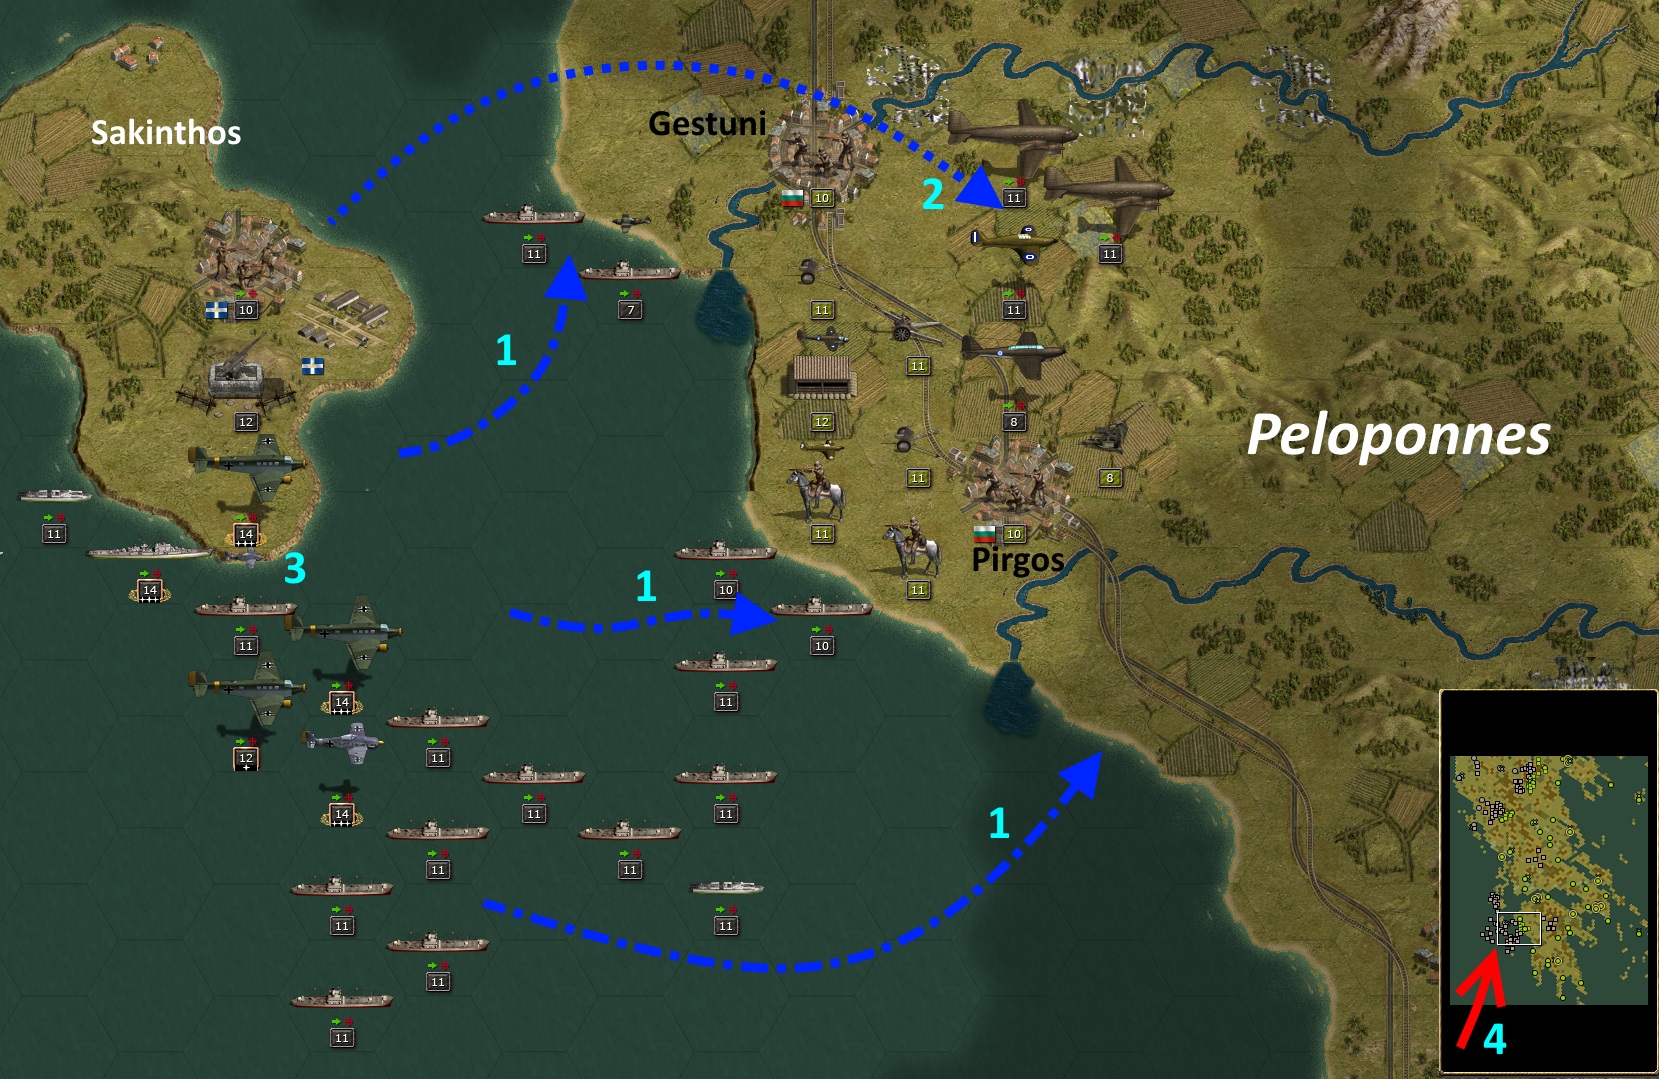
Round 21. The last sample map in wide view mode. In the meantime, the Greek troops have also advanced further in the south of the peninsula. They are advancing towards Sparta together with the partisans (1+2). A Greek level bomber attacks a Bulgarian heavy cruiser, which gives disruptive fire into its own flank (3). Meanwhile, on the south coast, heavy friendly ships advance, giving supporting fire in the attack on Sparta (4). A special action by a Brandenburg unit at Cape Matapan was successful. A heavy Soviet fortress preventing the advance of the own fleet was eliminated (no longer visible)(5). This action resembles the operation from the feature film "The Guns of Navarone" with Gregory Peck and David Niven only with different parties.
You can see large parts of Greece on the overview map. This scenario takes place on a very large map, but this does not mean that things are particularly tough. The aim is to reconquer Greece. In the process, your own core units will come from Macedonia in the north, while primarily Greek troops are to liberate the Peloponnese peninsula. In between, there are still Greek partisans fighting on their own side. The area is defended by Bulgarians and Soviets.
2nd round. Greek landing troops move towards the Peloponnese (1). In addition, Greek paratroopers land further east to screen the battle area (2). German air forces, ships and airborne troops together with a spy group (in transport aircraft) join the attack (3). The small, inserted map (4) shows how large the entire map of this mission is.
Turn 6. In the far north, the own core units go over to the attack on the important port city of Salonika, which is defended by Soviets (1). At the same time, infantry crosses the Aliakmonas River and is already oriented towards the south in order to advance along the east coast (2). The own planes are proceeding in a concentrated manner (3). Among them is a FW 187, which intervenes in the ground fight (4).
10th round. In the meantime, the Greeks have gained a foothold on the Peloponnese peninsula and are advancing on Patras. Soviet units interpose themselves (1). Greek partisans flank in support (2). An own spy group probes the apron up to Patras and provides important information (field of view approximately within the pink circle)(3). Own ships cover the northern flank (4). Among them is the Italian destroyer "Ascari", which is one of the own core forces and was previously damaged by a Bulgarian level bomber.
Round 21. The last sample map in wide view mode. In the meantime, the Greek troops have also advanced further in the south of the peninsula. They are advancing towards Sparta together with the partisans (1+2). A Greek level bomber attacks a Bulgarian heavy cruiser, which gives disruptive fire into its own flank (3). Meanwhile, on the south coast, heavy friendly ships advance, giving supporting fire in the attack on Sparta (4). A special action by a Brandenburg unit at Cape Matapan was successful. A heavy Soviet fortress preventing the advance of the own fleet was eliminated (no longer visible)(5). This action resembles the operation from the feature film "The Guns of Navarone" with Gregory Peck and David Niven only with different parties.
-
Sonja89_1
- Administrative Corporal - SdKfz 251/1
- Posts: 142
- Joined: Sun Jul 04, 2021 4:27 pm
- Location: Holstein, Germany
Re: DAW - Der andere Weg - The other way
Once again, there is a brief insight into a scenario of the third campaign. It is the 18th scenario "Arkhangelsk" about the northern path. The scenario is set in August 1943 and marks the end of the fighting in the northern section.
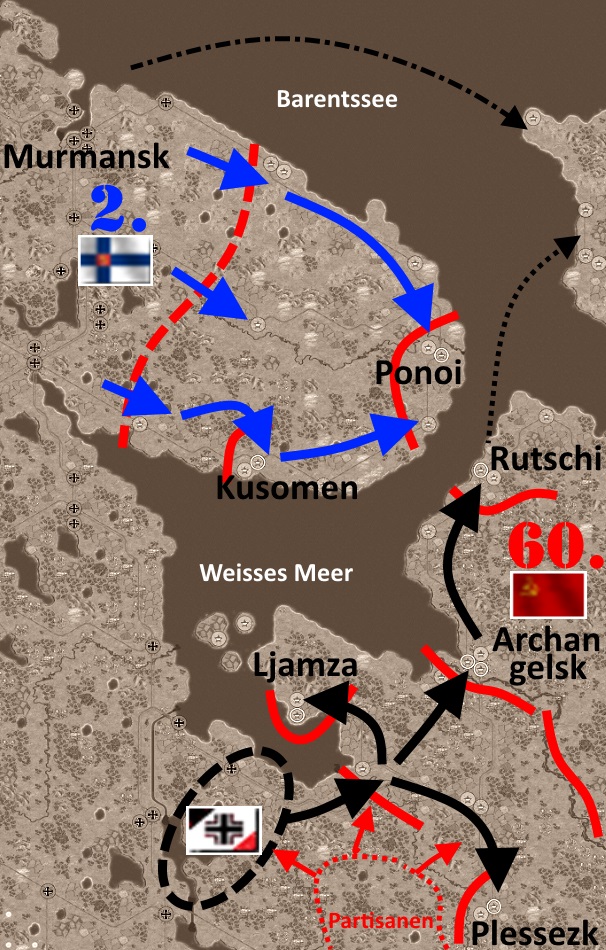
On the overview map you quickly recognise two battle areas. On the one hand, the Kola Peninsula has to be fought free with mainly Finnish units, and on the other hand, the Soviet port cities (especially Arkhangelsk) have to be captured with the core units along the southern shore of the White Sea and the Red Fleet's bases taken away.
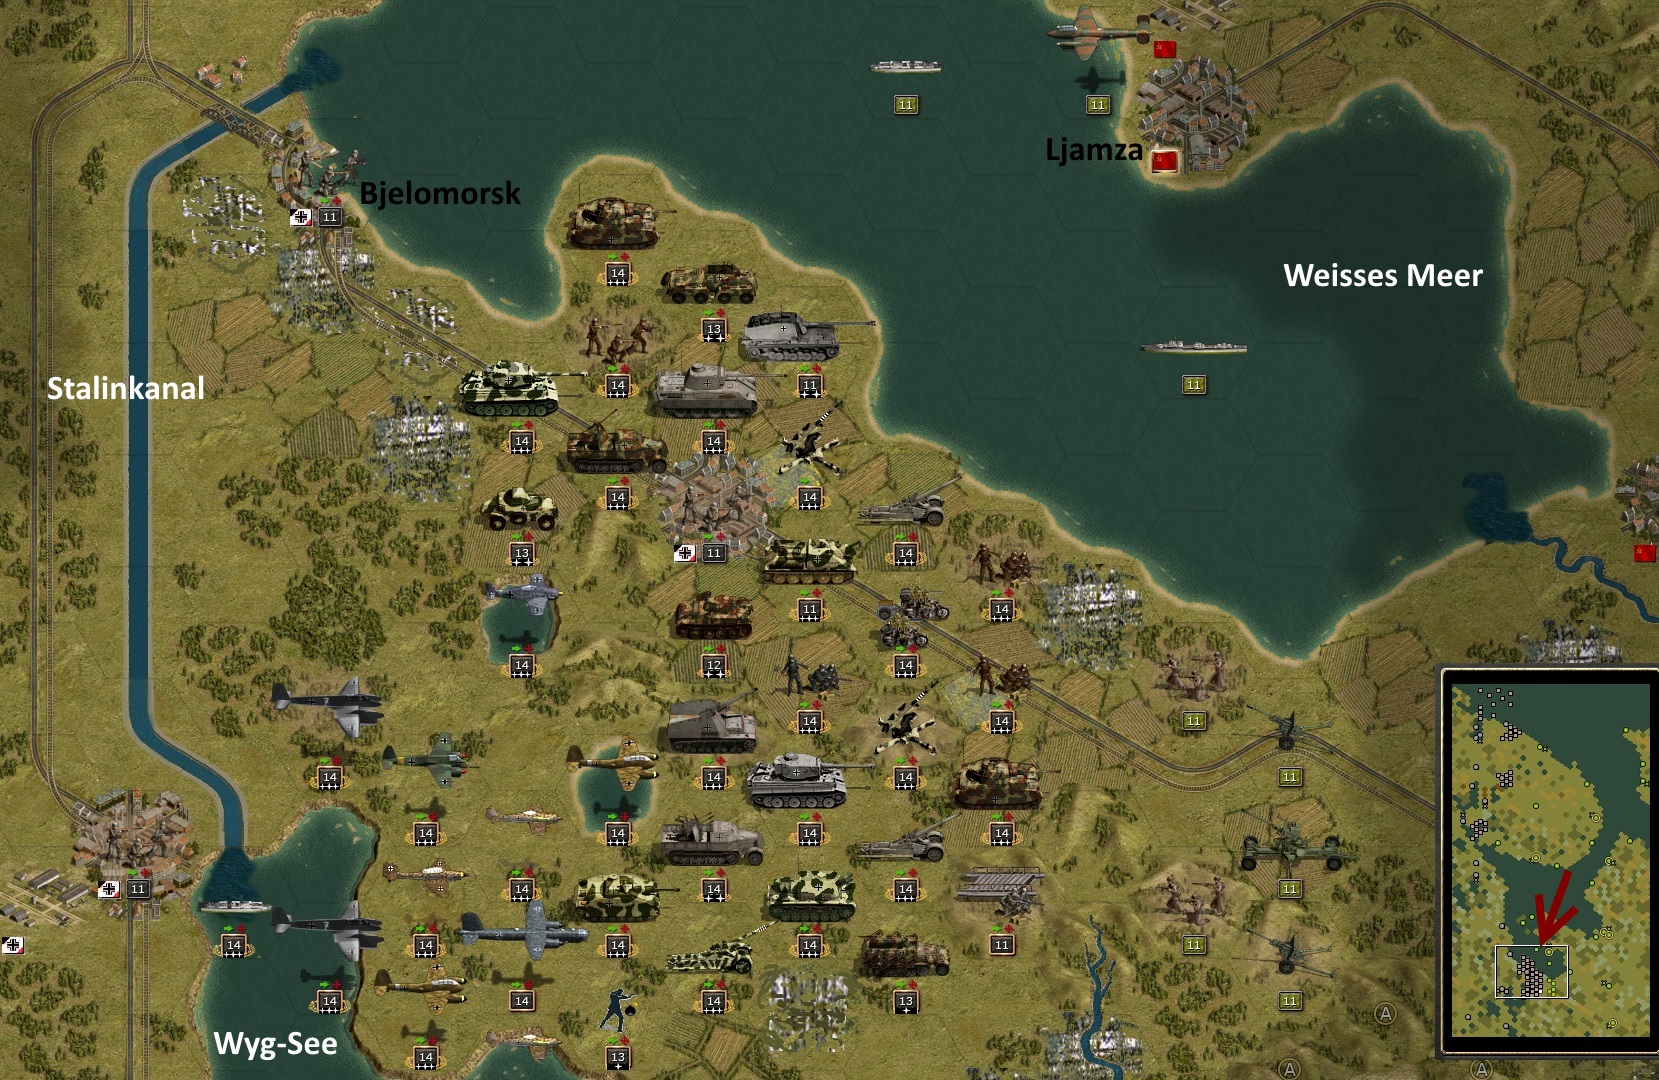
The first picture shows the initial position of the core units before the first round. On the left you can see the Stalin Canal, which provides a connection from the White Sea via Lake Wyg to Lake Onega further south.

4th round - In the far north, Finnish units are cautiously advancing towards Charlowka (1). Again and again there are light counterattacks by the Soviets (2). Our own navy provides decisive support (3). Soviet capital ships could hardly be expected. But enemy destroyers and especially submarines must be reckoned with. To the west, Murmansk and the port of Polyarny, which were captured in a previous scenario, are still visible.
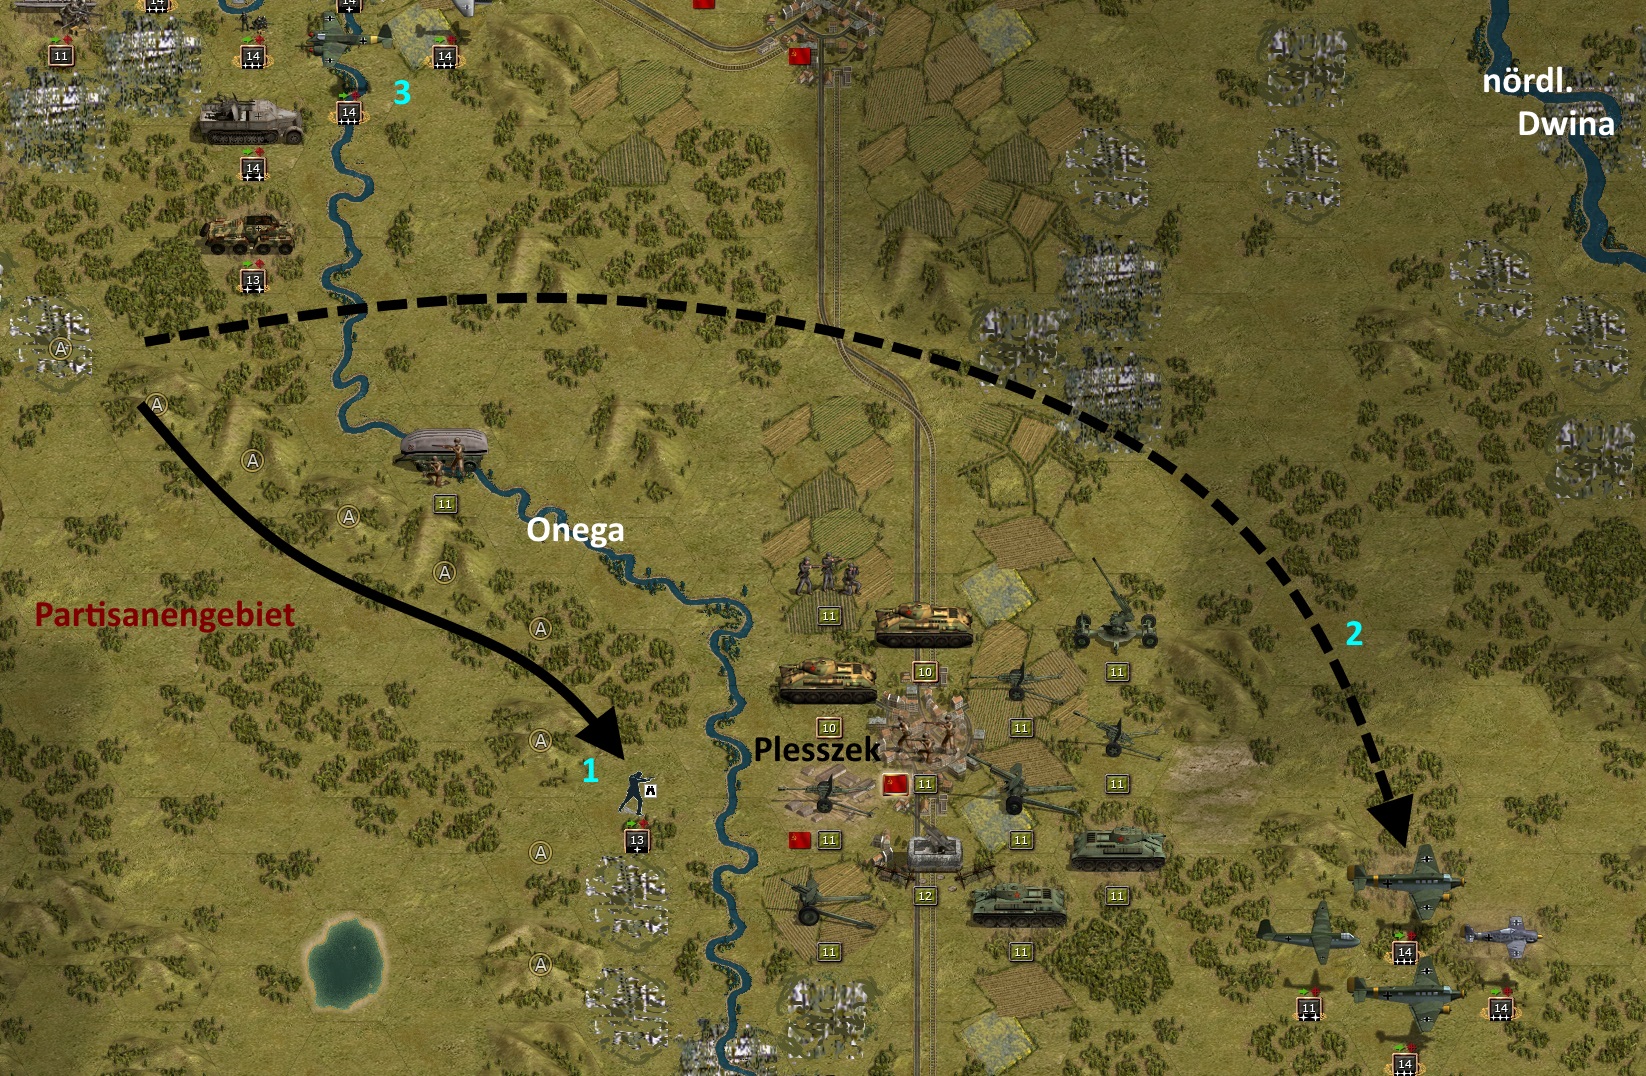
Turn 4 - At the same time, the main offensive in the south begins. The own spy group goes ahead of the troops and spies out the Plesszek region (1). Paratroopers follow immediately and deploy behind the town (2). Meanwhile, the remaining ground troops are just reaching the Onega River (3).
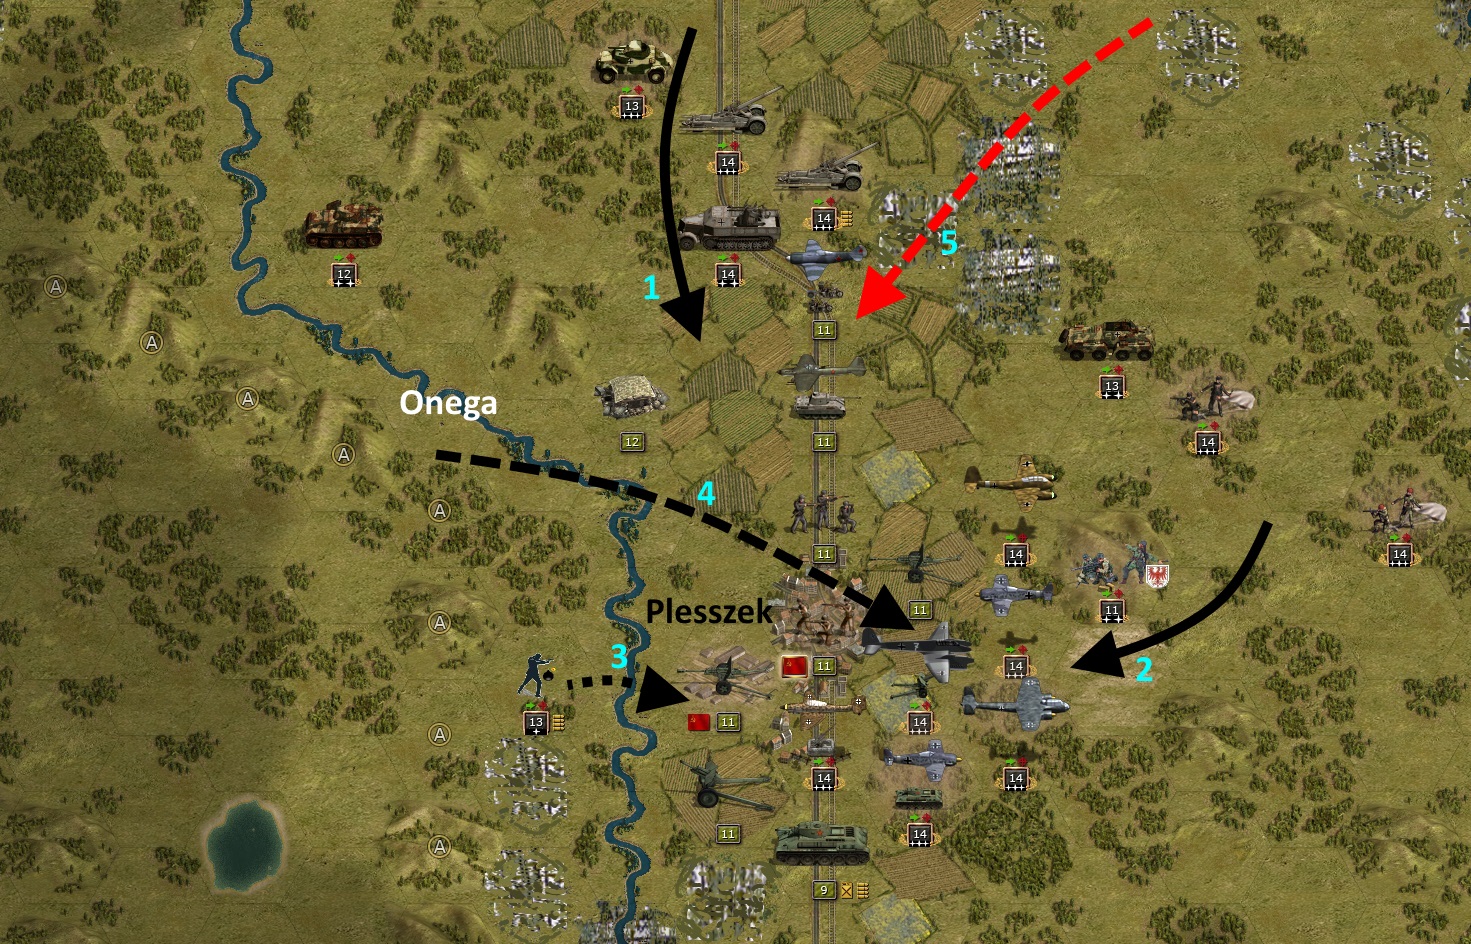
Turn 7 - The ground troops have crossed the Onega with enough troops and are advancing towards Plesszek (1). At the same time, the paratroopers, who have meanwhile landed at a safe distance, are attacking from the east together with Brandenburgers (2). The spy group has 'switched over' and is carrying out disruptive attacks by sabotage (3). The own air force supports the attack decisively (4). However, enemy planes also repeatedly drive into our own troops (5).
On the overview map you quickly recognise two battle areas. On the one hand, the Kola Peninsula has to be fought free with mainly Finnish units, and on the other hand, the Soviet port cities (especially Arkhangelsk) have to be captured with the core units along the southern shore of the White Sea and the Red Fleet's bases taken away.
The first picture shows the initial position of the core units before the first round. On the left you can see the Stalin Canal, which provides a connection from the White Sea via Lake Wyg to Lake Onega further south.
4th round - In the far north, Finnish units are cautiously advancing towards Charlowka (1). Again and again there are light counterattacks by the Soviets (2). Our own navy provides decisive support (3). Soviet capital ships could hardly be expected. But enemy destroyers and especially submarines must be reckoned with. To the west, Murmansk and the port of Polyarny, which were captured in a previous scenario, are still visible.
Turn 4 - At the same time, the main offensive in the south begins. The own spy group goes ahead of the troops and spies out the Plesszek region (1). Paratroopers follow immediately and deploy behind the town (2). Meanwhile, the remaining ground troops are just reaching the Onega River (3).
Turn 7 - The ground troops have crossed the Onega with enough troops and are advancing towards Plesszek (1). At the same time, the paratroopers, who have meanwhile landed at a safe distance, are attacking from the east together with Brandenburgers (2). The spy group has 'switched over' and is carrying out disruptive attacks by sabotage (3). The own air force supports the attack decisively (4). However, enemy planes also repeatedly drive into our own troops (5).