


Hi Folks
Just a heads up that FoGN will be offered at Battlecry next year.
Venue is the Remuera Bridge Club, Auckland New Zealand (same as last year)
Dates are the weekend of 20th and 21st February.
I'll work on a player's pack over the next fortnight, but likely 800 points & scenarios.
More info to follow in due course.
Cheers
Brett
Battlecry - Auckland 2016
Moderators: terrys, hammy, Blathergut, Slitherine Core

Re: Battlecry - Auckland 2016
Yeehaaaaa
-
BrettPT
- Lieutenant Colonel - Panther D

- Posts: 1266
- Joined: Tue Jan 20, 2009 8:52 am
- Location: Auckland, NZ
Re: Battlecry - Auckland 2016
Well, another fun tournament. 10 players played 4 games each, 3 scenario and one 'normal' game (on pre-set terrain).
The scenarios used this time were Durnstein, Austerlitz, Teugen-Hausen, Hanau & Quatre Bras.
It looks like we now have Quatre Bras balanced. Teugen-Hausen needs a further small tweaking to help the defender.
Anyway, the results:
1st Phillip (1815 Anglo-Dutch) -86pts
2nd Andy D. (1813 Prussians) -76pts
3rd Mike (1814 French) -63pts
4th Brett (1795 French) -62pts
5th Lawrence (1812 Russians) -60pts
6th Kendall (1805 Anglo-Russian)-46pts
7th Andy H. (1794 Sardinians) -31pts
8th Al (1809 Anglo-Spanish) -27pts
8th Kit (1815 British) -27pts
10th Stu (1813 Russian) -22pts
Best Painted - Lawrence whose Russians are stunning
Coolest Army - Andrew H - vast horde of crappy ancient regime infantry with hardly a cavalryman or gunner in sight.
Congrats to Philip. Led from the front all the way through and disposed of a stern challenge from Andy Duncan at Austerlitz in the last round.
My thanks to all who attended.

Re: Battlecry - Auckland 2016
Any chance we could have a look at the lists? Especially interested in the Anglo-Dutch 1815.
-
Philip
- Administrative Corporal - SdKfz 232 8Rad

- Posts: 168
- Joined: Wed Jan 21, 2009 6:21 pm
- Location: Auckland, New Zealand
Re: Battlecry - Auckland 2016
Anglo-Netherlands Army in Belgium 1815
800 points, 28 ACV
Corps Commander (Skilled, Charismatic) The Duke of Wellington
British Infantry Division
Divisional Commander (Skilled) Lt.-Gen. Sir Charles Alten
British Line Infantry - Small Superior Veteran
British Line Infantry - Large Average Veteran
British Medium Foot Artillery - Small Average Veteran
Hanoverian Line Infantry - Large Average Drilled
British Cavalry Division
Divisional Commander (Competent) Maj.-Gen. Sir W. Ponsonby
Impetuous Shock Heavy Cavalry - Small Average Drilled
Impetuous Shock Heavy Cavalry - Small Average Drilled
Attachments for British Divisions after terrain
Rifle Skirmisher
Medium Artillery
Medium Artillery
Cavalry
Netherlands Infantry Division
Divisional Commander (Competent, Allied) Lt.-Gen. Baron de Perponcher
Nassau reformed Line Infantry - Small Poor Drilled
Dutch-Belgian reformed Line Infantry - Large Average Drilled
Dutch-Belgian reformed Line Infantry - Small Average Conscript
Dutch reformed Line Infantry - Large Poor Conscript
Netherlands Cavalry Division
Divisional Commander (Competent, Allied) Maj.-Gen. de Ghigny
Dutch-Belgian Light Cavalry - Small Average Drilled, Artillery attachment
Dutch-Belgian Light Cavalry - Small Average Drilled
-
Daemionhunter
- Corporal - Strongpoint

- Posts: 70
- Joined: Fri Jan 10, 2014 8:41 am
Re: Battlecry - Auckland 2016
I've got a long battle report of the tournament ready to post but want to include images of the scenario maps. How do I do this?
Re: Battlecry - Auckland 2016
Thanks for publishing the list. I almost have most of the elements that you used. I especially want to run it with Dutch Belgians so am pleased you did.
Last edited by geoff on Mon Feb 22, 2016 10:09 am, edited 1 time in total.
-
ravenflight
- Brigadier-General - 15 cm Nblwf 41

- Posts: 1966
- Joined: Wed Aug 26, 2009 6:52 am
Re: Battlecry - Auckland 2016
Probably blog it and link it here would be best way.Daemionhunter wrote:I've got a long battle report of the tournament ready to post but want to include images of the scenario maps. How do I do this?
-
Daemionhunter
- Corporal - Strongpoint
- Posts: 70
- Joined: Fri Jan 10, 2014 8:41 am
Re: Battlecry - Auckland 2016
Napoleonics tournament report
I like reading battle reports so here are a few of mine from the just completed Battlecry convention in Auckland New Zealand.
We played with a few modifications to the rules in regard to terrain and light infantry and few other things. I am sure Brett, the tournament organiser, will post these for interested parties to review.
The tournament results were:
First: Philip Abela
Second: Andrew Duncan (me)
Third: Mike Haycock
My list was Prussian 1813-1814 Autumn
Exceptional Charismatic Corps Commander
(despite not getting a reroll for rallies in this tournament I’m too impatient to be the defender so spent the points any way)
Initiative of +6
12 units
ACV 29
First Mixed Division
Competent DC
Average Drilled Infantry with Medium Artillery and Rifle Skirmish
Average Drilled Infantry with Rifle Skirmish
Large Poor Conscript Infantry
Large Average Drilled Heavy Cavalry with an Officer
Large Average Drilled Medium Artillery Battery
Second Mixed Division
Competent Charismatic DC
Average Drilled Infantry with Medium Artillery and Rifle Skirmish
Small Average Drilled Horse Artillery Battery
Large Average Conscript Light Cavalry with Lances and an Officer
Average Drilled Infantry with Rifle Skirmish
Large Poor Conscript Infantry
Third Cavalry Division
Competent Charismatic DC
Small Average Drilled Light Cavalry
Average Veteran Shock Heavy Cavalry
Battle Reports
For the scenarios, the first three games, I’ve included the mission rules after each report.
Game One: Teugen-Hausen
This is a new mission designed by Brett.
I played Mike Haycock. He had an 1814? French list with four batteries of guns, 3 light infantry units and a Guard division and some light cavalry with infantry etc. Perhaps Brett will post the lists.
Despite both of us having played the mission before to test it out we were too keen to get stuck in and just paid attention to the deployment rules. I asked Mike who went first. He said me. Neither of us checked! So I went first and won.
This mission has the defender strung out along the road guarding the baggage/supplies/pay for the rest of the French army. They start in column of march with at least one division in each sector between the road and a couple of wooded hills. They need to protect the baggage long enough for it to get off the far board edge down the road. This takes 7 turns at 10 inches a turn.
Mike left his cavalry off, defender only gets 650 points and has to take his cavalry off first. He then deployed an infantry division in each sector with his Guard division protecting the exit point.
I deployed my cavalry division as far to the left in the rear sector as I could to go through the woods and tie up his rear division. My first mixed division deployed centrally. The second mixed division put its drilled infantry at the right edge of the left most sector to support the central sector. This divisions Landwehr infantry and cavalry and horse guns were going to go through the gap near the exit point to tie up the Guards.
I tied up Mike’s rear and frontal sectors and hammered through the middle to capture the baggage etc.
Neither of us remembered the who goes first issue until recounting events to Brett afterwards. I would have felt a bit guiltier but given how many time Mike has hammered me in tournaments, Flames of War and Napoleonics, I’ll take the win.
Scenario Rules: Battle of Teugen-Hausen, 19 April, 1809
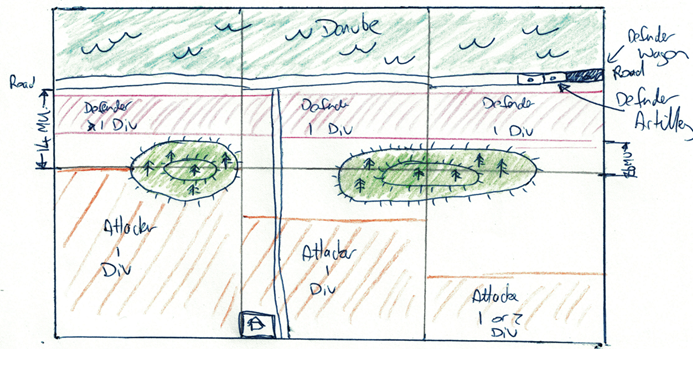
Attacker 800 points
Defender 800 points (less 150 points)
Terrain
Hills are gentle.
Forest is rough going and cover.
Deployment
• Dice for initiative as usual. The Defender has the first turn in this scenario.
• Deploy as per normal deployment rules with the following restrictions:
• The Defender will not use most/all of his cavalry in this battle. The defender must delete at least 150 points from his army list which troops are not used in this game (the removed troops must be cavalry units, unless there are none left in which case other units may be removed).
• The Defender Deploys with :
o all forces in the valley between the main road and the line of the hills in a single march column per division (except artillery units -see below), facing the defender's right.
o One division is deployed in each deployment sector, however if it will not fit then it may extend the minimum necessary into one (or both) adjacent sectors.
o Any 4th Defender division may be deployed (in a march column) in any sector.
o The Defender's baggage train starts on the road, facing right, with its rear touching the left-side table edge.
o All the Defender's artillery units start limbered on the road facing right as well, in the same sector as their division is deployed.
o there are no movement restrictions for the Defender in turns 1 and 2.
• The Attacker deploys
o one division deployed in his left hand sector, up to 18MU from his baseline NOTE the map incorrectly shows this division deployed up to half way; and
o one division in his central sector, up to 18MU from his baseline; and
o all remaining divisions in his right hand sector, up to 12MU from his baseline.
Victory Conditions
• The Defender may move the supply train up to 10MU, straight ahead along the road in each of his movement phases. The supply train may not leave the road nor pass through any unit that even slightly blocks the road.
• The supply train is the Defender's LOC. If contacted by an enemy unit the supply train may not move. The Defending army also counts as if it had lost its LOC while so contacted.
• If any part of the supply train base exits the Defender's right hand table edge, the defender automatically wins (the attacking army counts as broken).
Game Two: Austerlitz
I played Al Donald who had an 1809 Peninsula list with a Spanish Division.
I won the roll to attack and deployed my two Landwehr infantry behind the river but on the edge and the cavalry division in the left sector against the road. Al deployed an infantry division in the sector facing my left, 2 big units of good infantry on the hill and some more British Light Cavalry and the Spanish division in the sector on my right. I then deployed the rest of my mixed divisions facing his centre right seeing that his two good infantry units were separated from each other, and not directly supported by his other divisions on my right and within 12 inches of my start line.
I raced up the hill with three units picking on one infantry unit and my 2 mixed division cavalry units lining up his artillery. I rolled up his good infantry, took out the artillery and supporting Spanish light infantry then cleaned up his Light Cavalry.
A quick win for the Prussians.
Scenario Rules: Battle of Austerlitz – 2nd December 1805

Attacker 800 points
Defender 800 points
Terrain
The Pratzen Heights is gentle
The vineyard is rough terrain.
The river has no effect on movement (no CMT required to cross or assault) but does count as an obstacle in combat if defended. Infantry can fire at medium range across the river.
Deployment
1. Dice for initiative as normal.
2. All units for both sides must be deployed facing the enemy table edge (unless defending a building).
3. The Attacker first places one division in sector D, up to 10MU from the centre line, and 2 units (from any division in the army – & don’t have to be from the same division) in sector F, anywhere behind the river.
4. The Defender then deploys his entire army.
- At least 1 division must be placed in sector A, at least 10MU from the centre line.
- At least 2 divisions must be deployed in sector C, up to the centre line.
- 2 units (from any division in the army & don’t have to be from the same division) are placed anywhere on the Pratzen Hill.
- The Defender’s CC is placed on the Pratzen Hill.
5. The Attacker then deploys all his remaining forces in sector E, up to the centre line.
6. Attacker has first move.
7. Neither player is subject to the normal movement restrictions in turns 1 and 2.
Victory Conditions
• The Defender wins automatically if they have an unbroken unit in contact with the Attacker’s LOC in any recovery phase. If this occurs, the Attacking army breaks.
• Alternatively, if victory is attained by either side, as per the FOG N rules, then the game is over and that side is the winner.
Game Three: Battle Hanau
In this game I played Lawrence and his 1812 Russians. I won roll to attack and Lawrence took out 150 points leaving him with the following units, 2 large infantry units with guns and cavalry attachments, 2 light infantry units with guns, large Opolchenie Poor Unreformed Conscripts, 2 large batteries (one heavy) both with officers and a veteran horse battery.
While he was down to 650 points I would start with only half my army, in units, on the table. The attacker’s reserves come on one unit per turn in order of march. They arrive from the road allocated to each division before deployment.
I’d won this previously as the attacker when the defender held back. However, I’d also seen a few other battles where the defender deployed the maximum distance forward demolishing an initially understrength attacker.
So I committed my second mixed division to come on from the right road and the cavalry from the left most road. This would allow me to either concentrate my on table forces on my right and leave the cavalry a hopefully free run the objective point, his centre rear, or I could deploy them on my far left and split his army.
Lawrence deployed his Opolchenie in the large town in the rear on my left, Hanau. He then had a line of large infantry units interspersed with batteries between that town and the one on my right which he capped on my right with a gun armed light infantry.
I decided to deploy my on table forces to my left. I headed for the gap between Hanau held by the Opolchenie and the river with my heavy cavalry supported by my two infantry units. My large battery and Landwehr demonstrated between Hanau and Neuhoff to stop him weakening his centre to swing round on me. I advanced more cautiously on my right as reserves came on.
Lawrence moved his veteran horse artillery into the gap and deployed. I moved outside their arc with my cavalry. He failed to wheel to shoot them and I charged home the next turn through some desultory fire to cut them down. I then charged the light infantry with a gun who were moving over to provide support. They decided to form square as I’d hoped. I had moved up infantry through the gap to shoot them in square. My cavalry passed through and the following infantry took out the square. With me in his rear the game moved to a conclusion.
If Lawrence had defended the gap with both the horse guns and the light infantry but from a little behind it I couldn’t have got around his force. As only one unit would fit through the gap it would have come out facing 6 dice from the guns and 6 from the light infantry with a medium artillery attachment, that’s not going to end well! I would have had to attack Hanau held by the Opolchenie. The rest of his line would have been very difficult to breach. Between Hanau and the village on my right he had 5 dice, 8 dice, 5 dice, 8 dice and 6 dice at medium range and no gaps.
Lawrence deployed pretty well and I had the good fortune to get the heavy cavalry through the guns. This decided the game. If Lawrence had been a bit luckier with his guns shooting, well who knows!
Scenario Rules: The Battle of Hanau 31 October 1813
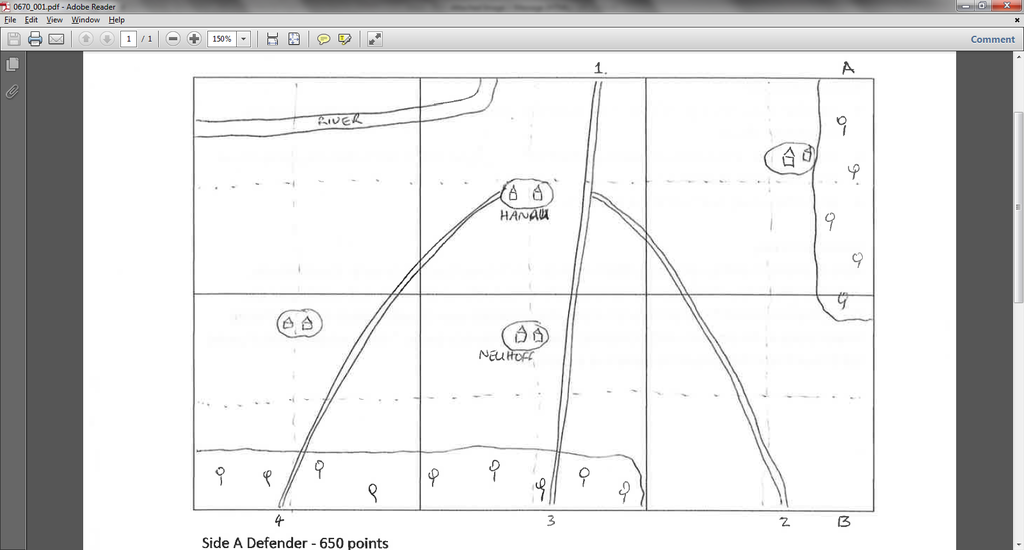
Defender - 800 points (less 150 points)
Attacker – 800 points
Terrain
• Woods are open (cover to troops wholly inside)
• The river is uncrossable. No infantry fire at medium range fire is permitted across the river, other than from artillery attachments.
• All roads are a base width wide
Deployment
• Dice for initiative and deploy as per normal, qualified as follows:
• The Defender must detach at least 150 points of troops, in whole units, which are not used in this scenario. The attacker’s ACV remains as per his army sheet.
• The Defender starts with all remaining units on table as far forward as the village of Neuhoff.
• Attacker starts with max half units on table (complete divisions where possible) up to a line over 6 inches back from Neuhoff. The CinC starts on table.
Reinforcements
• Before deployment, record which of roads 2, 3 or 4 each of the Attacker’s Divisions will arrive from.
• An entire Division must arrive down the same road.
• One unit of the Attacker’s reinforcements arrive each turn, starting on Turn 1.
• If the DC of the arriving unit is Skilled, 2 units of his division may arrive each turn. If he is Exceptional, 3 units of his division may arrive each turn.
• Units arrive in their order of march. The first off-table division comes on before any 2nd (or 3rd), and units arrive in the order they are listed on their army list.
• Divisional generals not already on table arrive with the first unit to arrive.
Victory Conditions
• Attacker wins as soon as he gets at least 2 steady or disordered units within 6 inches of road point 1 with no intervening steady or disordered enemy units.
• Alternatively, if victory is attained by either side, as per the FOG N rules, then the game is over and that side is the winner.
• Any other result is a win for the defender.
Game Four: Mission from the rule book using the Austerlitz table terrain
In this game I played Philip, the eventual, winner. Philip had a Waterloo British force with lots of Dutch Belgian allies. One Dutch Belgian infantry division with 2 large average drilled and a large and small poor conscript (or was the small poor drilled?). Dutch Belgian light cavalry division with 2 average drilled light cavalry units one with a gun. A British infantry division with veteran horse artillery, a large veteran unit, a superior veteran unit and another large drilled unit. He also had a shock heavy cavalry division of 2 impetuous units both with guns.
I won the roll to attack. Brett adjusted the rule book mission:
• no extra unit for plus 3 attacker
• defender doesn’t get plus 4 ACV
• winner of initiative roll off gets to choose either to attack or to choose table side and defend.
Impatient as always I decided to attack and Phillip took the hill. Perhaps a bit of caution on my part and taking the hill as defender would have paid a better dividend!
My initial idea was too put all my good infantry and supporting cavalry and perhaps some artillery on my left and go around the town. (The lesson here is to always go with your initial instincts and not overthink things. Instincts are the accumulation of experience and will inevitably be pretty close to right, as we shall see!) However, Philip put a couple of British infantry on the hill unsupported and another behind the town. So I changed my mind and decided to go up the hill and into the centre. However, this was Philip’s cunning plan. He weakened his centre to tempt me and then held the shock heavy cavalry in central reserve. Phillip had his big Dutch Belgian units on my left with their cavalry in support forward and on either side of the town. The veteran British horse artillery was also in support to my left of the town.
The decisive fighting took place in the centre. I threw my infantry up the hill and wavered both his good British units to the board edge. I then charged by cavalry into his poor conscript Dutch Belgians coming up from the LoC to support routing them and causing the British on the board edge to rout as well.
However, his shock cavalry division had arrived on their first dice roll from reserve. They came on to my right of the vineyard at the top of the hill.
They charged downhill into a square with a gun and cut them down after passing two checks to charge home. Not unexpected with 14 dice even needing 5s to hit. He got 4 dice vs square plus uphill plus gun for each unit. I did spend both units.
He then charged them into the flank of my heavies and again at the next unit of infantry in square so I couldn’t shoot the unit going for my heavies. This of course required passing two tests to charge when spent (another rule adjustment for the tournament). This mildly fortunate series of charges and passed tests for routing infantry rolled up enough of my force to get me over 50 per cent.
Meanwhile on my left on turn two I threw my large officer led conscript lancers into a large unit. They held firm and disordered me but I charged home, hurrah. Not really hurrah as they routed in melee. I should have worked those numbers out before charging! However, they rallied with help from the CiC. Philip was pressing me hard on my left but I was holding on despite his infantry routing my Lancers again with close range shooting and then recovering before finally running from a light cavalry charge.
I was just holding on the left and managed to rout his large unit of poor conscripts with a couple of light cavalry charges. However, this wasn’t enough to save the game. Philip won by taking me over 50 per cent. I had him at 40 per cent but wasn’t going to get any more and he was going to bust the rest of my force in short order.
Nicely played by Philip with a very clever deployment. I thought we both had good plans.
The reason I like these rules in comparison to some other gaming systems is that the points are pretty even between units. As a result when both players have good plans a bit of luck will decide the winner.
The trick is have a good plan and something in reserve to manage situations where luck doesn’t quite run your way. Not something my clumsy manoeuvring of the Prussians allowed for in this game. Philips pressure on my left and my over enthusiasm with my cavalry on the left, including the reckless charge by the Landwehr Lancers, left me without anything to counter his reserve heavies or exploit my own central success. It should be noted that Philip didn’t make any reckless move of this nature and reaped the appropriate rewards!
Conversely Philip reinforced the gaping hole in his centre with a redeployment of the horse guns. This delayed my initial successes enough to allow his heavies to finish me off.
Conclusion
Another good tournament run by Brett. If the record above has mistreated any of my opponents please feel free to comment.
-
BrettPT
- Lieutenant Colonel - Panther D
- Posts: 1266
- Joined: Tue Jan 20, 2009 8:52 am
- Location: Auckland, NZ
Re: Battlecry - Auckland 2016
Great write-up Andy.
I'll copy over the rule amendments we used when I have a moment.
Cheers
Brett
I'll copy over the rule amendments we used when I have a moment.
Cheers
Brett