


This was a game between Clive, using Sassanid Persians and myself, using a 3rd Century Imperial Roman army. The rules are the new Art of War rules (beta version).
The Romans had won the pre-battle initiative through the cunning ploy of rolling a high dice score. They chose a battlefield (see photo below) in an agricultural area, where there were orchards and ploughed fields to protect the flanks of the infantry against any wide encircling move by the more mobile Sassanids. The centre of the battlefield was open.
In AoW figures are mounted on 40mm (60mm in 25mm scale) bases. Each base will have two, three or four figures mounted on it, depending on troop type and operating density. For example heavy infantry have 4 figures to a base whereas light infantry is 2 figures to a base. The Roman order of battle was:
- Three veteran legions (each 4 bases of legionaries and 2 bases of integral archers)
Two cohorts of auxilia (each 6 bases of auxilia and 3 bases of integral archers)
One cohort of auxiliary archers (6 bases of close order archers)
One unit of locally recruited light infantry archers
Two groups of field artillery (each 2 bases of bolt-shooting ballistae)
One ala of Roman cavalry (6 bases)
One unit of Numidian light cavalry (4 bases)
One unit of auxiliary horse archers (4 bases)
The Sassanid order of battle was:
- Three high quality units of Sassanid noble cavalry (each 6 bases)
One unit of very heavily armoured lancer cataphracts (4 bases)
One unit of fearsome elephants (4 bases)
One unit of light cavalry (6 bases)
One unit of light infantry archers (10 bases)
One unit of auxiliary infantry (8 bases)
One unit of foot archers (4 bases)
Four small units of poor quality defensive spearmen, guarding the baggage.
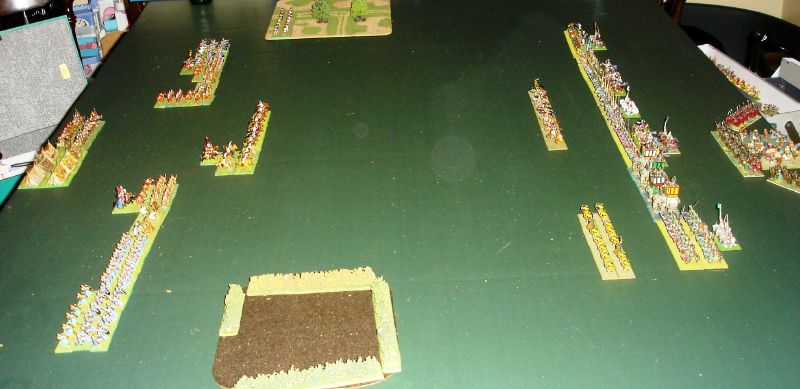
Deployment is shown in the photo below. The Romans are on the left, the Sassanids on the right. You will notice that the Roman light infantry have seized the orchard on their far-left flank (top of photo) and have pushed forward their light cavalry in the centre. The Sassanids have light infantry and light horse screening their main battle line. Both armies have a baggage train deployed on their base line; with the Sassanid baggage well protected by a hedge of infantry.
In addition to the obvious difference between the two armies, mounted Sassanids versus Roman infantry, there were several other differences: 1) The Romans were drilled; the Sassanids undrilled. In AoW terms this means that the Roman units are able to execute more complex manoeuvres. 2) The Roman infantry were all armoured and better swordsmen than the Sassanid foot, whereas the Sassanid cavalry were generally better than their Roman mounted counterparts. 3) In addition the Sassanid nobles were all skilled horse archers and could choose to either shoot or charge into combat as they wished. 4) Finally, the Roman commander was highly talented (an inspired commander in AoW terms) whereas the Sassanid commander was competent (a field commander). An inspired commander is represented on the table by an increased command range and an increased ability for troops within that command range to pass morale tests (called ???cohesion tests??? in AoW).
Turns in AoW are taken as alternative bounds. After the initial three pairs of bounds the battle looked as follows:

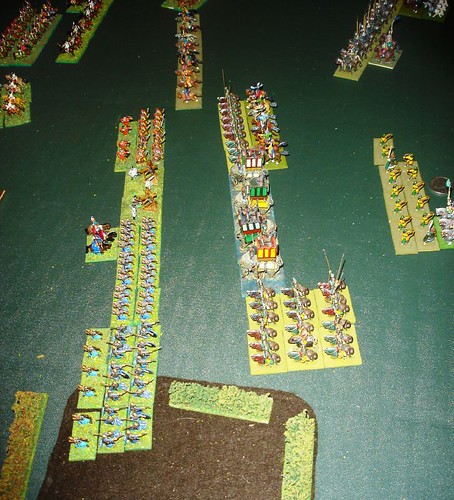
The Romans have pushed forward their wings to form a crescent shape, with the tips of the crescent anchored in the terrain on each flank. The Roman light horse in the centre pushed forward initially but was quickly driven in by Sassanid shooting.
At this point the Sassanids split their battle line in the centre, with each half wheeling to face off to their respective Roman wings. The Sassanid light horse was given the job of linking the two halves together and to deal with the cowed Roman light horse in the centre. The light horse clash in the centre was to eventually decide the outcome of the battle.
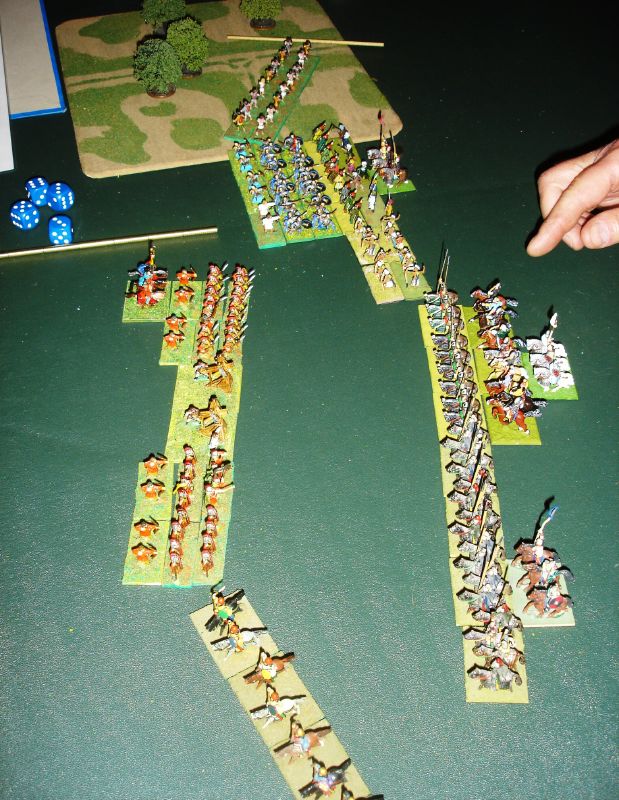
The situation on the Roman right / Sassanid left as the forces closed is as follows:
The artillery, despite scoring several shooting hits, failed to intimidate the elephants. The elephants charged the artillery and bowmen, supported by the nobles to their right. The nobles on the elephant??™s left held back from charging the Roman auxilia, fearing to get entangled in the hedges and soft ground of the ploughed field.
Combat and shooting in AoW is resolved by throwing one dice per base. Typically the first and second rank can shoot and fight. The score required on a dice to ???hit??? will depend on the relative advantage between the two units involved in the combat. Sufficient hits will force a morale test (the cohesion test). If the test is failed the unit drops a cohesion level. Cohesion level ranges from formed, to disrupted, then fragmented, then routed. As a unit??™s cohesion drops so does its fighting effectiveness, morale and ability to manoeuvre. A general can join a unit and rally it, which will raise the cohesion level. Sufficient hits can also, if you??™re unlucky, result in a base of figures being removed.
Elephants are very powerful and once they closed the Romans facing them were in serious trouble. Eventually the Roman auxiliary archers broke and fled. The Roman auxilia cohort on the Roman far right charged the noble cavalry is a desperate attempt to salvage the situation, but this proved a mistake as the auxilia in the open was no match for the well armoured mounted warriors and they too joined in the rout. The artillery and the legion grimly held on to continue to give the flank some stability.
On the opposite flank things proved to be more favourable for the Romans:
The auxilia cohort had closed with their Sassanid counterparts. Superior armour and swordsmanship gave the Romans an edge and the Sassanid infantry soon routed, despite outnumbering the Roman auxiliaries. The artillery shooting again proved inept. Despite this the rest of the Roman line managed to absorb the impact of the Sassanid charge, although eventually one legion disgraced itself by routing. The situation was stabilised by throwing the Roman cavalry ala, held in reserve, into the fight.
In the centre the shaken Roman light horse rallied (just off-table to the bottom left in the above picture) and counter charged the Sassanid light horse (seen in the foreground of the above picture, with the unit extending off table) sent to keep an eye on them. The Sassanids were quickly routed due to some remarkably inept dice rolling. This rout opened up a large gap in the Sassanid line which the Roman light horse rode through, initially in pursuit of the routing Sassanid light horse. The Romans managed to bring their light horse back under control, turn around and charge the Sassanids in the rear whilst they were engaged frontally by the legionaries. At this point the Sassanid commander conceded defeat. It was a close run battle, with the Romans being roughly handled by the Sassanid cavalry and elephants.
Both Clive and I enjoyed the game; the forces were evenly matched although I understand the rules authors are reviewing the effectiveness of elephants. The Roman artillery will be sent off to have their sights recalibrated and the Roman commander will write to Rome requesting a triumph.


