Axis versus AI Tutorial AAR (War is Over, Grade Me)

After action reports for Commander Europe at War.

Moderators: rkr1958, Happycat, Slitherine Core

Post Reply
rkr1958
General - Elite King Tiger
Posts: 4264
Joined: Wed Dec 12, 2007 2:20 am

Axis versus AI Tutorial AAR (War is Over, Grade Me)

Post by rkr1958 »

Introduction

The goal for this AAR is to present a tutorial of a game for a “nominal” Axis strategy employed against the allied AI. The settings that I used are the same that I would use for a PBEM or hotseat game (C1). I do not expect this game to be challenging and I will only use the strategies or tactics that I would use against an experienced opponent. My objectives for playing this game are: (1) introduce new players to the game and grow our pool of players, (2) help new or less experienced players to better learn the game, strategy and tactics, (3) provide a forum for the more experienced players to comment on the strategies and tactics that I employ to help make me and the rest of us better players and (4) provide a forum to discuss the stupid things that the AI does and suggestions at the tactical (or even strategic) level of what could be done to improve it. With respect to this fourth objective, I can say with very high certainty that no changes or improvements will be made to the GS AI; however, my hope is that we might provide useful suggestions that could be incorporated in the AI for Commander: The Great War (CTGW) and the AI for future Commander series games.

I plan to capture all this in a document that I will make at the conclusion of this AAR for download. I wish to capture the wide range of GS experiences across the community and encourage all comments and discussions on this game. Even those that are critical of my moves. While one can get away making sloppy moves against the AI, I do not plan to play that way. So, if you see me make a move that works against the AI; but which might get me hurt against an experienced human opponent please point that out. Again, I’d like to use this AAR as a learning tool for new players.

Axis Strategy

My strategy will be the one I’ve termed the “nominal” axis strategy, which emulates the historical axis strategy to within the limits of the CEAW GS game engine. This means that the exact timeline and order of Axis invasions won’t be followed but the general flow of the war will and only the countries invaded and conquered by the axis in the actual war will be invaded and conquered in this AAR. This means no Sea Lion or invasion of Spain (i.e., Close the Med). Here is my war plan through June 1941 (i.e., Barbarossa):
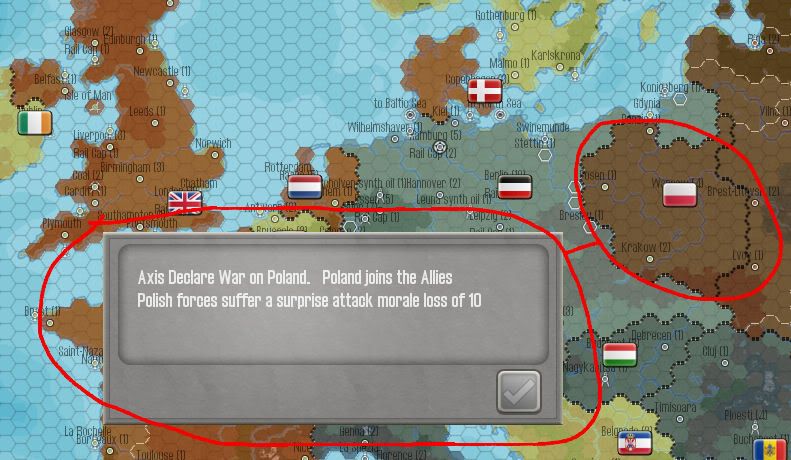
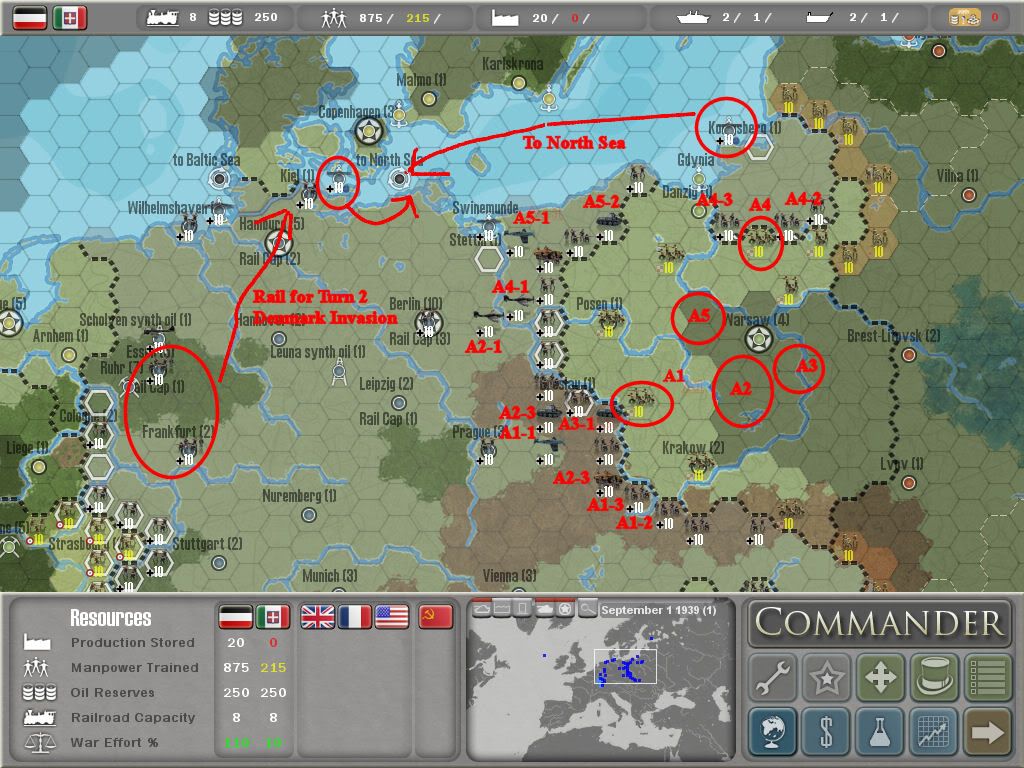
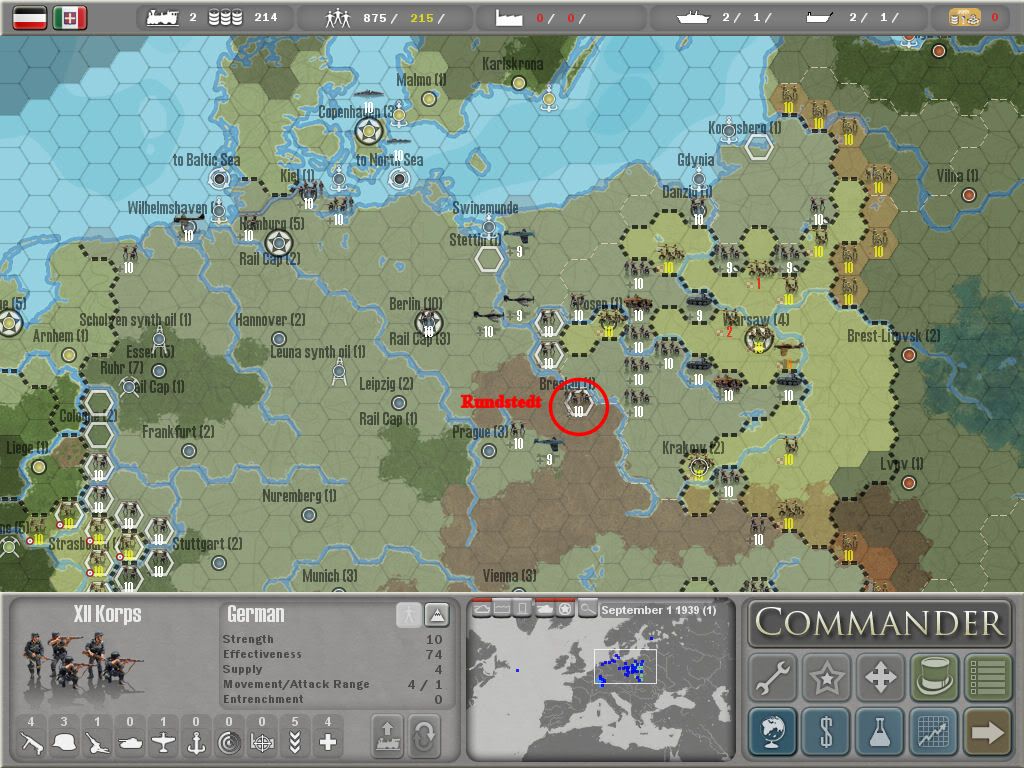
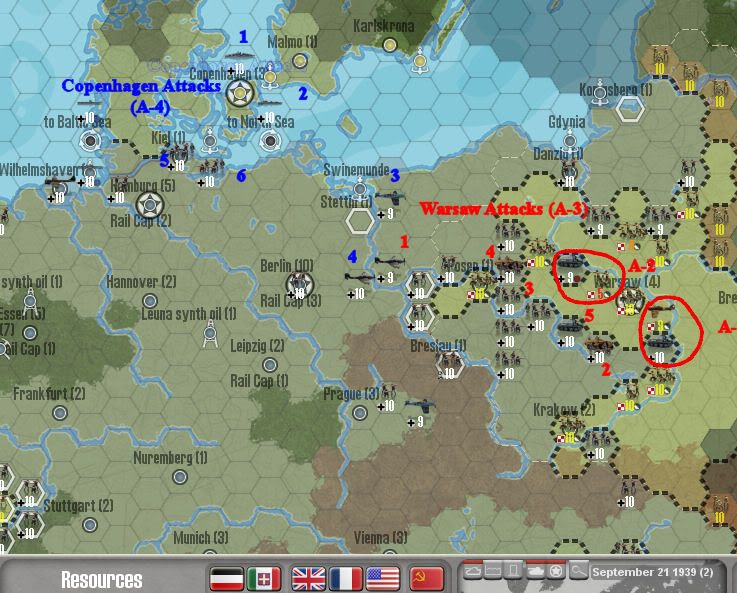
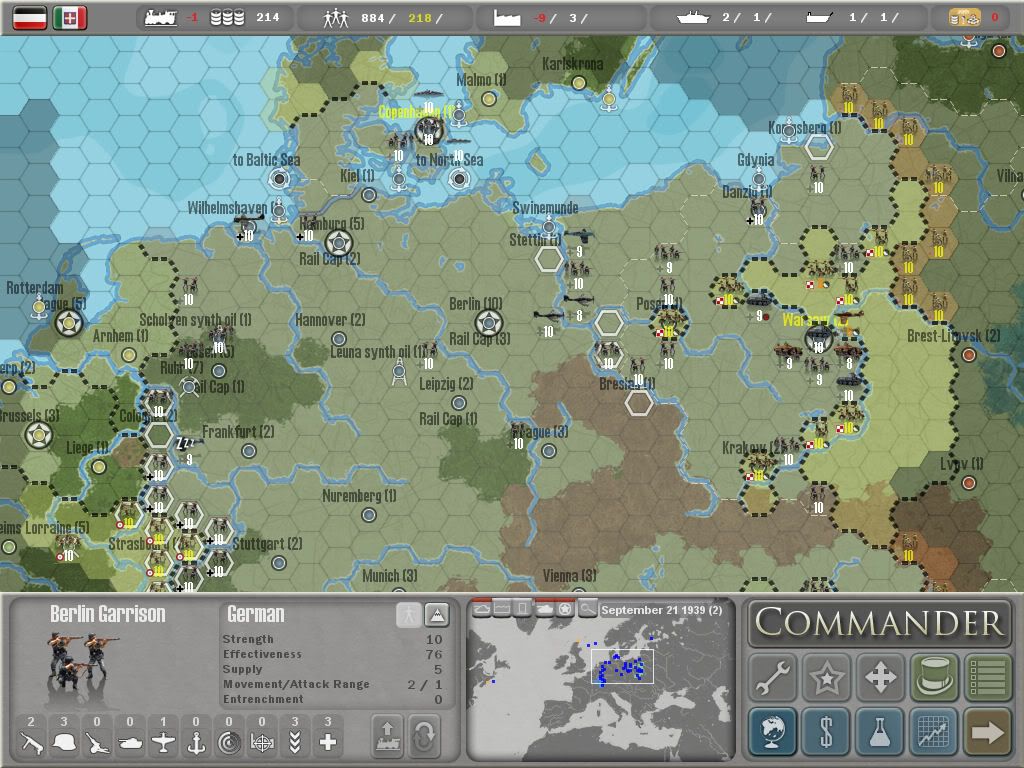
• Poland (9/1/39 – 9/21/39)
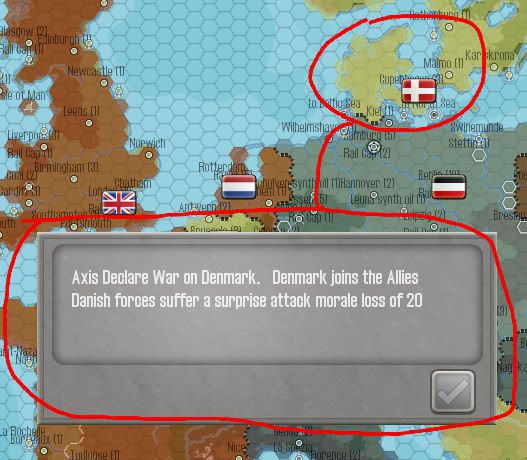
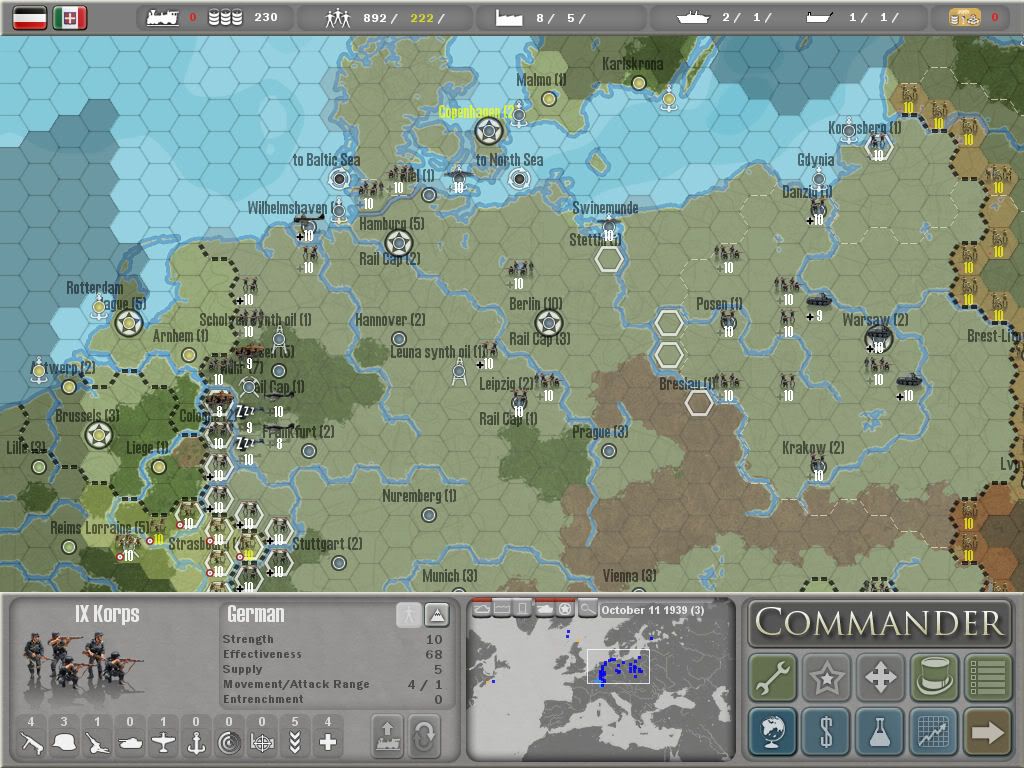
• Denmark (9/21/39 – 10/11/39)
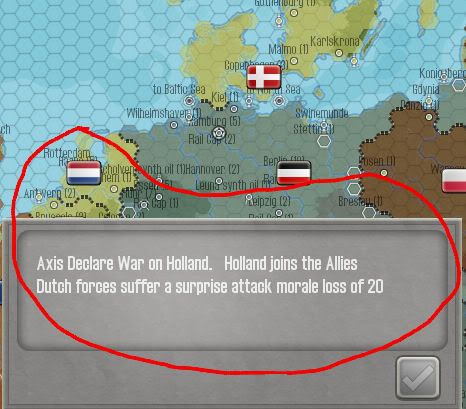
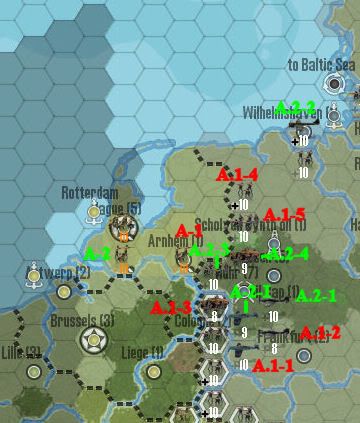
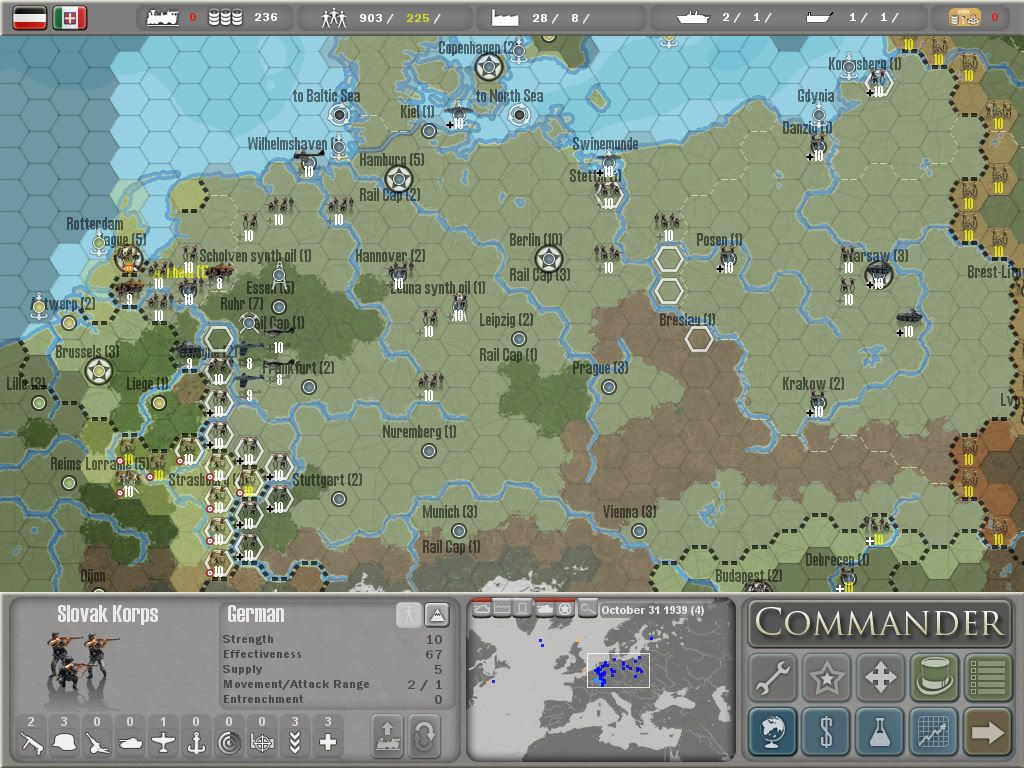
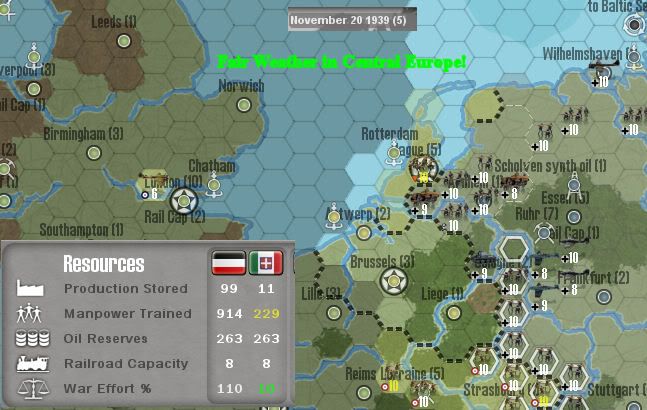
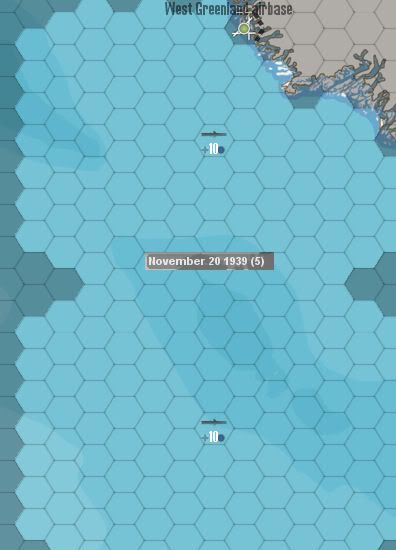
• Holland (10/31/39 – 11/20/39)
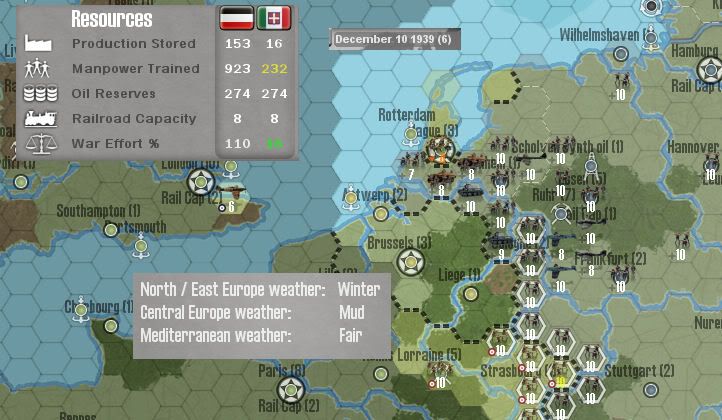
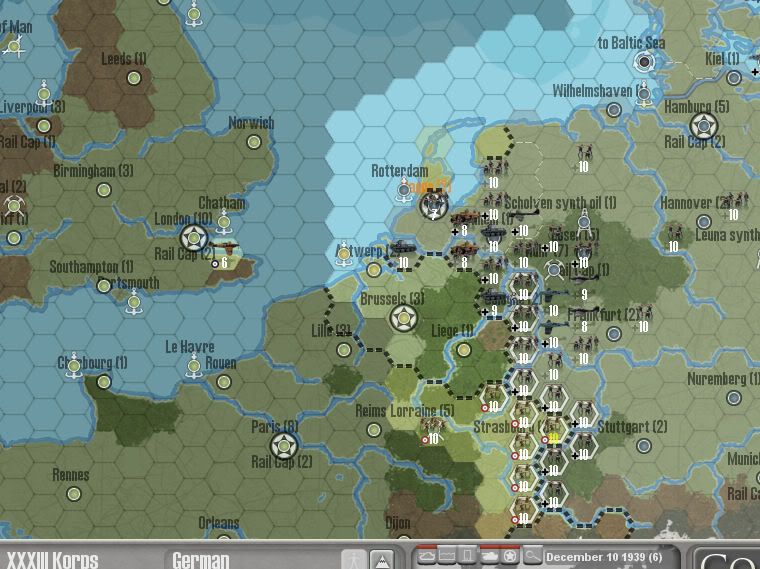
• Belgium / France (Sietzkrieg)
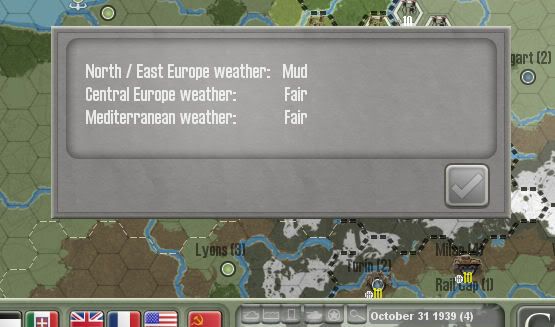
o First fair weather turn in 1940 (2/8/40 – 4/8/40)
o End when Paris falls (5/18/40 – 7/17/40)
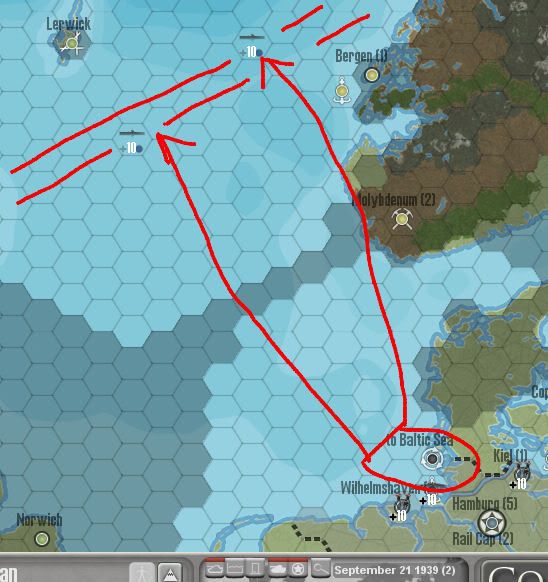
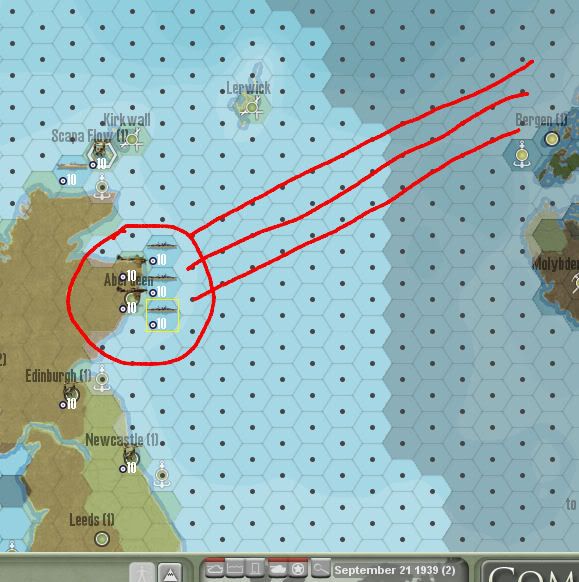
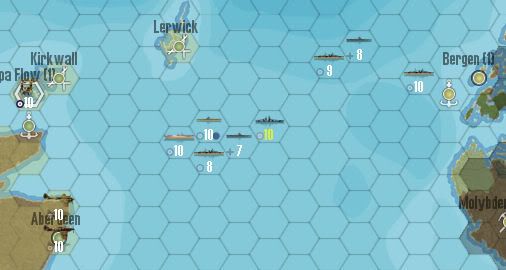
• Norway (Summer / Fall 1940)
• Yugoslavia / Greece (Spring 1941)
• Russia (Barbarossa) (June 22, 1941)
• North Africa (Hold)

With respect to North Africa, the AI tends to ignore this area. I will not take advantage of this and I will deploy the forces that I normally would to hold this area against a more experienced player. I know that there are some players now who advocate lighting defending or even abandoning North Africa; however, I like to hold there as long as possible in order to buy as much time for Italy as I can.

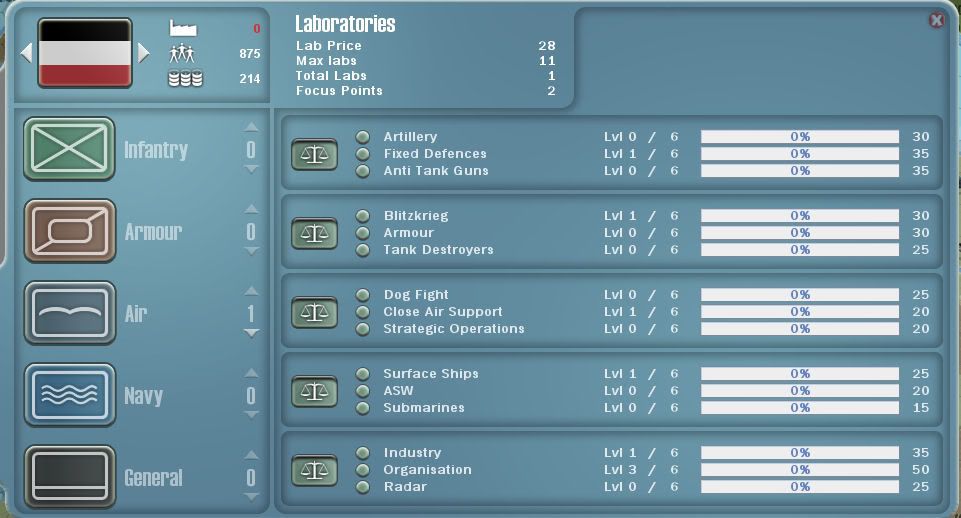
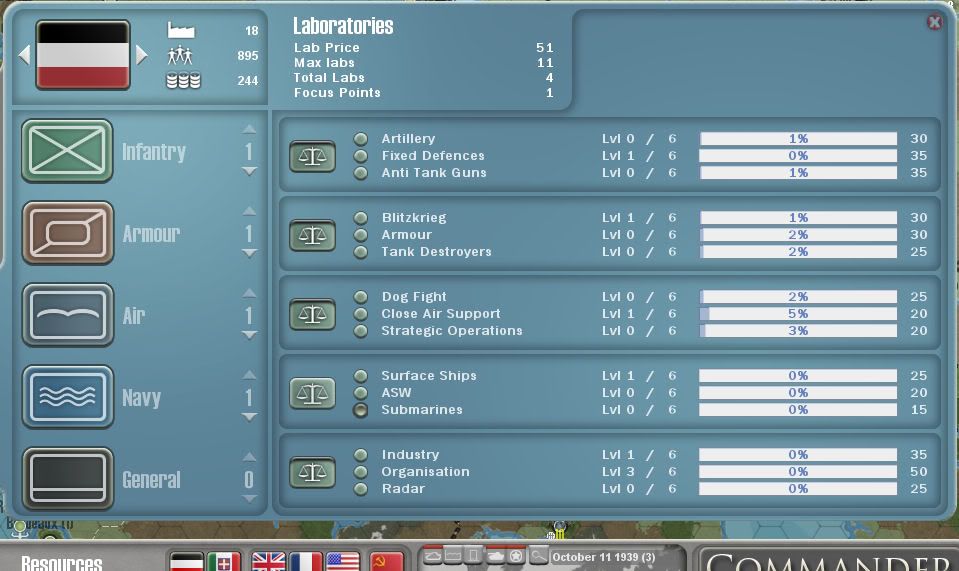
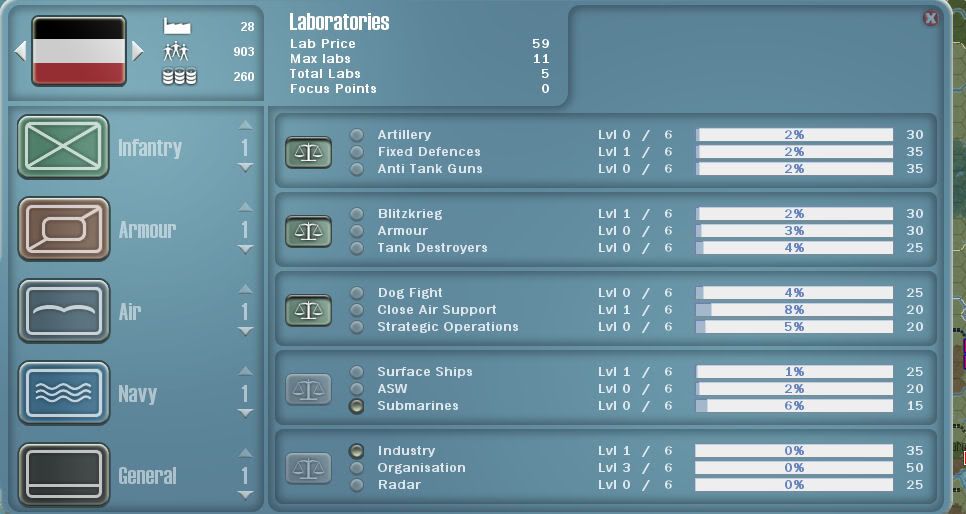
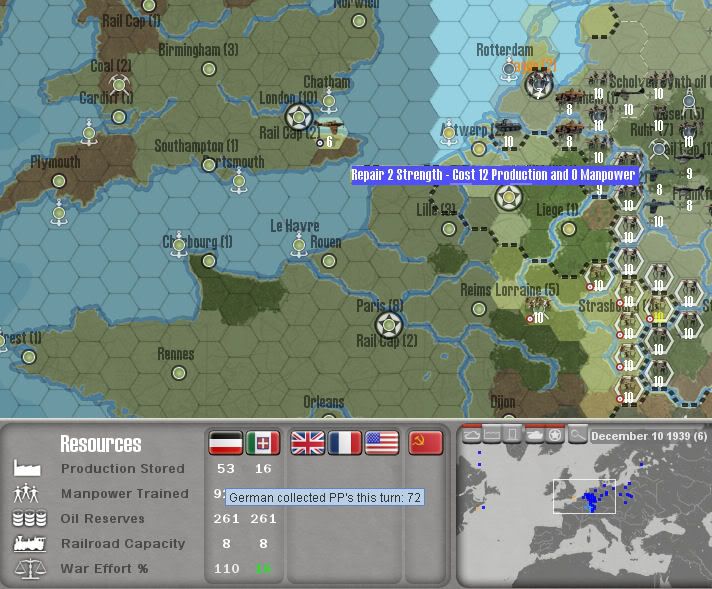
My start game build and research priories for German are: (1) build one lab in each are as soon as possible (see AAR for details), (2) fighter, (3) tactical bomber, (4) second lab as soon as possible in every area except for naval, (4) 3 subs as soon as level 1 is reached, (5) Barbarossa builds.

For Italy, I plan to focus on building up their infantry and air and; therefore, will only focus on Infantry, Air and General labs. I plan to use Italian forces primarily for defending North Africa and Italy and for second line troops in Russia.
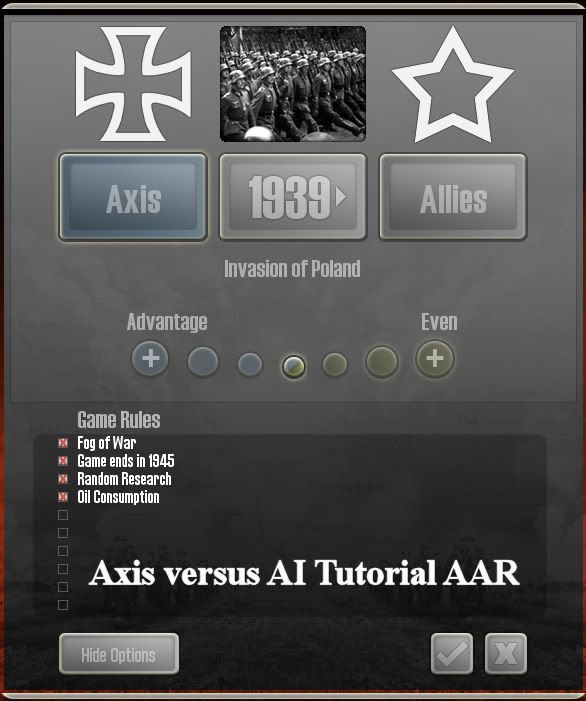
Image
C1. Game Settings
Last edited by rkr1958 on Mon Jul 12, 2010 3:55 am, edited 4 times in total.
Blathergut
Field Marshal - Elefant
Posts: 5882
Joined: Tue Jan 22, 2008 1:44 am
Location: Southern Ontario, Canada

Post by Blathergut »

cool..looking forward to this..you are using gs 105?..any further word on when this will be released by slitherine?
rkr1958
General - Elite King Tiger
Posts: 4264
Joined: Wed Dec 12, 2007 2:20 am

Post by rkr1958 »

Blathergut wrote:cool..looking forward to this..you are using gs 105?..any further word on when this will be released by slitherine?
We're close. Iain's built an installer for us and we're testing it out now. The only question is, since there have been several v1.05 updates, do we want to keep the version as v1.05 or do we want to change the latest to v1.06. This is a question for Iain on what he prefers.
Plaid
Brigadier-General - 15 cm Nblwf 41
Posts: 1987
Joined: Tue Apr 27, 2010 10:16 pm

Post by Plaid »

Is there any point to go for AIR tech as Italy?
Looks like they don't have PPs to build and/or support planes anyway, while going for navy/subs deffinetely helps a lot to defend Italy.
rkr1958
General - Elite King Tiger
Posts: 4264
Joined: Wed Dec 12, 2007 2:20 am

Post by rkr1958 »

Plaid wrote:Is there any point to go for AIR tech as Italy?
Looks like they don't have PPs to build and/or support planes anyway, while going for navy/subs deffinetely helps a lot to defend Italy.
I would agree with this if I wasn't going to invade Greece and have Crete available as an airbase. Being able to deploy air units to Crete is a strong deterrent to the British prematurely marching into Libya or to the RN getting to aggressive too early in the Med. I know that this won't be necessary against the AI; however, I will build and deploy as if I were playing the axis against a player like Borger, Joe, Neil or Supermax.
rkr1958
General - Elite King Tiger
Posts: 4264
Joined: Wed Dec 12, 2007 2:20 am

Post by rkr1958 »

Turn 1. 9/1/1939 Axis.

I always like to take care of a few things before attacking Poland. This way I don’t get carried away with the Polish offensive and forget to do them.

The very first thing I did was to build an air lab (see p2). Once I reach level 1 in “Strategic Operations” I will switch from balance to focus on “Dog Fight”. Next, I railed two infantry corps in position for my Denmark invasion next turn. Then, I sortied the two u-boat flotillas in the Baltic to the North Sea transport loop. Finally, I moved the remaining u-boat flotilla already at sea towards Nova Scotia. Once in position, and on patrol, he will keep an eye on the Canadian fighter and whether or not the allied player moves it to the UK or to North Africa. If in a non-AI game (i.e., against a human opponent) he moved it to North Africa then I would begin plans for Sea Lion. In this game I have no idea what the AI will do; but I will play it as though he moved it to England.

I plan to use the other two subs to go after the northern convoy. However; if the allied player weakly escorts the Canadian fighter I will move them to go after the fighter. Generally, I like to avoid allied escorts this early in the game and especially with the French still around. The expected damage that the u-boats suffer if they go after well escorted convoys/transports or escorts (i.e., DDs or BBs), in general, is not worth the damage suffered and the time lost to repair that damage. It’s more cost effective (in my opinion) to go after unescorted convoys. However; if there’s a good chance to destroy the Canadian fighter then I think it’s worth the damage suffered.

Now, I declared war on Poland (C3) and their forces suffered a 10 point effectiveness drop. The sequence of my attacks (A-1, A-2, A-3, A-4 & A-5) are shown in C4.

A-1: Polish infantry. Attackers and their order of attack are fighter (A-1.1), infantry corps (A-1.2) and infantry (A-1.3). The result was that this corps was destroyed and another Polish corps in A-2 was revealed.

A-2: Polish infantry. The order of attack was tactical bomber (A-2.1), tank corps (A-2.2) and mechanized corps (A-2.3). The Polish unit was destroyed. This attack also revealed the Polish fighter adjacent to Warsaw.

A-3: Polish Fighter. The fighter was attacked by a tank corps (A-3.1).

A-4: Polish infantry. The attack sequence was tactical bomber (A-4.1), infantry (A-4.2) and infantry (A-4.3).

A-5: Polish garrison. The garrison in A-5 was uncovered by previous attacks and moves. The attack sequence was fighter (A-5.1) and tank corps (A-5.2).

Rundstedt was deployed to an infantry corps in the fort. The remaining units were moved to maximize the number of units that can attack Warsaw next turn and in positions to minimize Polish counterattack opportunities. Were feasible, I moved infantry corps to block and protect the more expensive armor and mechanized corps. However, I did move one of the mechanized corps next to a full strength Polish corps in Posen but across the river from it. The results for this turn are shown in C5.

Image
C2. Germany Air Lab #1

Image
C3. Poland Declaration of War (9/1/1939)

Image
C4. Turn 1 (9/1/39) Execution

Image
C5. Turn 1 (9/1/39) Results
Last edited by rkr1958 on Sun Jun 27, 2010 2:44 pm, edited 3 times in total.
supermax
Lieutenant Colonel - Panther D
Posts: 1287
Joined: Sat Dec 29, 2007 7:05 pm

Post by supermax »

HEy Ronnie this is very nice for new players!

Keep up the good work and i'll comment from time to time as well.
schwerpunkt
Sergeant First Class - Panzer IIIL
Posts: 367
Joined: Fri Apr 17, 2009 12:26 am
Location: Western Australia

Post by schwerpunkt »

Below is a slightly different first turn, which keeps with Ronnie's scenario plan;
In this approach, the INF south of Krackow is railed instead as it is in a useless position. The INF at Breslau gets railed too. The Polish INF south-east of Danzig is pinned in place by the German INF just south of Danzig (which actually finished destroying a retreating Polish unit).

Near Krackow, an INF is moved to pin the polish unit meaning the MECH and ARM's can only be attacked by the Warsaw INF. I ended up with a MECH unit not used, so to keep in line with Ronnie's scenario, I railed it to Kiel to attack Copenhagen by land move. A FTR is also free to move west into the Ruhr. I've placed Rundstet in the Berlin GAR as he can support the Danish assault units and the TACs - next turn he moves 2 hexes west to put the western forces (including the STR and FTR) under his influence.

Image

What do people think?

As a note, when I go for Holland, I put Rundstet in the Wilhelmshaven GAR to put the west under influence immediately.
rkr1958
General - Elite King Tiger
Posts: 4264
Joined: Wed Dec 12, 2007 2:20 am

Post by rkr1958 »

Turn 2. 9/21/1939 Axis.

I always like to take care of the other business first before I get down to the main moves and attacks in a turn. In this way I tend not to overlook something like research or moving u-boats.

I built two more labs, which were infantry and armor (C6). It’s important to advance the technology in air, infantry and armor as quickly as possible in order to get critical updates before Barbarossa. So that’s why I built these three labs first.

Next, I moved UF 2 and UF 3. When trying to advert contact with enemy naval units the one thing I try to avoid are straight line. By this I mean any hex that’s on a straight line of a possible naval sweep by my opponent. C7 shows possible sweeps that would impact UF-2 and UF-3 if I were to move them their maximum. I know this and it’s very likely my opponent would know this too so I choose to move these two flotillas less than their maximum range in order not to be in these potential sweeps (C8).

I also moved UF-1 in position to spy on the Canadian fighter transport (C9). Note that I moved to a hex that would avoid straight line sweeps from Halifax.

My objectives for this turn were to finish off Poland and conquer Denmark (C10), though I generally achieve a 1 turn conquest of Denmark about 50% of the time.

C11 shows my situation at the beginning of the turn. The AI chose to repair units instead of counterattacking. A human player, knowing that Poland would fall this turn, would have counterattacked and inflicted what damage they could have on the German units. The AI did cut supply to one of my armor corps. No big deal though.

Finishing off Poland was fairly straight forward. Here are my attacks.

A-1: Polish Fighter was attacked by the adjacent tank corps. The attack forced the fighter to retreat, which made available another hex from which to attack Warsaw. Also, this attack, as any attack against a fighter’s base, grounded the fighter, which means it will not intercept this turn.
A-2: The 5-step depleted Polish garrison was attacked and destroyed by the out of supply (adjacent) tank corps. This attack made available two more hexes from which to attack Warsaw.

A-3: The Warsaw attack. The attack sequence was tactical bomber (1), mechanized corps (2), infantry corps (3), mechanized corps (4) and tank corps (5). The Warsaw defenders were eliminated and Poland surrendered.

I also railed three infantry corps to west in preparation for the planned 10/31/39 invasion of Holland. Next turn I will rail the two mechanized corps back.

Last was the invasion and conquest of Denmark. The attack sequence was: BB (1), DD (2), fighter (3), tactical bomber (4), overload infantry corps (5) and the amphibious infantry corps (6). The last attack by the amphibious corps needed to finish off 2-step and that’s exactly what the result was. I’d estimate that I’m able to take Denmark out in 1 turn 50% of the time. The results for this turn are shown in C11 and C12.

Image
C6. Turn 2 German Infantry and Armor Labs.

Image
C7. UF 2 & UF 3 Breakout Dangers

Image
C8. UF 2 & UF Breakout Attempt

Image
C9. UF 1 Patrol and Sweep Dangers

Image
C10. Turn 2 Denmark DOW (9/31/1939)

Image
C11. Turn 2 (9/21/39) Poland & Denmark Attacks

Image
C12. Turn 2 Results

Image
C13. Turn 2 Casualties
rkr1958
General - Elite King Tiger
Posts: 4264
Joined: Wed Dec 12, 2007 2:20 am

Post by rkr1958 »

Turn 3. 10/11/1939 Axis.

The wasn’t much action to report this turn, which focused on transferring units from the east to the west in preparation of next turns invasion of Holland. I started off the turn by building the German’s fourth lab, which was naval with a focus in submarines (C14). Next, I took a peek to see if the Canadian fighter had been loaded on a transport yet (C15) and it had not. I have no idea what the AI is up with the fighter but right now he’s wasting it. In my opinion, sending it to the UK for defense against Sea Lion is the best option. However; a more aggressive and risky option is to send it to North Africa. While this opens the allies up to Sea Lion, more aggressive players may accept this risk in order to get a head start in North Africa.

UF-2 and UF-3 (C16) are breaking out without any apparent opposition.

The situation at the end of turn 3 is shown in C17. Note that I've move the German BB in the Skegerrak straights back into the Baltic Sea, which protects it from any French or British naval incursion. If Denmark hadn't fallen last turn then I would NOT have attacked with the BB in order to move it to safety after Copenhagen was captured and the way was open to move into the Baltic.

Image
C14. German Naval Lab with Focus on Sub

Image
C15. No Canadian Fighter

Image
C16. UF2 & UF3 Breakout

Image
C17. Turn 3 Results
rkr1958
General - Elite King Tiger
Posts: 4264
Joined: Wed Dec 12, 2007 2:20 am

Post by rkr1958 »

Turn 4. 10/31/1939 Axis.

A concern I have at the start of turn 4 is the weather in Central Europe. There’s a 25% chance for mud (and rain) and this significantly reduces the effectives of air attacks, moderately reduces the effectiveness of infantry attacks and results in higher casualties. However; the weather was fair (C18) though it was mud and rain in Northern / Eastern Europe.

I built the final lab for the Germans this year, which was a General lab with a focus on Industry (C19). I like to focus on industry because it increases German War Effort, which increases their maximum labs and the number of PPs they receive per turn.

With fair weather the way was open for the invasion of Holland (C20). My plan was for a two turn conquest of Holland since I’m won’t invade Belgium until the first fair weather turn in 1940. I have plenty of time and with the German armor still in Poland I don’t have the forces in place for a one turn conquest anyway. Also, a neutral Belgium protects German land forces from direct intervention by French and British ground forces. Though allied ground units could be transported to Belgium; but this would be very risky as any transport in Rotterdam would be destroyed when The Hague was captured. My objectives for this turn were the destruction of the two Dutch garrisons and the capture of Arnhem. My attack sequence (C21) was:

A-1: Attack on the Dutch garrison in Arnhem. Fighter (A-1.1), which was NOT intercepted, tactical bomber (A-1.2), mechanized corps (A-1.3), garrison (A-1.4) and infantry corps (A-1.5).

A-2: Attack on the Dutch garrison south of The Hague. Tactical Bomber (A.2-1), which the RAF fighter scrambled to intercept but was counter intercepted by the remaining German fighter, strategic bomber (A.2-2), infantry corps (A.2-3) and mechanized corps (A.2-4).

Both garrisons were destroyed and this left me in position to finish off Holland next turn (C22).

Image
C18. Turn 4 Weather

Image
C19. German General Lab with Focus on Industry

Image
C20. Turn 4 Holland DOW (10/31/1939)

Image
C21. Holland Attack Sequence

Image
C22. Turn 4 Results
Plaid
Brigadier-General - 15 cm Nblwf 41
Posts: 1987
Joined: Tue Apr 27, 2010 10:16 pm

Post by Plaid »

I think, that position of your strategic bomber in Wilgelmshaven is not perfect - its exposed to british CV without any fighter cover.
You don't want to waste steps of bomber and PPs for literally nothing, do you?
rkr1958
General - Elite King Tiger
Posts: 4264
Joined: Wed Dec 12, 2007 2:20 am

Post by rkr1958 »

Plaid wrote:I think, that position of your strategic bomber in Wilgelmshaven is not perfect - its exposed to british CV without any fighter cover.
You don't want to waste steps of bomber and PPs for literally nothing, do you?
Good observation. It's the small details, like this one and which I overlooked, that can really add up and impact the game. Thanks for pointing it out.
rkr1958
General - Elite King Tiger
Posts: 4264
Joined: Wed Dec 12, 2007 2:20 am

Post by rkr1958 »

Thanks for the comments and observations so far. I'm trying to capture all this in a document as I go, including comments and observations.

I will periodically update this document and link. When I do I will note it in my more recent posts in this thread.
Last edited by rkr1958 on Mon Jun 28, 2010 12:25 am, edited 1 time in total.
rkr1958
General - Elite King Tiger
Posts: 4264
Joined: Wed Dec 12, 2007 2:20 am

Post by rkr1958 »

Turn 5. 11/20/39 Axis.

The start of turn 5 brought good and bad news (C23). The good news was that the weather in Central Europe was fair (25% chance)! What a break and which means that I'll have no problem finishing off Holland. Right! Well ...

The bad news was that I started the turn 1 PP short of being able to buy a fighter. The AI last turn sent in the RAF strategic bomber without fighter cover and paid the price. So one area for AI improvement would be to consider fighter coverage before attacking with with bombers.

Note, that I moved the German strategic bomber away from the coast and within the protection of the German fighters.

Before I get to the conquest of Holland, I moved UF-2 and UF-3 in position to attack the northern convoy and the fair weather should make this easier. However; when they moved in place the northern convoy was no where to be seen. Did I miss it? Or, was it late in spawning? I'll keep looking. With respect to UF-1, which is on patrol spying on Halifax and the Canadian fighter, no change there. The fighter is still in Canada.

Now to the conquest of Holland. I kept the two German fighters on alert in case the AI had moved the RAF and / or French fighter in range of The Hague. The attack sequence was, tactical bomber, tactical bomber, infantry corps, mechanized corps and mechanized corps. This firepower in fair weather surely finished of the Dutch defenders. But NO!!! Holland survives and holds out at 1-step. While no much more than a minor irritation because I have plenty of time this still is an irritation. The main reason is that I wanted to rail my armor next to The Hague and position them for my Spring invasion of Belgium. But these moves will have to wait one more turn. Good news though was that no allied fighters tried to intercept, which meant that I could repair the two German fighters back to full strength. Also, this was made possible because I was 1-PP short at the beginning of my turn for building a 3rd fighter. So, being short 1-PP was also a break.

I ended the turn with 81 PPs and will have enough to build the 3rd fighter next turn (12/10/39), which means it will be ready for deployment on 2/8/40 and offensive use on 2/28/40. I will build a 3rd tactical bomber on 1/19/40, which means I can deploy it on 2/28/40 and it will be ready for offensive use on 3/19/40. With respect to the 3rd fighter, if I were playing against a human player who wasn't moving the Canadian fighter to the UK then I would delay its build and build a 3rd tactical bomber first. However; I proceeding with the 3rd fighter build as if the AI had made the smart play.

Image
C23. Turn 5 (11/20/39) Start

Image
C24. UF-2 & UF-3: No Convoy in Sight

Image
C25. Turn 5 (11/20/39) Results
patton
Senior Corporal - Ju 87G
Posts: 88
Joined: Sat Jun 05, 2010 4:17 pm

Post by patton »

The AI is not smart with ships. It nearly always leaves ships in ports of cities that are about to fall, losing the unit. Sometime (I believe) it will even sail a ship INTO a port it has already lost, and lose the ship at the end of the turn! I can't prove this because I can't "see" it happen. But I have played games where I get lots of "Naval Unit Captured In Port" messages on turns when neither I nor the AI have not captured a port city, I my guess is that is what is happening.
patton
Senior Corporal - Ju 87G
Posts: 88
Joined: Sat Jun 05, 2010 4:17 pm

Post by patton »

I don't understand the point about "sweeps". Isn't ANY hex potentially part of a straight line? So what are you really avoiding?
rkr1958
General - Elite King Tiger
Posts: 4264
Joined: Wed Dec 12, 2007 2:20 am

Post by rkr1958 »

Turn 6. 12/10/1939 Axis.

This turn I did have the PPs (C26) to purchase a 3rd fighter and that's what I did (C27). The weather in Central Europe was mud/rain; however, given the low strength of The Hague defenders this will not be a problem. The AI last turn attacked the German infantry corps with the RAF fighter and knocked off 2-steps. However; that fighter was intercepted and knocked down to 6-steps. A good trade from my perspective.

The allied AI repaired 3-steps of the Dutch defenders bringing him up to 4-steps. I wanted to have flexibility in bringing units back from the east and positioning for my Spring invasion of Holland so I decided to hit the defenders with two tactical bomber attacks followed by an infantry attack from the 7-step corps. Holland fell under these attacks (C28). I kept the full strength 10-step German fighter on alert and grounded the 8-step fighter. No need for any of this as the French fighter was not in range. Since we knew exactly where the RAF fighter was and it was out of range of The Hague then it wasn't a consideration.

After moving units in place and the only remaining decision I had left was if I would have enough PPs to bring up the 8-step German fighter to full strength and build a 3rd tactical bomber next turn (C29).

By the way, no convoys in sight and no action at Halifax.

Image
C26. Turn 6 (12/10/39) Start.

Image
C27. German 3rd Fighter (New Build)

Image
C28. Turn 6 Results

Image
C29. Turn 6 Fighter Repairs
rkr1958
General - Elite King Tiger
Posts: 4264
Joined: Wed Dec 12, 2007 2:20 am

Post by rkr1958 »

patton wrote:I don't understand the point about "sweeps". Isn't ANY hex potentially part of a straight line? So what are you really avoiding?
If the destination hex for a naval unit or transport lies along a straight line of hexes with respect to where the naval unit, or transport, is then that unit will travel along those hexes. In the example below I show how I made use of that fact to contest the breakout of the two u-boat flotillas UF-2 and UF-3.

On turn 1 they moved from the Baltic Sea to the North Sea transport loop. As the allied player I know this and position the RN to sweep the three lines of hexes where these u-boats might move to next turn if they were to move their maximum range of 15 hexes. If there is not unit occupying Wilhelmshaven when the u-boats exit from the loop then lines 1 and 3 are the maximum range that they can move. If Wilhelmshaven is occupied, as it was in this example by the German BB, then lines 2 and 3 contains the hex for the maximum move. Note that I don't have to guess which specific hex they move to but only that they move their maximum range.

In this hotseat game, I also moved the RAF fighter and bomber to hit the u-boats if they're discovered. And as you can see I was able to inflict 5-steps of damage (total) on the two u-boat flotillas. Now the German player has the choice to: (1) return and repair, (2) continue on and reduced effectiveness and greater risk of more damage if discovered again or (3) stand and fight. While option (3) might net an RN ship it would negate the impact of these two u-boat flotillas for a number of turns and allow the allies significantly more freedom at sea.

Image

Image

Image
patton
Senior Corporal - Ju 87G
Posts: 88
Joined: Sat Jun 05, 2010 4:17 pm

Post by patton »

Makes sense, thanks. You don't have to think about such things against the AI!
Post Reply

Return to “Commander Europe at War : AAR's”